
Repair: Compact Cassette
The compact cassette, known as the music medium of the 80s and 90s but also known for its infamous sound quality, of course this depends on the equipment and media you use.
But good tapes can also cause problems, especially if they are a few years older.
We are going to look at the different problems that can occur, and look at the possible solutions that are available.

Subjects:
- How do you open a compact cassette?
- The sponge has come loose/lost.
- The tape has come out of the housing.
- The tape is broken/stretched.
- The tape got messed up.
- The sound quality is not right.
- The cassette or tape is making noise.
- Cleaning a cassette.
- Removing stickers.
- Detection tabs on the cassette.
This page will soon be split up into two pages.
1. How do you open a compact cassette?
In most cases it seems quite easy to open a cassette tape, and often it is. However, there are some cases where your standard screwdriver won't do the job. We're going to look at different models of cassette tapes to see the differences and take a few apart and reassemble them to show what (in my opinion) is the best method of opening a tape without to much damage. (Yes, you read right, there is a change of damage involved).
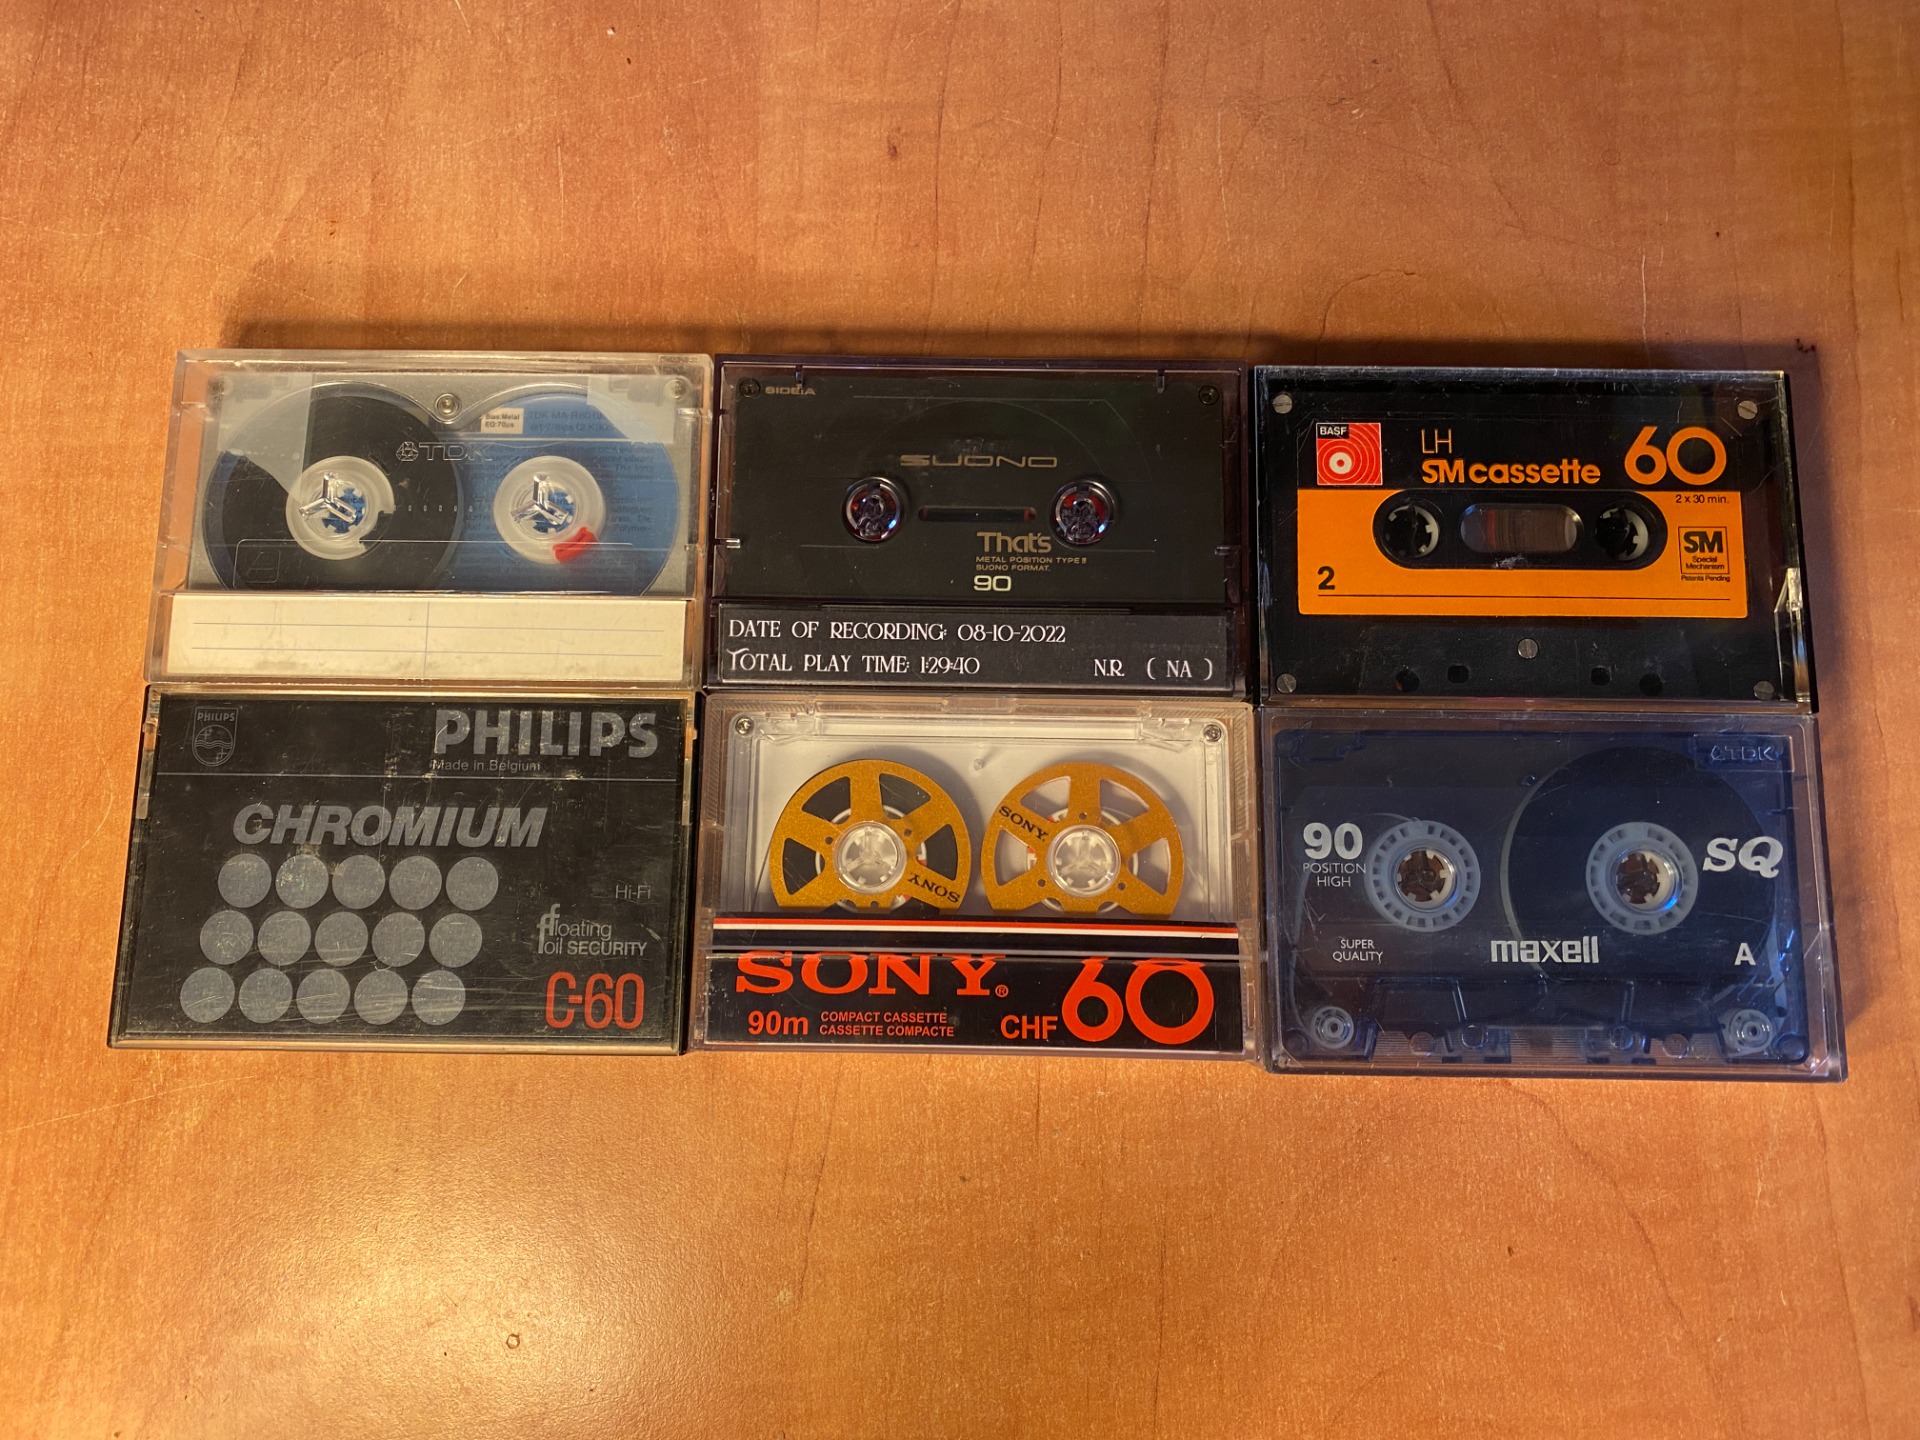
Above is a collection of tapes from different manufacturers, types and years.

When it comes to opening the tapes, they all have something in common, except for a one. We'll put this one aside for later. We will first look at the tapes that are easy to open with a screwdriver.
The most common system for holding a cassette closed is by using four to five Phillips head screws. In this case, these tapes both have five, four in the corners and one just below the center.

The screws can be opened with a 'PH1' head, for those who are not familiar with it, most 'standard' screwdrivers have a PH2 head which is just too big and will not fit.

The flat screw type is best opened with a screwdriver with a head that's 0.8mm thick and 4mm wide. Smaller is also possible, but then there is a risk of damage to the screw, the other way around is not an option, then the screwdriver will not fit.
What often happens when removing the screws is that they remain stuck, you can pick them out with your nails, or do this with a flat screwdriver or tweezers.

Or you simply hold the cassette upside down and tap them out, provided they are loose enough.

Whether flat or Phillips head, most types of screws in cassette tapes are tapered. I can remember having had one with a bolt and nut configuration, but chances are I'm wrong with a different type of cassette.

Now that the screws are out, the cassette can be opened, keep in mind that you always put the side where the screw-holes are on top before you open it. Inside the tape are often loose parts, these are placed on the underside of the housing ans can fall out when you open it the wrong way round.
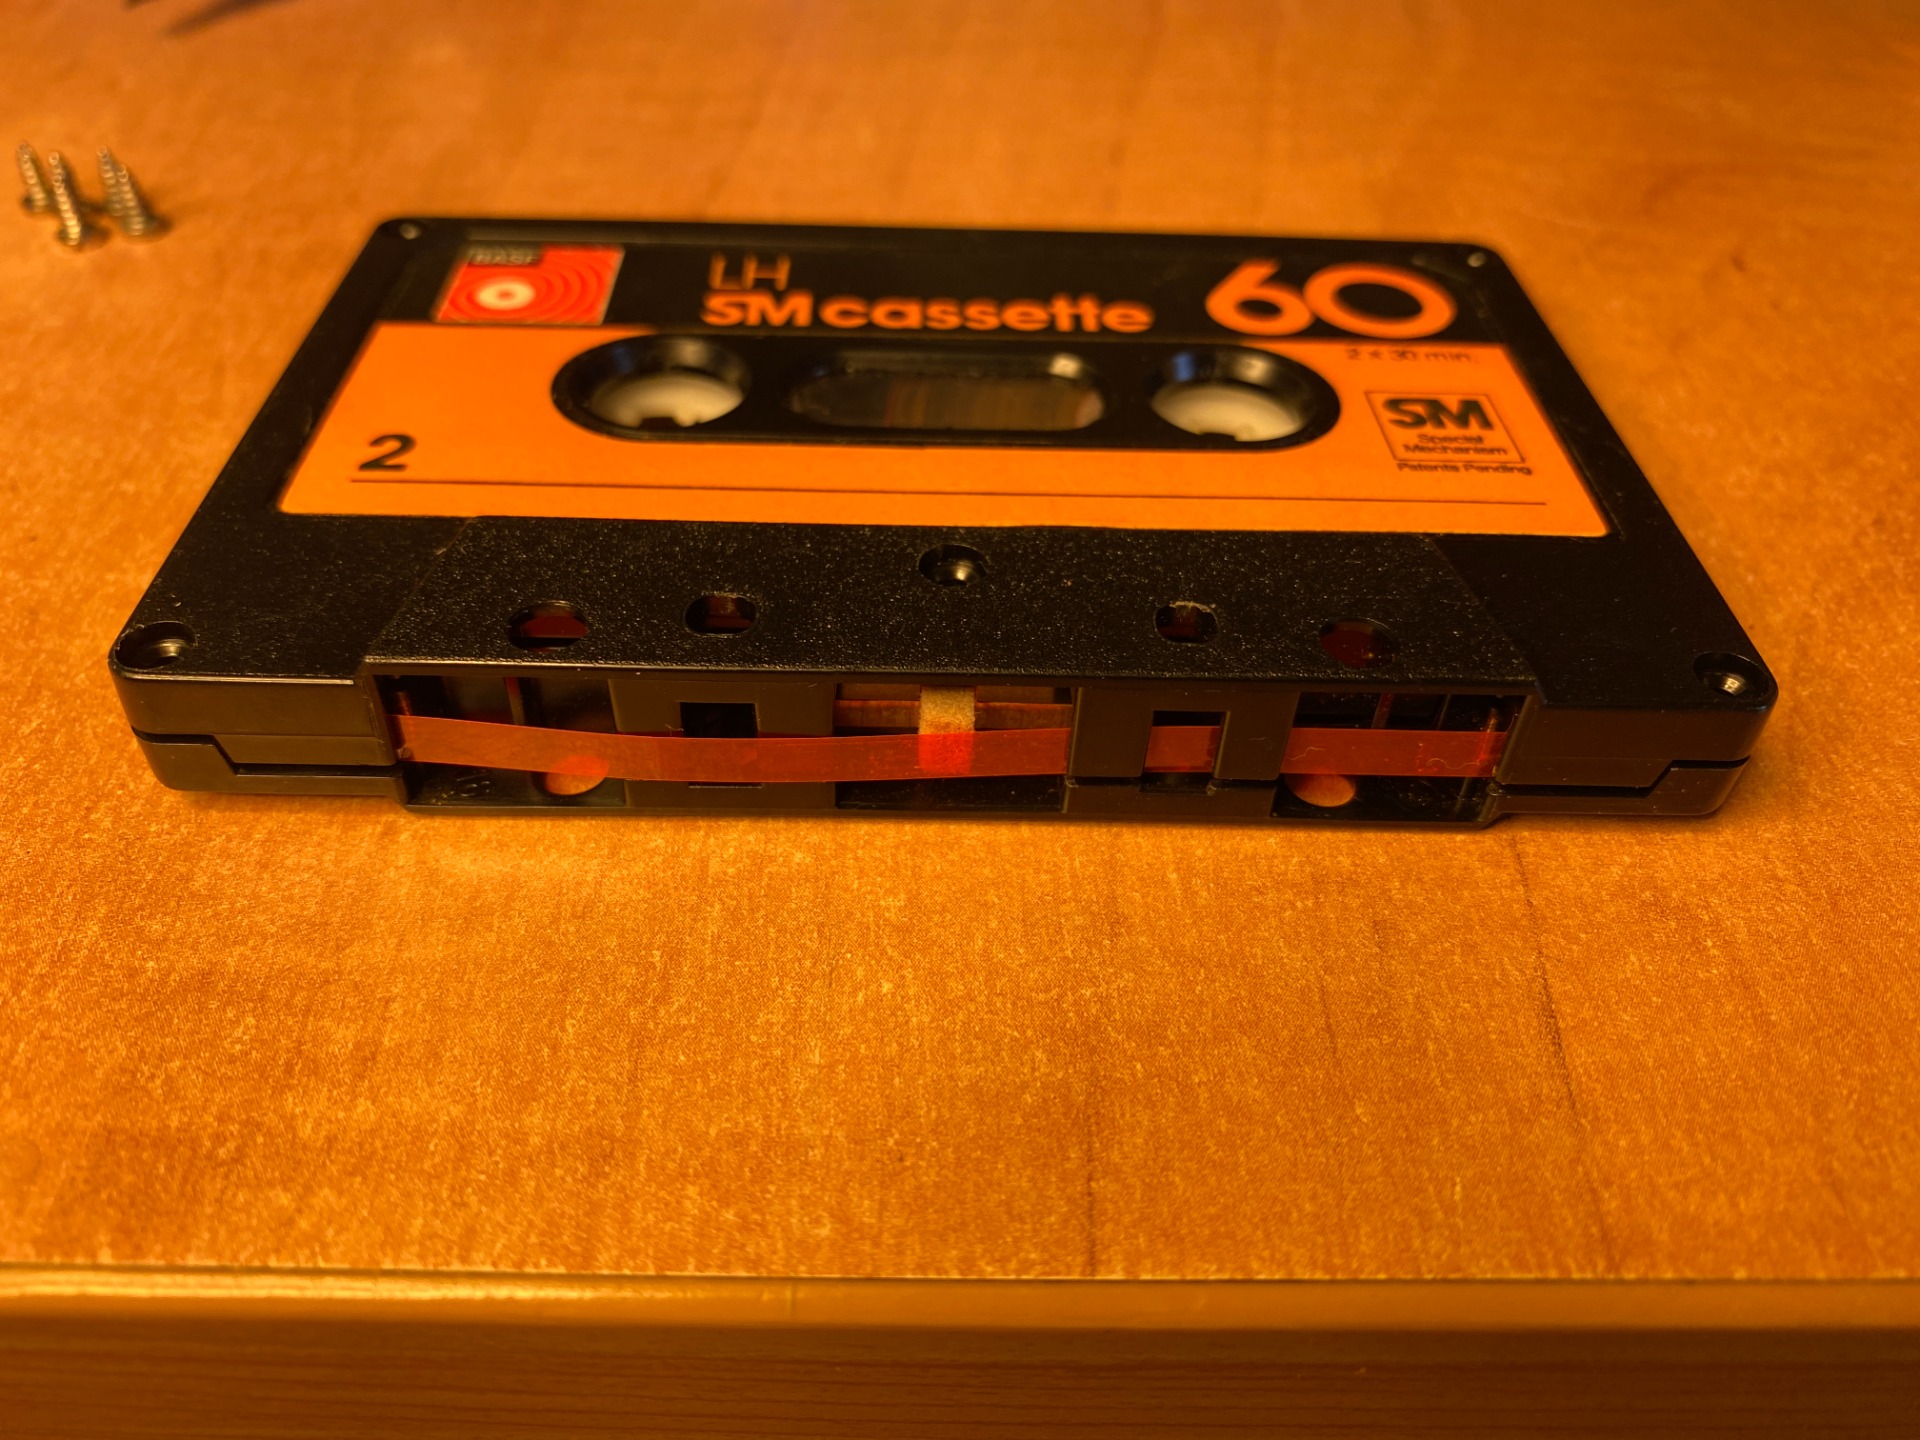
As far as I know, the side with the screws is always the A side of the cassette, in the case of this BASF cassette it is the B side (given the '2' at the bottom left of the sticker). My suspicion is that the stickers where placed on the wrong sides.
The housing can be opened by pressing down the bottom half and pulling the top half open like it is hinged. Open the housing carefully, in some cases parts can stick to the top and fall out of the cassette when you open it.

And there we have a look at the inside of the cassette, in the case of BASF there are these special levers mounted that should ensure better guidance of the tape. As I mentioned, parts like these as well as the white rollers and sponge at the bottom are loosely placed in the housing. If I had opened this cassette the wrong way, they would have fallen out.
In Chapter 8 (Cleaning a Cassette). I'll take a look at this particular tape again, it's a perfect example of a cassette that could use a good cleaning!
Suppose you have finished the work inside and you want to close the cassette again. Again a few details emerge that must be taken into account. Before closing the housing, check whether all loose parts are correctly in place. Also keep an eye out whether the tape does not get stuck anywhere, or protrudes from the housing. Above is a simple example of the tape that runs around the outside of the housing.

It is therefore advised to tighten the tape before closing the housing. by turning the reel (preferably the one where the tape is), this way the tape stays within the desired paths when closing the cassette. The levers do come in handy here, if I would turn the spool too tight, it would pull too much on the other spool, which would then be dislocated from its place.

When the cassette is reassembled, a final thing remains. Check if the tape has not gotten stuck anywhere, I use a Stabilo marker for this. It is just the right size to grip into the teeth of the spool and turn it around without too much slack. In my case, the tape lingered a bit but eventually freed itself. If the tape really sticks, open the cassette again to see if the tape is not stuck anywhere, don't force the tape if it doesn't want to move.
Of course there are always exceptions, in this case a cassette from the brand That's. The screws here are of the 'Tri wing' type. You can find this kind of screw mostly on electronic devices, this is to prevent anyone from getting inside. Fortunately you will rarely find them on a cassette tape, the fact that they are used here is probably to give it a better quality look then being functional.
Nevertheless, these screws are still easy to get out with a suitable flat screwdriver.
There is still one last type of cassette, in this case one with no screws at all. The cassette is glued together or maybe even heat-sealed. Yet it is still possible to get inside, though it requires a little more work.
To start with, take a hobby knife that is as thin as possible, another thin knife could also be used as long as the blade itself is thin. I start in the corners and carefully push the sharp edge into the seams of the cassette.
I wiggle the knife back and forth a bit to force the two sides apart, after this I push the knife through the seams to cut open the cassette with care. By the way, do not push the knife too deeply into the cassette, otherwise there is a chance that you will cut into the tape itself.
I should also mention that you have to be very careful, not so much because you can damage the cassette, but if you were to slip with the knife you have a good chance to cut yourself which would leave a nasty wound!

Before and/or after cutting, it may help to take the cassette firmly in both hands and twist it slightly (pry it back and forth). By the way, do this carefully and do not distort the shell too much.
Both during cutting and twisting you will sometimes hear the plastic crack, you hear this sound when the two halves start to come apart from each other, this may not always go neatly along the seams as can be seen in the following photos:
Often cracks may appear along the seams, it is therefore very important that you do the actions above as carefully as possible. If you apply too much force with your hands or knife, there's a chance that the housing will break beyond repair. Small fractures as in the photos are acceptable, and almost unavoidable.
If you think the two halves are loose enough, you can try to separate them from each other, as with the screwed cassettes, hold the bottom half down and carefully lift the other half. It may well be that you have to use some force to open the cassette because it's still stuck at some points. Again it is advisable to do this with caution and not to force it, doesn't it want to open yet? Then check where the cassette is still holding and pass along those parts again with the knife or twist the cassette carefully until it does open.
With enough care and patience it is still possible to open these cassettes, although damage along the seams may again be unpreventable.

Okay, the cassette is open, but it also needs to be closed again. The best thing is to use superglue, but this does not come without risks. Avoid the points where the tape runs close to the seams, it is best to smear the sides and top with a very thin layer and avoid the bottom completely.
When you put the top half back on, make sure that the tape doesn't get stuck anywhere and that the loose parts are in place, after all you only have one chance to do this right!

In Dutch, super glue is also named as 'second glue' for it's fast reacting properties, Though despite that it is wise to give the glue time to dry. I prefer to let it dry for around fifteen minutes and first check whether the two sides are actually properly bonded to each other, after which I check if the tape can move freely.
Super glue consists of various chemical components that may react with other substances, the gases released by the glue have in this case reacted to the fingerprints I left on the cassette, unless you have very clean hands or work with gloves you might be able to avoid this, the fingerprints are now a permanent feature because they are also on the inside...
A attentive reader may have noticed, The places where the screws should fit have been burned open by me with a soldering iron, I looked into whether it was possible to put in screws but without success. Then I used the holes to put in a drop of superglue, which wasn't a great idea either. A little bit of glue ended sticking to the tape during drying, luckily I was able to get the tape moving without much effort, the cassette is still useable.
In short, opening and closing a cassette if it has no screws comes with a number of risks. Fortunately, the cassette I used above was not of great importance to me, so it wouldn't have hurt if I broke it.
Finally, I would come back to using four or five screws setup, or in the case above with no screws at all, why do some cassettes have them where others don't?
My experience says that this has to do with the price/quality of the tapes. It is true that better quality cassettes, are mostly screwed together, but glued cassettes do not have to be bad either way.
Ultimately it has to do with how much money had been put into the production process, gluing the two parts instead of using screws may cut a lot of costs with big production runs, this also means that you as a consumer may pay less for buying a cassette.
Personally I don't even think the difference between screws or glue makes any difference in the sound quality of the cassette. The only advantages of screws is that it'll make it easier to repair/maintain a cassette. But also that the two halves would come loose less quickly if they where to be exposed to extreme conditions (such as temperature or impact). Nevertheless, I have yet to come across a cassette where the glue has failed.
2. The sponge has come off/lost
A common problem is that the sponge in the cassette comes loose. Usually you will find it in the box, the cassette itself or in the machine, in other cases you have to look for a new sponge.
The sponge is very important, the head presses the tape against it during playback to maintain the smoothest possible contact. Your tape will not be damaged quickly without a sponge, but the sound quality will deteriorate considerably. Fortunately, replacing the sponge is not difficult, a few simple tools, good eyes and knowledge gained from the first subject should suffice.

As I write this topic I am recording my first 120 minute tape. Before I started this, I had to do some light maintenance on the cassette in question.

120 minute tapes are quite rare, especially chrome variants. I own three of these tapes, they are from the late 1970s. Two contain recordings but a few are unused.

With the unused tape, the sponge has come loose, I found it in the box of the cassette. A check of the sponge shows that it is still in good condition, so I can reuse it.
The glue with which it was attached has simply aged over the years.

Because this is a more luxurious strap, it is secured with screws, with a flat screwdriver of 3mm I can easily remove it.

When the housing is open, a whole system comes into view, I'll come back to this at some point. For now, let's focus on the lower part (circled in red). This is where the sponge should be. The metal bracket on which it has to be mounted is almost always loose in the cassette. You can take it out with tweezers.


There is quite a choice of glue types, my preference here is super glue, I don't need much and the expectation is that the strap should be able to last at least another 10 years (if it comes to that).

After applying the glue, which should not be too much. Stick the sponge back with the tweezers and press it gently. Make sure that this glue does not end up on the top or in the sponge, due to the chemical properties of super glue in particular, the sponge can become very hard and lose its function, your music will still sound bad (or worse) and you will be stuck with an unusable sponge+holder.
Let it sit for a minute or two, then check to make sure it's secure. Then I put it back in the housing.

Just to be sure, I let the sponge dry for a few extra minutes, I don't want to take the risk that the tape will get stuck due to a bit of glue.

The cassette can now be reassembled.

Check the operation to make sure that everything is still running properly. Also test if the sound comes through properly.
In case you have lost the sponge, you can possibly get it from a donor, otherwise you can easily buy new sponges on webshops, they will probably not be expensive.
The sponge is an important part of the cassette tape, the tape is pressed between the sponge and the playback heads during playback. Without a sponge, your sound quality can be seriously affected or worse it can damage the tape. So always check whether the sponge is present and that it is properly attached before the first use!
3. The tape has come out of the housing
4. The tape is broken/stretched

Tape in cassettes can come loose in some cases, usually this happens at the ends but in the case above the tape is broken. The deck in which I rewinded this tape has pulled it apart, the tape is still on both reels, but when the cassette opens there is nothing more to see.

Even before I rewinded it into the deck I could already see that something wasn't quite right, so it was to be expected that it would break if it didn't already. We're going to open the cassette and try to make it.


The advantage of this cassette is that it is screwed shut and not glued, with a flat screwdriver you can remove the five screws in no time.

I lift the top of the cassette off, but leave the cassette flat on the surface when you do this.
I was always in doubt about the quality of Philips cassette tapes, but the inside shows some solidity, a paper felt keeps the tape neatly in place. Please note that this strap may be from the late 1970s. A newer strap would certainly be of better quality, but for that time it is certainly not bad.

When I lift the pad something remarkable happens, the left coil sticks firmly to it.


When I remove the relevant coil from the felt, I see what is playing, someone has already tried to make the tape. It probably broke before and someone tried to fix it with super glue twice. In vain anyway. But no lost hope, the damage seems limited so it should be possible to make the strap again.


I have a so-called 'splice' set available for incidents like these. This set contains everything I need to repair tape.

It is difficult to get a good picture of the process, the tape is wafer thin and has a tendency to curl. So I need two hands to do this right and I can't take pictures with it. I cut off the damaged pieces of tape using the board that is included. I do this for both ends of the tape to get a clean cut.

Here's the piece of tape I cut away from the left spool. It is at most a second or two of sound so the damage is very limited.


In the end I am unable to re-adhere the tape via the shelf and eventually do it directly on the desk. I have to stop the tape from curling again. playing the blade keeps it in place for now.
the blue piece is the tape with which I attach the tape back together. A length of a good centimeter is more than sufficient. The blue tape is quite stiff so with longer lengths it may not roll up properly on the spool, which can cause problems later. I partially overlap the tape underneath but no more than an inch, this should be enough.
Finally, it is important that you stick the blue tape as straight as possible on the tape itself.
The surplus that is next to the tape I cut away with the knife.

Then I turn the tape over and do the same on the other side. This way you attach both parts well to each other and it should last for years again.


I carefully put the whole thing back in the housing and close the cassette again.
After this it is a matter of testing in the cassette deck. If all goes well, the blue strip should let sound through during playback and recording. After all, it is magnetism that should pass through this without any problem. Finally I rewind the tape completely, the beginning is visible and everything seems to be okay again.

Coincidentally for this tape I want to digitize the content. Of the 120 minutes, only a small 9 minutes have actually been used. The rest of the tape is empty for now. When digitizing I hear the tape fidget after a few minutes and on the recording I also hear some distortion but can't say for sure if it's the recording itself (which was made somewhere in the early 80's), or the patched tape I got here. hear back. But after a few seconds I no longer hear the sound and the tape and recording sound good. In my opinion a successful repair.
5. The tape got messed up.
6. The sound quality is not right.
Despite everything, it is still possible that the sound quality of the cassette is incorrect. The bad sound quality can be described in many different ways.
Let's list some possible problems because there are a few of them:
- The sound fluctuates (also called 'Wow').
- The sound drops out frequently during playback (Dropouts).
- The speed is not constant (Flutter).
- There is a grinding or squeaking sound through the recording (Scrape flutter, see chapter 7).
- The stereo sound is incorrect.
- The sound quality is just moderate to poor.
Some of the cases mentioned can often be traced back to the cassette deck, it is often wise to exclude your deck first by testing it with a different (brand or type) tape, or vice versa by testing the relevant tape in another deck. If the tape still plays bad, you can possibly exclude the deck.
There are many reasons why a tape does not sound good, first of all it can happen that the type of tape you use is simply of cheap quality, especially if it is a Type I tape, otherwise it could be a tape from an unknown (cheap) brand . It is best to dispose of the tapes or else if it is useful, keep parts as a donor. Of course I assume that the tape does not contain any special recordings...
Keep in mind that tapes are simply old and have already gone through a big journey. After all, a tape from 1990, for example, is more than 30 years old! the appearance of the tape may still look good, but that doesn't have to say anything about the content. For example, there is a chance that a tape has been in a car for years and has been exposed to severe changes in temperature. Or think of a damp attic, shed or maybe cellar, that won't make a tape sound any better either.
Well, you'll probably never find out how the previous owner handled the tape and you can't undo what already has happened, but what can you do with a tape that plays badly?
Many of the above problems can be traced to a cassette that has a stiff tape.
In this case, check if the tape in the housing still runs smoothly, if there seems to be a lot of friction, you may be able to wind the tape up and down a few times (provided your deck has enough power) or play it at normal speed until the end and then see if it runs better after that. Sometimes it's just the beginning or end of a tape that runs rough and causes problems. Another cause could be that the cassette was wound badly on the spool the last time, see below for an example:
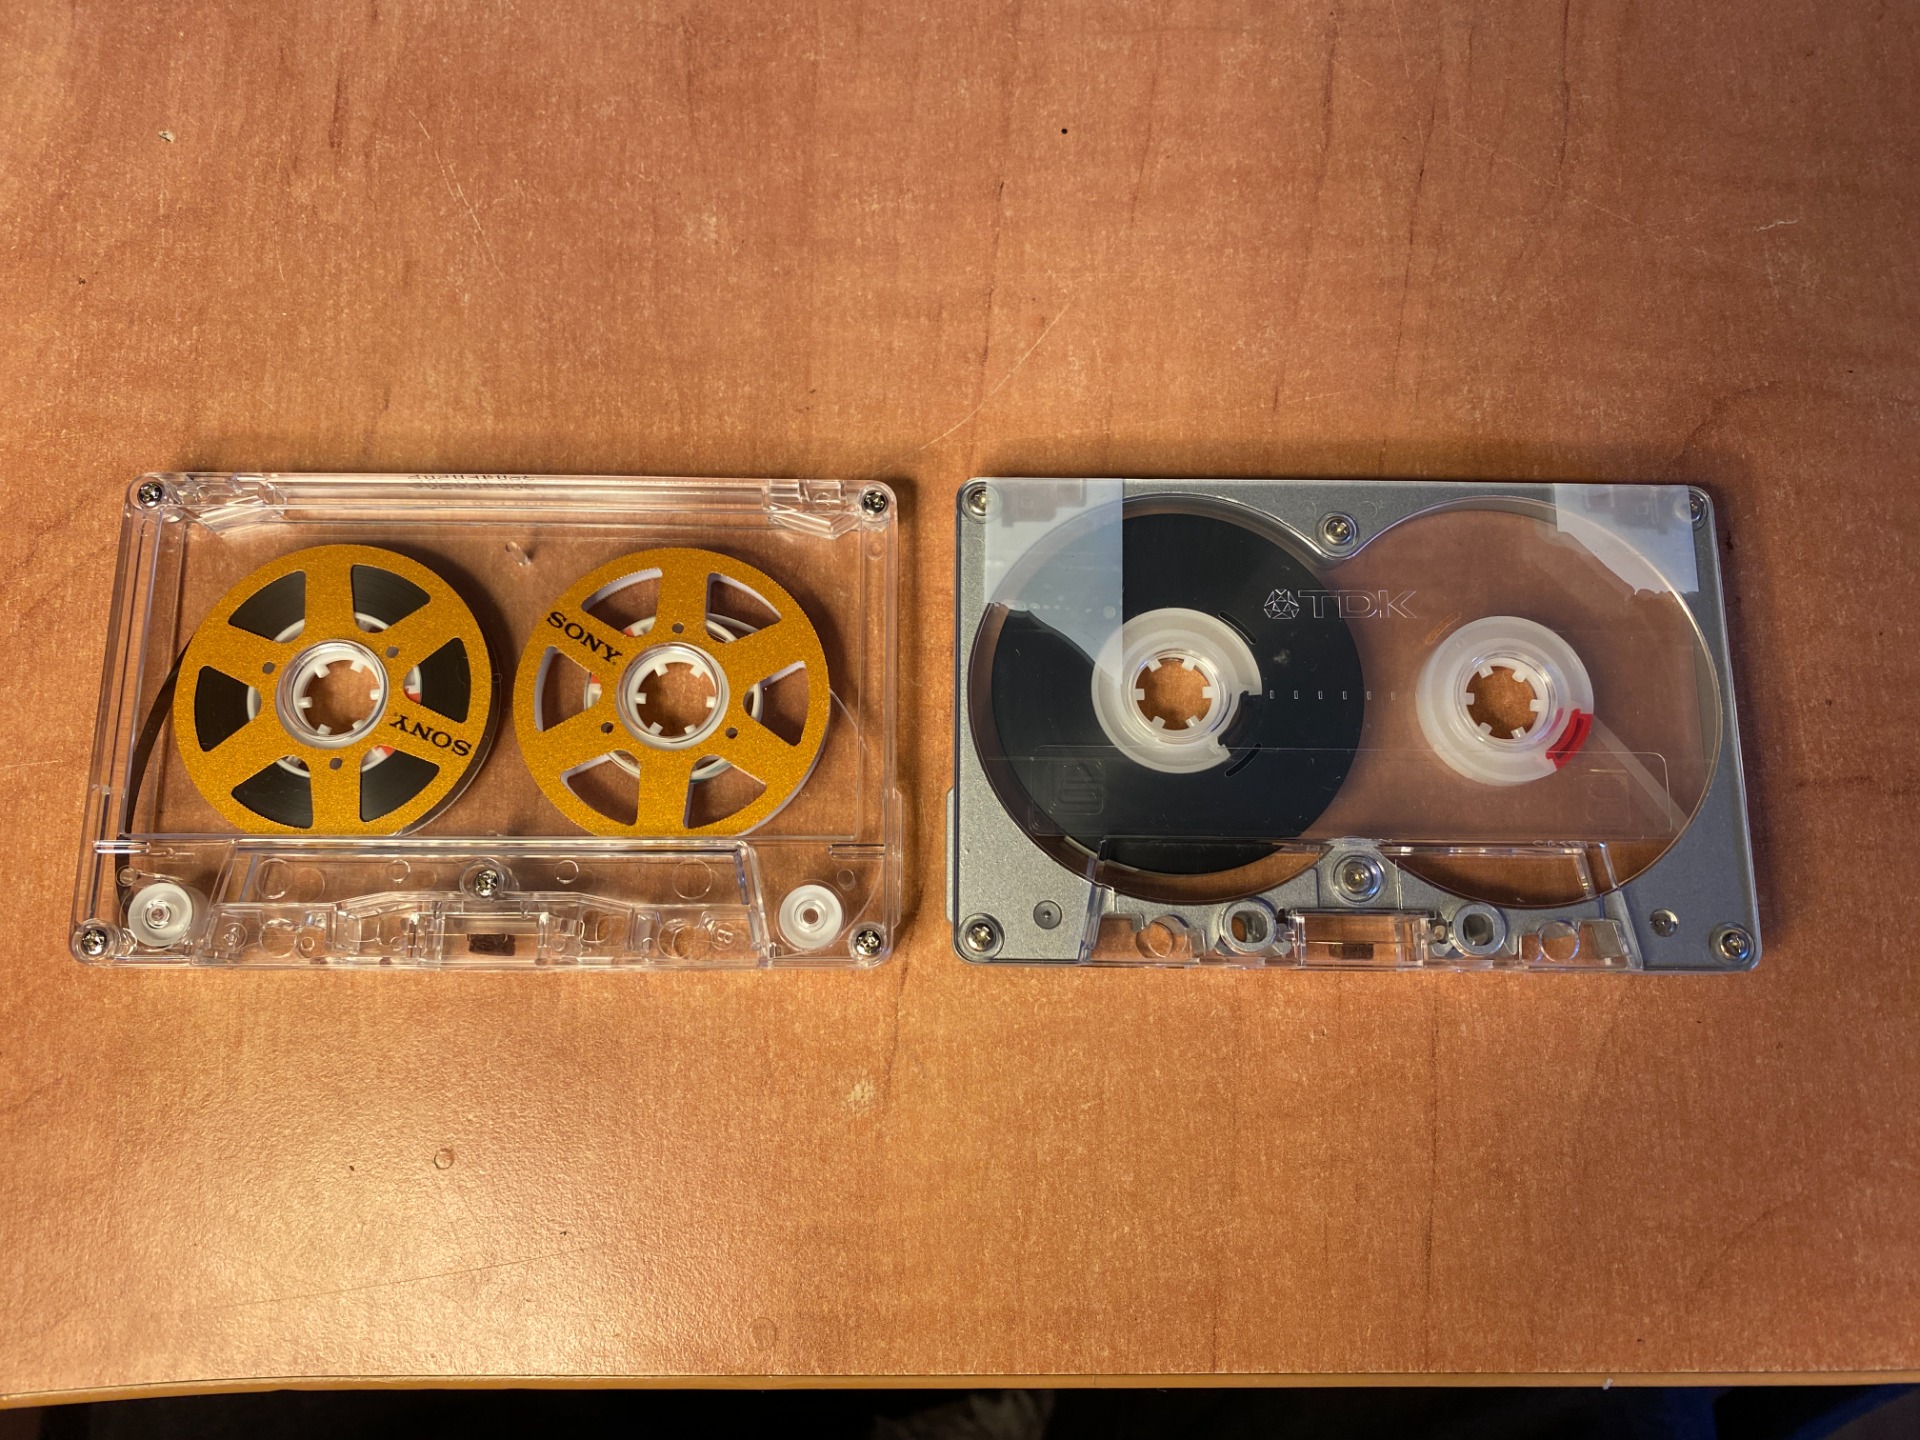
I don't have an example of a cassette, so we use a reel from a reel-to-reel recorder instead. The pictures are the same reel with tape, in the left photo the tape comes unused from the box, in the right photo you can see the tape after I have rewound it (wound forwards and backwards). The tape no longer fits neatly and probably causes friction with the reel during playback. Exactly the same can happen with a cassette, the tape then runs stiffly against the housing of the cassette itself. Fast winding is therefore not always good for a tape.
If a tape gets completely stuck when playing or winding, it may even be necessary to turn it manually, make sure you don't use too much force because if a tape is really stuck, you have a chance that you will tear the tape.
The problem may also be related to the housing and the transport inside the cassette, check the functioning of the mechanical parts:
- Is the sponge still there (or the metal bracket on which the sponge sits)?
- Are the rollers still good or do they run stiff?
- Do the spools on which the tape is wound clamp?
- Are there other mechanical parts that could cause problems?
- Are the parts where the tape runs past clean and free of filth?
It can also be the case that the tape is stuck somewhere in the housing, it wouldn't be a bad idea to open the housing to check the path of the tape for blockage.
If in all other cases the tape runs smoothly, there is a good chance that the tape has simply gone bad. watch the tape for yourself:
- Are there (dark) spots or other discolorations on the tape?
- Do you see mold spots (often indicated by small white, sometimes fluffy spots)?
- Is there shavings or chips in the housing that seem to be coming off the tape?
Or maybe the coating of the tape has deteriorated? In this case, the plastic layer and the oxide layer of the tape could come apart. This is not always visible to the naked eye, however.
In these cases, the tape is often irretrievably lost, there is little left to do but to throw the tape away, although it may still be that the housing is reusable, as is the case below:

"tape bad, replace!" I wrote on a card, because this is a rather special cassette tape that's worth replacing.

It is a tape that is by many considered to be one of the better cassette tapes. Namely a MA-R tape from TDK with type IV (metal) tape with 90 minutes playing time.
As you can see in the pictures, the tape itself is not in very good shape, I bought this tape together with two others (of 60 minutes) for a reasonable price.
The wrinkled part is fortunately only in the beginning, but when I wind the tape a bit and compare it with another tape of the same type, I notice that there are strange lines running through the tape.
I already tried to record something but the sound is very bad, like you are listening to a bad mp3 file. After checking everything it seems to be the tape, but I need a worthy replacement to get this cassette right again.

I bought this TDK Metal tape for €35 on Marktplaats, the tape is almost the same and the price is still quite reasonable.
The tape is not only of the same brand and of equal quality, but is also new in packaging. This gives you a little more certainty that the tape itself is also good (although this is not a guarantee).
It's just painful for me to have to take it out of the wrapper and then take it apart as a donor right away.

All that remains is to open both cassettes and change the tape itself.
Step by step I take the MA-R apart and eventually also the new MA. The most important moment is the switching trick, because it is not easy to transfer a roll of tape without it falling off the spool.

So I place the housing of the MA-R over that of the MA and then turn the tape upside down.

After turning around, the spool of tape lies neatly on the plastic housing of the MA-R. The roll of tape is on side B, but that can be solved by winding the tape back once it is put together.

I also transfer the metal bracket with the sponge, these are not only equal to each other, the new one also looks a lot better.

Once reassembled and rewound, the tape is ready for use again, now with 'new' comparable tape from 1988.

I could have chosen to transfer the reels as well, but this is a very complex and delicate process and there is a big chance that I will damage the new tape. But what can I do with the old tape that remains?
I cut the transparent beginning and end pieces and keep those together with the spools, I store them in the now empty housing of the MA cassette, unfortunately I have to throw the rest of the tape away.
Replacing tape is a costly and expensive process, especially when it comes to this type of tape. But sometimes it's worth it. In many other cases, you can save yourself the hassle and throw away the entire cassette or at least the tape.
7. The cassette or tape is making noise.
The cassette or tape makes noise, it is a fairly broad term. The cassette may rattle during use (whether during playback or winding). But as in the video above, it is also possible that a squeaking sound comes from the cassette that can even be heard through the speakers. In this topic we will mainly focus on the latter.
The squeaking sound you hear has a name, several in fact: 'Stick-slip effect' is one of them, but the most well known name is the 'Sticky-Shed Syndrome'. The fact that this characteristic sound has its own name often does not mean much good... Incidentally, there is also 'Scrape flutter' which can give a similar sound but has a different cause. More on this later at the end of this chapter.
What does the name 'Sticky-Shed' mean? The name is a combination of two related problems that can occur with (especially older) tape. The tape will stick (sticky) and the tape will leave particles of oxide behind (shed).
The reason behind this 'syndrome' can be traced back to the manufacturing of the tape in the factory. The binding material used to bind the oxide layer to the plastic coating is the culprit.
The binding material consists of material that can attract moisture, this makes the tape damp and as a result sticks to other objects (such as the heads during use.
My suspicion is that the sticking itself is again due to the properties of moisture or water, called cohesion, you can imitate the effect by, for example, rubbing a damp hand over a window, your hand vibrates very violently and makes a squeaking or grinding sound when you do this.
Now comes the first question, can this problem be prevented? Yes and no...
No, the problem actually arose during manufacture due to the use of the type of binding material.
Yes, by using the correct cassettes where a different type of binding material has been used during manufacture.
And second question, Can the problem be solved? Yes and no...
No, the binding material will always attract moisture.
Yes, the problem can be solved temporarily, after which you can make a copy of the tape before this problem occurs again.
Time to see what we can do to get rid of this problem permanently.
So first of all it is important to mention that the physical tape should be considered lost with its contents. The only real solution is to copy the content (the recordings themselves) to another type of media where this problem does not physically occur.
The internet is full of the same solution, which is to literally bake the tape in the oven.
This process is very delicate and has to be done correctly, you cannot literally throw your cassette in the oven and bake it at 200°C for 20 minutes to make it playable again.
I'm not going to venture into this process either, although I've read and seen a lot about it.
A process that I don't often see (and which is often referred to as nonsense) is to actually add moisture to the tape and then make a copy before it dries again. We will describe this latter technique below.
As a candidate we have this BASF cassette with the 'new toppers' from March 1987. For those who have also read the previous chapters, BASF appears remarkably often on this repair page, partly coincidentally, but in the case of the 'Stick-Slip Syndrome' BASF is actually to blame of using the wrong type of binding material for its tape. More on this later, for now we will try tackle the problem first.

I was actually busy erasing tapes for reuse, including three BASF tapes. while erasing I came to the conclusion that two out of three suffer from the syndrome. Only one did not have this problem, but it is only a matter of time before this one also become infected with the syndrome.
Still, one of the squeaky tapes holds something special.

If a tape has potentially interesting content, I play it first before I decide to delete it. The 'new toppers' cassette secretly contains quite nice songs, but the syndrome is making it inaudible. Copying the tape is not possible, because the squeaking will be included in the copy recording.
Fortunately, only a quarter of the cassette is infected with the syndrome, it may be possible to get this piece of tape play normal again to then quickly make a copy of it.

The first step is to find a worthy replacement for the content to be copied. In this case a tape from Maxell with the same playing time. I do choose to use a Type II tape so that the sound quality does not suffer too much when I copy the content.

As I mentioned earlier, I'm going to use an alternative approach to salvage the content. We are going to drench the cassette with liquid to temporarily suppress the squeaking. First I wind the tape to the point just before the squeaking starts.
Then I push a cotton swab through the holes of the cassette, a piece of tissue paper is wrapped around the cotton swab, which is in contact with the tape.


As a liquid I use cleaning alcohol. The reason for this is that the alcohol evaporates slowly, so that after a while no liquid residue will remain in the cassette, but more importantly no unwanted liquid ends up in the cassette deck.
I drip the alcohol onto the paper and manually continue to wind the tape with the pen inserted through the hole. I repeat the dripping after every few cycles of the reel.


After administering the alcohol, it can be clearly seen on the reel of tape. Now that the reel contains a high dose of alcohol and is getting tipsy, it is time to make a copy of the entire content.

I put both cassettes in a dual deck and switch the deck to 'dubbing'. Thereby it copies the contents of the left deck to the right deck.
The process is of course not without it's struggles, the BASF tape jams a few minutes just before the end of side A. Whether this has to do with the alcohol or whether the tape is really that bad I can't say. In the end I manage to get around this problem by playing the tape in reverse (this deck can play in reverse). Incidentally, with most decks, the left take up spool can exert more force on the tape than the right spool does.
In the end I manage to transfer the content from both sides to the new tape, without the BASF tape squeaking. In the meantime the alcohol has also evaporated. the BASF tape is sober again but with the contents secured it has lost its value to me.

The only thing that matters are the stickers. I carefully remove this from the BASF cassette so that I can stick it on the Maxell tape. This way I try to keep everything as original as possible.

The result is a beautiful Maxell tape with the contents of the BASF tape. I play the cassette to check the result. The sound is clear and crisp, I hear no unwanted noises through the recording. Even though I had my doubts about this approach, it seems to have worked!

For those who are interested in the actual content of the tape. The original card is also still present and now resides in the back of the box of the Maxell cassette.

But what to do with the three squeaky BASF tapes? Simple, I consider the tape itself lost. But all other parts are worth keeping as a donor. With this I may be able to save a few tapes in the future if necessary.
Until then I will remove the tape from the cassettes. There's only one way to get that done quickly:
Okay, so the cassette above was a perfect example of sticky-shed syndrome, but what about other defects that produce unwanted sounds?
First of all, as mentioned earlier, there is also 'scrape flutter', which gives the same type of sound, although the culprit here is the equipment with which you play the tape. You could think of the above term as the stuttering of the tape as it is pulled past the playback head. There is a certain amount of friction between the tape and the head, but because the tape is in constant motion, it is simultaneously pulled away from the head. So the result is the same kind of squeaky sound. The quality of your deck (and its adjustment) determines how serious this sound is present.
In addition, many other unwanted sounds are possible. The most common cause of unwanted noise is the reels on which the tape is wound. These may rattle or tick during playback or rewind. While I'm inclined to say it's due to the quality of the cassette, this problem could also be related to age. After all, I have noticed that even better cassettes sometimes suffer from this problem, although to a lesser extent than their cheaper counterparts.
I have not yet been able to find a simple solution for this, although I must admit that it does not bother me much. It seems to have little influence on the sound quality and is mostly not even audible in normal use.
Below is a nice example (of cheaper tapes) where the reels make a lot of noise:
In the case above it is simply the quality of the cassette, the cause of the noise comes from the reels rattling against the cassette body. Better cassette tapes therefore have an intermediate layer that separates the reels (and tape) from the housing.


Above is such an intermediate layer that prevents or at least dampens the rattling of the coils.
Finally, there are still many other possible unwanted sounds and causes to name, but we have now described the most common.
A remedy that I have deliberately not mentioned would be to lubricate your cassette, personally I have never done this purely because a cassette is very compact and the chance is big that any grease may end up on the tape itself. Moreover, I strongly doubt whether lubrication can offer a solution for certain problems. Again I sometimes take it for granted, after all it is a type of media with its characteristic inconveniences, in that respect it is almost part of the hobby and the characteristic sound of the cassette.
Do you encounter a problem where the cassette produces unwanted noise? See if changing certain parts (rollers, the sponge, intermediate layer or special guides) can help. In other cases you could always make a copy to a cassette that does not have the problem.
8. Cleaning a Cassette.

You may have already seen this BASF cassette in Chapter 1 of this page.
Normally cassettes require very little maintenance, even after a year or 20/30 they can still sound great with minimal care. However, there are exceptions, especially when it concerns cassettes of a lower quality and/or older age. The example above is perfect for showing how dirty the inside can get after multiple uses of such a cassette.
There is a remarkable amount of dirt on the inside of this cassette, mostly orange/brown in colour. The reason behind this is easy to find.

We take a look at the culprit. 'Yes you! Filthy piece of tape!' or is the manufacturer, to blame?
The reason that this cassette is so dirty on the inside has to do with the quality of the tape (along with the age and how it was handled). The composition of the tape (type I ferrous to be precise) is more often known to stain the parts it runs along. In the case of the cassette: the walls, the tabs and the sponge. This brown mess is nothing more than iron oxide (rust) that has come off the tape during use.
I have here another example of dirt build-up by Ferro tape, although this concerns the heads of a reel-to-reel recorder, the cause can be found in the same possible culprit:

Is BASF to blame when it comes to excessive dirt and grime?
Before we make a final judgment, let's put this aside for now and get back to the subject,
how do you clean a cassette?
Very simple actually, with cotton swabs and some cleaning alcohol.

Well, almost then... You still have to do the cleaning yourself.

It is wise to remove all parts from the cassette first, especially the reels with tape must be removed from the cassette, because they should not come into contact with the cleaning agent.

The cleaning itself is simple, I dip a cotton swab in alcohol and rub the parts until they're clean.
I check all parts that the tape comes in contact with and clean them.
And this is how a dirty cassette becomes neat and clean again. But we're not there yet!

We're going to fast forward this tape first, then we'll open it again to see if cleaning the cassette was worth it.

After winding I take a look at the heads on the deck, I expected that they would be a lot dirtier with this cassette, but it's not that bad. Only the Capstan is dirty but this was already the case before I put in the cassette.
It seems not too bad after all, the tape is also better wound around the reel, only a few tabs at the bottom seem to be a bit dirty again.
In short, you don't often find a dirty cassette, at least not as filthy as the one above was. But what should you pay attention to if you want to know whether a cassette is prone to get dirty? Is it the brand, the tape type, the age of a combination of everything?
Look at the color of the tape, especially if it is brown (Type I). The lighter the color, the bigger the chance of dirt build-up inside. Above is a collection of Type I tapes of different years and brands. You can see a clear difference in color when you compare the top to the bottom.

Of the collection of tapes, these three cassettes are the ones where dirt can quickly accumulate. Nevertheless, the brand is actually not to blame in this case, the two tapes from both BASF and Philips were produced sometime in the late 1970s. The top tape probably comes from somewhere in the 1990s, but is nevertheless an unbranded mass product for voice recordings.

We may have drifted off the main topic a bit, so let's come back to it, if you want to make sure the cassette is not dirty with oxide from the tape, look at the tape itself and don't be fooled by texts like 'NEW Improved Quality' or the brand itself, moreover, this particular cassette even suffers from the 'Stick-slip effect'. Look for tapes from the later years, and even better for tapes of a different (higher) type of tape.
So to make a final verdict, the Type I tape formulation is to blame, in companion with the year it was produced. Though I still keep my eyes on you BASF en Philips!
I've had more disappointing results with both brands in the past so don't blame me for looking down on those brands as being less than best...
9. Removing stickers.

You experience it often enough, you want to reuse a strap but are stuck with that old sticker. Most come off easily, sticker remover otherwise highly recommended, but then you have those extra stubborn stickers, we're going to look at a good example.

I want to reuse this tape, the old recording has already been erased and it is almost ready to use, but first the old stickers will be removed.

Since you already saw how to disassemble a cassette in Chapter 1, we'll continue from here. The cassette has to be completely disassembled because I will be working with chemicals, I don't want this to get into the cassette and onto the tape.
In most cases, the explanation below will suffice.
But in this case it had little effect on the sticker, in step 3 this was the result after 15 minutes of scrubbing.

I then started looking for alternatives.

I have dozens of bread clips in the junk bin (who doesn't keep those things?). It has a little more effect, but I'm not making any real progress with it.

After looking for alternatives for a while, I finally grabbed a screwdriver. It is strongly not recommended to sand off the stickers with metal objects, they almost always scratch the soft plastic of the cassette.

The result is not great either, the screwdriver has left quite a few scratches.

This could be better, I still have two of the same cassettes with the same stickers, I still have to remove these too.

I read the instruction on the back of the sticker remover bottle for a change. This gives some useful tips, first sand the surface of the sticker until the adhesive layer is exposed, then apply the gel and let it soak in.

In the meantime I have found a nice alternative to the screwdriver.

The end of this broom is sharp enough to sand with, but too soft to damage the cassette. There are also special sticker scrapers made of plastic for this kind of purpose, I will have a look at these soon.
I can now remove the sticker with much more ease.

The result is much better, but there is still adhesive residue on it, these are really very stubborn. In the end, I also manage to get most of this off by scrubbing well.

I was lucky with the third cassette, the sticker came off easily this time. All I had to do was scrub off the sticky layer.

In total I wasted two hours, but the cassettes are ready for reuse. Some stickers are simply not easy to remove.
Usually the combination of sticker remover and cotton swabs is sufficient.
In other cases, a plastic scraper makes the job a lot easier.
10. Detection tabs on the cassette.
Related pages:
- Compact Cassette Information
- The Compact Cassette: Past and Present Blog
- New old tapes! blog
- Erres 3537 Cassette Recorder Repair (vol. 2)
- Erres 3537 Cassette Recorder Repair (vol. 1)
- Marantz SD1000 Cassette Recorder Repair
- Compact Cassette Gallery