
Reel to reel
The tape recorder is a great and noble device to behold. The reels with tape that you put on it make it complete.
You don't see them often, so if you have one at home, it is often interesting to give a demonstration to visitors, a well-functioning recorder can still match the digital sound quality of today, provided it is set up correctly.
In contrast, the tape recorder is perhaps the most complicated type of media there is to work with. Playing tapes, recording and keeping the device clean can be a chore.
Below information about how to operate the machine and keep it optimal, divided into different chapters.

Subjects:
- How does a tape recorder work?
- Reel types and quality.
- How do you put on a reel?
- Record your own music.
- Maintenance and storage.
- Buying new reels of tape.
- Editing tape.
- Stickers!
1. How does a tape recorder work?
How does a tape recorder actually work? For this we take the Akai X201D and the manual that comes with it.
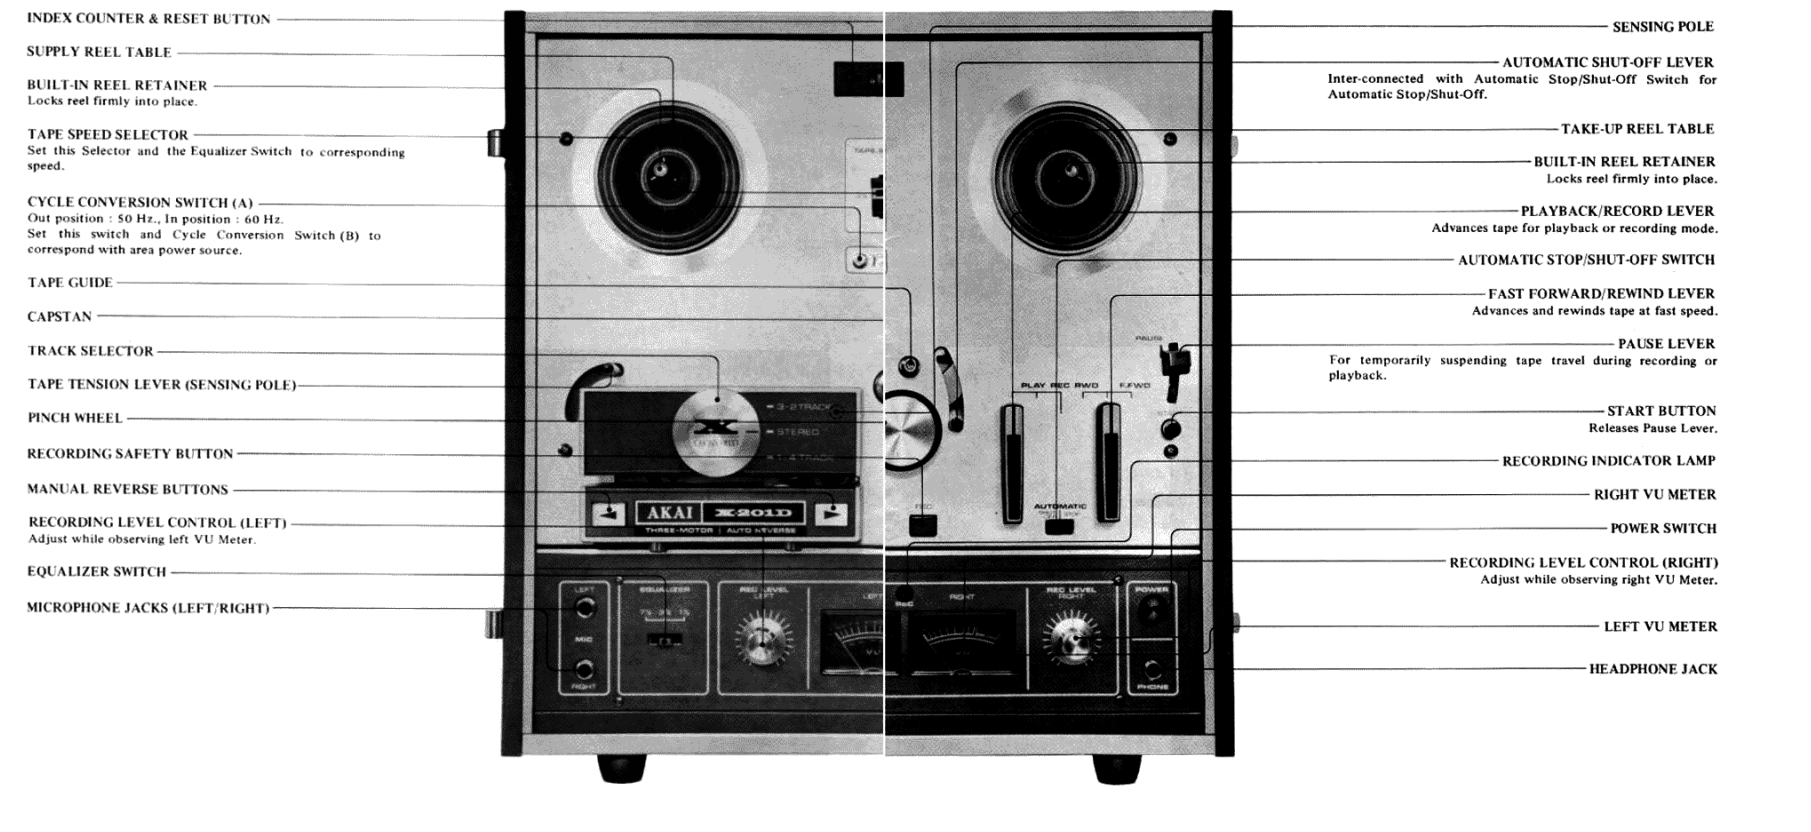
The description of all functions can be seen here, I had to paste the two pages together, as you can see they don't quite match...
If this is too complicated, I can refer you to the mediocre scan with figure 7 from the manual...

Setting up a tape varies by device, you can see the example above as a guideline for how the tape should usually run.

Almost every tape recorder has a power button or switch, if you press the power button of a tape recorder, anything can happen. In the case of the X201D, the motor starts running, but does not drive anything further.
The X201D is a tape recorder that is at least 45 years old (in 2022). It is therefore not a bad idea to let the engine warm up before you start using the device.

Above the power button is the control panel. The two large switches control the tapes, the left one is for playback and recording, the right one for winding. To record, the record button (REC) at the bottom left must also be pressed, otherwise you cannot switch the switch to record mode. Many Akai models and other types of tape recorders work in the same way.
at the very top right is the pause switch with the start button below it.
Between the switches is also an auto stop/power function, with this you can stop playback automatically when the tape has reached the end, or in the same case switch off the entire tape recorder.
The above functions are also well explained in the manual.

The machine is full of features, most of the features are the same as other recorders. Only this one goes a little further in its options.

The part where the heads are also has functions, you can switch the reel in playback direction with the buttons on both sides, a function that the device can also perform automatically (I'll come back to this in Chapter 3).
The large round disc can be used as a switch to select the tracks of a tape.
This recorder can record up to 4 tracks on a tape, there are models that work with more tracks, but we will stick to the most commonly used setup here. It's complicated enough as it is...
Setting the track-layout can be a complicated thing to understand if you are not familiar with it. Besides 'stereo' you can choose to only play on tracks 3 & 2 or tracks 1 & 4, but why not 1 & 2 or 3 & 4?
This has to do with the heads on the tape recorder and the layout of the tape:
As you can see, the position of a single head changes as the switch is rotated.

Here's a close-up of the head used for recording and playback, the recording head has the same kind of layout as the chosen tracks. The two stripes on the head are actually the channels through which the tape is scanned. Switching the knob does not change the position of this head, but channels on the head are turned off or on. Here's what it looks like on the tape:
- In the stereo mode, both channels of the head are used simultaneously per side.
- In mono mode 3 & 2 only channel 3 is used for side A and only channel 2 for side B.
- In mono mode 1 & 4 only channel 1 is used for side A and only channel 4 for side B.
It can be quite complicated to understand how a tape recorder records its music in stereo or mono despite the explanation above, so let's explain it simply:
In Stereo you can put two recordings on a tape (1 for side A and 1 for side B).
(Like on a compact cassette).
With Mono you can put a total of four recordings on a tape (2 separate recordings for side A and two separate recordings for side B). You'll have to switch the round knob to choose which of the two mono recordings you want to listen to per side.
The double recording option by putting it in mono can have advantages, tapes have never really been cheap, but also storage space can also sometimes be limited, by recording in mono you save half the space, so you can ultimately store twice as much music on a shelf by recording in mono.
However stereo is often preferred nowadays, it has become a kind of standard. So if you do own a tape recorder these days, you probably want to get the best out of what it can deliver and use stereo over mono.
If you still want to put more music on a single tape, it is better to choose to lower the speed, this way you can still double your recording time and your recordings can still be listened to in stereo . About the playback speed there's the following below:

The speed of the tape is determined by the "tape speed" switch, which is calculated in 'Inches per second' (I.P.S.), usually you use 3¾ or 7½ Ips. The higher the speed, the better your quality, you will however sacrifice on playback time by recording in higher speeds. Recording and playing music at 1⅞ is not recommended, this speed is intended for voice recordings of low sound quality and is also not available on all recorders.
At the very top is the tap counter, to the left of it is a small button to set it to zero.
Changing the speed doubles (or halves) the total recording time. For example, if you have a reel indicating you can put an hour of music per side with 7½ Ips speed setting, you could switch to 3¾ Ips
and put two hours per side.
You will however compromise a bit on sound quality. I have to admit that the difference between 3¾ and 7½ Ips is not a huge difference, only if you listen to the music carefully you might notice that the quality is slightly less at a lower speed. 1⅞ Ips, on the other hand, is so slow that the difference in quality compared to 3¾ Ips is remarkably less, so you will also experience more background noise, which you would rather not hear with music. In short, avoid 1⅞ Ips for music purposes.
There is also an adjustment screw under the speed switch to set the frequency. You set this on the basis of the network frequency of your country, in the Netherlands (and large parts of Europe) the electricity network is set to a frequency of 50Hz. In America, for example, 60Hz is common. After setting up, you never really have to switch this screw unless you emigrate to a country with a different net frequency...

If you set the speed, you must also take the Equalizer into account, set it to the same position as you set the speed. The equalizer sets the hearing frequency range at which you play or record music and should therefore be equal to the speed. The fact that this can be set separately on the recorder is rather an unnecessary luxury in this case.
Of course, the machine also has two volume knobs for the sound to be recorded. You can control the channels with both knobs independently of each other.

To make it easy on myself I drew numbers in pencil to better adjust the sound. In this case from 0 to 20. It is not beautiful to hand write down these numbers, but it is an important indication to determine how far the volume should be open when recording music.

On the drive system of almost every tape related device are a capstan and pinch roller. The tape must pass through this for stable transport during playback.
The axis on the far right acts as a lever, if the tension on the tape becomes too low, the lever drops, if it falls below a certain point, the device switches itself off automatically. The center axis that the tape passes over is only there for stability, it is required in this case, but not often seen on other recorders.


The device can also determine the playback direction automatically, provided the tape itself is equipped with a metal strip. This strip is normally located on the end of side A. The axis you see in the photo can scan the metal strip and switch the playback direction.
If the tape does not have a metal strip, or you do not want it to switch automatically. Can you let it the tape run below this lever, in the manual this is called the 'pressure axis' so it may be important for a stable course of the tape, I haven't noticed a difference myself yet.
Not all tape recorders have this function, it is again more of a luxury. The option however could come in handy, you no longer have to turn the reels yourself at the end of a playback.


Let's take a look at the inside of another recorder, the Akai 1710W is an interesting example, it has a built-in amplifier and stereo speakers. This model also works on vacuum tubes.
A tape recorder can and will become very warm inside if it is turned on for a while.
A fan is often attached to the main motor on the back, while grilles are on the housing to dissipate the excess heat.
Make sure there is enough space above and behind the recorder, if you do want to put something on it, keep it modest and keep the grilles open. These guys can get seriously hot, and since many of these recorders are over 40 years old, the risk of damage to the equipment is even greater.
Always or check the tape recorder yourself or by a third party before using it. It is wise to remove any dust with some compressed air and a paint brush to prevent damage.
Also with a vacuum tube machine check whether the tubes are still working properly, do not touch them with your bare hands. The grease and acid from your fingers can cause heat spots on the glass when used, potentially causing a tube to wear out sooner.
In case of uncertainty or defects, it is wise to let the machine being checked by someone with the proper experience. Never mess with the internals yourself if you are not familiar with it, there's a big change of harming yourself and the machine in the process!
Later on the page we go into more detail about maintenance.


I can't resist showing a collage of three generations of Akai tape recorders.
You can see that the operation of the machine in general has not changed much.
The quality of my photos however did...
I never consciously chose Akai, but they more or less came my way, I actually bought the 4000DS MKII at a flea market for €35, this also included a box of old tapes, it was the beginning for me into more advanced tape media. The machine still works perfectly although I the machine is currently begin used by a friend.
In my opinion these Akai recorders are certainly not bad. They have been made in large numbers, but however are well designed. Replacement parts are easy to get and the machines are not really expensive to get hold of. Many of these recorders (if properly preserved) still work, although it is possible they will no longer work as intended after all these years.
Finally, I think they look good, I would dare to classify them in the mid-range class, I can recommend these as an interesting entry-level model if you would ever start with this type of media.

I almost forgot the VU meters!
They display the volume in dB (top) and percentage (bottom).
This panel shows how far you can go when recording.
As long as the needle stays around the 0-limit you're fine, short peaks up to +3 are allowed, but much higher and you may hear noise on your recording.

For a large device like the tape recorder, they often only have small VU meters, the rest of the space is needed for the operation parts of the device.
Finally, this Akai is just an example. There have been many different models and brands on the market, each with its own way of operating, setting up tapes and unique features.
It is also noteworthy that the types of tape recorders shown here does not have a noise reduction function such as Dolby or DNL. The reason lies in the age, only in later models noise reduction was added as a function to a tape recorder. Personally, this is an unnecessary function, because even without noise reduction, noise is hardly audible unless you set the playback speed very low or perhaps listen to the music through headphones.
2. Reel types and quality.
This subject will be updated soon with information on 10 Inch reels.
The information regarding tape formulations is currently incorrect since 10 Inch reels do actually have other types of formulations.

Like almost any type of analog media, the tape recorder also has different types of tape and different types of quality.
Yet with the reel recorder there are no different compositions as used in the Compact cassette. With the reels it all comes down to different compositions of the Ferro type tape.
Why isn't there a better compound like Chrome or even Metal tape?
The main reason is that Chrome and Metal respectively are mainly intended to improve the sound quality of the overall lesser Compact cassette. A compact cassette runs continuously at 1⅞ IPS (inch per second).
With the reel recorder, the speeds at which you record music with are 3¾ and 7½ IPS (or even higher) which is many times faster compared to a cassette. As a result, the standard sound quality is much better on it's own. It should also be mentioned that the width of a compact cassette is only 3.81mm (0.15 inch). Where that of the tape on a reel recorder is 6.35mm (0.25 inch). As a result, almost double the sound fits on a reel than on a cassette. The wider the tape, the richer (and better) the sound.
In short, tape on a reel is of much better quality than tape on a cassette, so 'better' compositions are actually overkill on a reel recorder.
Having said that, there are reels with Chrome and Metal tape, but this is/was mainly used in professional recording studios on reels with an even wider tape than used in household appliances. It is also interesting to mention that the tape on a video tape (VHS) does also consist of Metal tape, the difference is of course that video images are also stored in it that need more quality for a better reproduction than is the case with audio alone.
That reel recorders use Ferro tape does not necessarily mean that there is no difference in the composition of this tape specifically. Over the years, the composition of Ferro itself has also improved. This can be clearly seen if you take a tape from 1960 and compare it with a tape that is ten or more years younger.

Above you see four different types of Ferro tape from four different reels (and brands). You can see a clear difference in color, this is accompanied by quality of composition. Although I can't say for sure, chances are very likely that the quality of the light brown tape on the bottom is lesser then compared to the darker shades of tape on top. Another noticeable difference is the reflection intensity off the tape.

As you can see there is a strong reflection in the three pieces of tape on the right, the one on the left hardly reflects any light.
Although the reels are not visible in the photos, I can almost certainly say that the leftmost piece of tape in particular comes from the 1960s. The pieces of tape on the right are from later years (no idea what year exactly).
It is therefore wise to take a good look at how the tape colors and reflects, a dark shade together with more reflection often equals better sound quality.
The gloss itself can be traced back to the size of the oxide grains on the tape, these grains are expressed in microns, the smaller the grain the better the sound quality and the bigger the reflection of the tape.
Now there is also something to mention when it comes to wear and traces on the tape, the tape on the left has clearly been played often, which can be seen from the traces (or scratches) that run along the length of the tape. The same can also be said about the tape on the right, which also shows slight traces of use.
The traces you see are mainly caused by playing the tape past a dirty or weathered head. This scrapes a little bit of the oxide layer on the tape with every play, so the sound quality also decreases. Even with clean and good heads this may still happen, after playback you often see residue on the heads and parts where the tape has passed. It is very important that you check and clean the parts where the tape passes after each use so that the tape and sound quality last longer.

The matte brown tape you just saw on the far left is from this small reel, the reason I know this is tape from the 1960's (or older) is to read the tape backing and the size of the spool. On the back of the tape it says 'Magneton band', a name that was used to identify reel recorder tape. Sometimes you also see the similar name Magnetophon(e) being used. In later years the term 'Magnetic tape' or in the case of the reel recorder: 'Reel to Reel tape' became more common, the name Magnetophone has nevertheless also been used in later years, mainly on tapes of European manufacture, after all the name comes from Germany where magnetic tape was developed in the 1930s.
Now that we have shown a fairly small reel above, it is interesting to start about the different sizes of the reels. After all, a very wide array of formats are common, the format above, at 7.5 cm, is almost the smallest format that was available for the reel recorder.
Above a collection of different sizes from small to large. Only one larger size is missing from this list, the 25.4 cm reels, better known as the 10 inch reel.
The size of course determines the playing time of a reel, but originally the size of the reel had a completely different purpose. They are often tailored to the device you use them on.
While 7 Inch and 10 Inch are the more familiar sizes for reel to reel recorders, the smaller sizes have often been more common on portable reel recorders. It can also be said that the smallest formats were previously used for spoken text, the playback speed is also often set to the lowest speed available (1⅞ IPS). When more compact media such as the 8-track and Compact cassette came on the market, portable tape recorders lost in popularity. These smaller types of reel eventually disappeared from the market. This also allowed me to say with more certainty that the small spool of tape probably comes from the 1960s (provided the tape has not been swapped with another reel).
Nevertheless, all these sizes of reels can be played on a regular reel recorder because the hole in the center is the same on all sizes. It just doesn't look as imposing as using a larger sized spool.
It is only with the 10 Inch reels that the center hole differs, the small triangle shape is to small to keep hold on such big reels, the center hole for a 10 Inch reel is therefor way bigger and needs the use of a adapter to fit on a 10 Inch reel to reel recorder.
[photo of two 7,5cm reels on a reel recorder] #
Above are two photos of the different reel sizes as seen together.

Finally, there is also a difference in the material that a blank reel consists of. As can be clearly seen in the photo, there are the plastic and metal reels.
There is not a big difference between the two types, metal reels rather serve as a nice alternative to the cheaper plastic reel. Still, there are minor differences where one has advantages or disadvantages over the other, including:
Plastic Coils:
- Almost always transparent so you can see the entire spool of tape.
- Less susceptible to visible damage (scratches and scrapes).
- Lightweight, so less heavy for the recorder's motors.
- Deforms less quickly (does not quickly remain permanently bent on impact).
- Risk of breakage, especially if the plastic becomes brittle after many years.
- Cannot be taken apart.
- Aesthetically less attractive than a metal coil (depends partly on taste).
Metal Coils:
- Can be taken apart, easier for loading a 'pancake' (more on pancakes later).
- Better to clean because it can be taken apart.
- Longer lifespan, does not become brittle as can occur with plastic.
- Not transparent, tape can only be seen through the 'windows'.
- Can tolerate impacts a little better (breaks less quickly than with plastic).
- Deforms faster, once bent almost impossible to straighten again.
- Heavier, therefore, could also have an adverse effect on the lifespan of the motors on your recorder.
- Usually nicer looking that cheap plastic reels (again depending on taste).
In short, there are certainly differences, but if you handle your material well, you could already cross off a fair number of them.
By the way, it is a striking thing that is certainly worth mentioning with metal coils.
The shape of the windows is often a reference to the brand, almost every brand has its own preference when it comes to the windows in a reel, something that also occurs with plastic reels, but is more noticeable with metal because they are not transparent. let's assign some reels to their respective brand:
There are of course even more brands, each with their own way of distinguishing the windows.
If necessary, look on Google for the shapes of the other brands, after all, some brands have several different shapes of windows.
Finally, with the metal reels I mentioned the word 'pancake', what is a Pancake?
A Pancake is basically a roll of tape without a reel. These are actually cheaper (because no reel is included) and if you already have enough empty reels lying around, it is more attractive to load a new roll of tape than to have to buy a new full reel and then transfer it to another one manually.
On the web shop of manufacturer Recording The Masters you see the so-called Pancakes for sale, in this case it only concerns the 10 Inch variants, 7 Inch variants have probably also been for sale in the past, but not through this web shop whom actually produce new tape.

Finally, I bought four new reels from Ebay, these are 12.7cm (4.7 Inch) reels. Although not made by the original manufacturer, some imitate brands where others are pure fantasy. Perhaps you can guess from a few which brands are imitated?
These and many other metal reels are available here on Ebay from the same manufacturer.
3. How do you set up a reel?
Now comes the fun part, how do you put on a reel? Below is a step-by-step instruction.

Let's take a look at figure 7 from the manual again. Loading a reel of tape looks easier than it is.


First we set up two reels, on the left a full one, on the right an empty one of the same size or bigger.
You can clamp the reel with the plug in the middle, which you can pull up and turn. Other (especially older) tape recorders sometimes have a rubber cap that can be placed on top.
Below is a step-by-step plan for winding a tape on the Akai.
Of course, how you wind the tape differs per type of reel recorder. It is therefore useful to take a look at the manual to see how the tape should be placed.
Winding the tape on the second reel can also be much easier.


Many reels (not all) have a slot for the tape to pass through, make sure you turn the tape a quarter counterclockwise when doing this or you will create a crease in the tape. If you turn the reel around one turn while holding the strip of tape, it is well secured.
Personally, I am not a fan of this method and almost never do it myself. Moreover, many reels do not have this otherwise handy slot and you will still have to do it the difficult way, so learn it the hard way anyway I'd say...
4. Record your own music.
Now that we've covered the above, we can start recording music.

I have good tapes at home for serious recordings. Here are two different tapes from BASF. I'll grab some information:
SP 50 = standard play (0.5 to 1 hour per side I guess).
LP 35 = long play (0.75 to 1.5 hours hp).
DP 26 = double play (1 to 2 hours hp).
TP 18 = triple play (1.5 to 3 hours of horsepower).
QP 12 = quadruple play (2 to 4 hours of horsepower I'm guessing).
XP 9 = extreme play (unknown).
The number after the letters represents the thickness of the tape in micrometers. BASF tapes are generally not bad, especially if they are still in new condition. It is recommended (for all unused tapes) to wind them back and forth on a recorder before use, it may cause some slack but also loosens the tape a bit as it has been tightly wound up for many years prior. Unless of course you use brand new tape.
It is generally not recommended to use tapes with a playing time longer than 2 hours per side. Tapes like the Triple Play have such thin tape that it breaks very easily, not to mention the even longer tapes. If you are going to use them, you will have to be very careful with them and store them safely.


On the back of the box is indicated how much time you have to record at different speeds (calculated per side).
The recording I want to make will be two hours long, I can still choose from both reels but the LP35 has a total of 190 minutes of recording time at 3¾ IPS, too much for the playlist. The DP26 can record exactly 120 minutes (two hours) of music at 7½ IPS, perfect for this recording session and even better quality! So the choice is easily made.

Before I can start recording I obviously need a playlist, here's an example of the playlist I'm going to use for this recording.
I built the playlist by putting all songs from (in this case) UB40 in my library in one folder and making a selection from this, I write down each song on this excel sheet and note the time behind it, the document does all the calculation for me and shows how much time I have have left and how much time I have used.
The excel sheet can be downloaded as a template on this page for your own use. Scroll to the bottom of the relevant page for this.

With the playlist ready, I put the tape recorder in recording mode but still without tape. This way I can listen to the incoming sound (source) and determine via the meters what the recording level should be for each track.

I'm going outside the manual, I hear the volume knobs crackle when I turn them, so some contact cleaner. The cracking disappeared after that.

I write down the volume settings on a Post-It. Which I keep track of while recording.
After this is all set and done I place the tape to be recorded and an empty reel on the other side.

Set the equalizer and speed to the correct position.


As mentioned before, it is recommended to wind a new tape, winding is a fairly rough action, the tape will not look as neat after this as when it came out of the box.
A good example of this cautious action can be seen in this video, if you set your volume up high you may also hear the rumbling of my entire cabinet as the tape proceeds with winding. Just before the end is reached the floor even begins vibrating, because of these excessive speeds it is strictly advised to not put your fingers (or objects) near the reels when winding them!
If you decide to carry out such an action, never leave the recorder unattended, there is a chance that the tape will break or, in the worst case, that a reel will come loose from the recorder (if you forgot to clamp it down securely). And to be honest it is quite cool to see at what bizarre speed this rewinding takes place...
Also as a final quick note, my former recorder had a small problem when it came down to winding with metal reels, the reel would build up a static charge and spark every odd second with the metal housing of the recorder. And as the distance between the reel and housing is quite large this would mean that the voltage should be really high to accomplish this. Again you do seriously not want to touch the reel when it is winding at these tremendous speeds together with the risk of painful shocks!
With my previous tape recorder this was in any other way not a wise move to do, the tape would not be wound tightly around the other reel, this resulted in a lot of slack on the tape during playback/recording, with the result that it would slip every few seconds. Luckily I don't have this problem on the current recorder. So it remains to say that doing this is at your own risk!

Time to start recording, it's always exciting when you press the start button, you don't like to stop recording while it is busy, so I'm stuck in my room for at least an hour to make the recording go smoothly. If a song lasts long enough, I will allow myself to take a toilet break or do some minor chores in close proximity of the machine.

As soon as a song is almost over I check the volume settings for the next song, the trick is to adjust the settings between two songs. After the transition I cross off the current song from the list.
One small tip that I noticed (which also makes sense), most songs are around the same point in terms of volume. Songs that deviate greatly from this are in many cases also of poor quality. They are much too loud or much too soft, in both cases you may hear this difference on playback as distorted sound. Make sure that the settings do not differ much from one another, maybe even decide to switch a song for a better quality version if it sticks out a lot in volume.

The recording is going fine so far, in the photo above I'm almost done with side A

At 13:10 I started recording, at 14:14 the recording of side A was finished, time to do side B. This recorder cannot record in the other direction, so I have to swap the reels.


When you switch the full reel, it is also necessary to turn it 180°, so that the end of the tape sticks out on the left side of the reel (see the red ribbon coming off the reel).

I loop the tape again and can start recording side B, you can also use this moment to take a break, because after this you will be busy for another hour monitoring the recording.

Fortunately, the recording of side B goes well.

At 15:30 I remove the completed reel from the recorder, two hours of UB40 is now on this tape which still feels warm from recording. The tape recorder has been running for more than two hours (and actually proceeded with doing another 2 hour recording after this).
At the end of the day, the whole room smells like reel recorder (yes that smell exists).
It doesn't really smell bad, but it does remind me of the smell of old devices (if you know what I mean).
The recording seems to have been successful, but can only call it successful if I don't encounter any peculiarities during playback. In the meantime, this reel has already been played a few times and luckily found nothing out of the ordinary!
5. Maintenance and storage.
In previous chapters I have already told you something about the maintenance of the tape recorder, in this chapter we will go deeper into the subject.
Tape recorders require regular light maintenance. The most important of these is cleaning the heads and areas where the tape passes.
It is important to keep the tape path clean to avoid excessive wear on the tape and tape recorder components.
In chapter 2 (reel types and quality) I already showed you this picture. Striking here are the stripes on the tape on the left, it is a wear pattern that occurs when tape has been used often, but is probably also due to poor maintenance/cleaning of the parts on the recorder.
The tape on the far right also has the same characteristics as the tape on the left.
Tape wear also means a reduction in sound quality. The coating on the tape on which the music is also stored is sanded off when it passes along the parts of the recorder, so if these are also dirty, the coating will rub off even faster.
For a longer life of your tapes, it is important to mention that you have to keep a recorder clean and ensure that parts that have to rotate do so without friction.

I have shown these two pictures before on my blog about the reel to reel recorder. On the left a clean head, on the right an excessively dirty head. Although I say "excessively", this has already arisen after playing both sides of one tape in full! So you could almost say that after every use (whether it's only side A or only side B) you'd be better off to immediately clean the path of the tape. This may be a lot of work, but it ensures that you can enjoy the music for much longer without the quality of your recording deteriorating quickly.
Let it be that my tape recorder is still due for a cleaning, we will take advantage of this moment and look at the contamination and cleaning procedure:
In my case I first have to loosen the bottom piece near the heads, there are two screws on the bottom that can be unscrewed by hand. When removing this part, the heads are visible, when I look at the inside of the removed part, I see shavings of the tape on the bottom already.
Let's take a look at all the other parts that need to be cleaned on this type of reel recorder.
In all, there are no less than 15 points where the tape passes, a summary below:
1. First sensing axle
2. Guiding bearing.
3. First fixed axle
4. Erase head
5. Second fixed axle
6. Recording and playback head
7. Bias recording head
8. positioning lever
9. Guide bracket
10. Third fixed axle
11. Second sensing axle
12. Capstan
13. Pinch roller
14. Fourth fixed axle
15. Tension lever
Not all names mentioned are the official names, I have to make up a part myself to make it clear which part is what.
Of course it differs per recorder how many parts there are that you have to keep clean, I suspect that my variant is a small exception with the big amount of parts that the tape runs along.
Here are two photos that clearly show the deposit of oxide, this concerns the contamination from playing an entire tape (side A and side B). The oxide not only causes faster wear of the tape, but also poorer contact with the head and therefore a reduction in sound quality.

I clean the parts with cleaning alcohol and cotton swabs. Special kits exist to clean audio devices such as a reel recorder, but these are often expensive and with the amount of contamination, they are likely to be used up quickly. So my preference is to go for the alternative, such a bottle as above contains 120ml of cleaning alcohol and costs less than €5. The cotton buds come with a box of 300 pieces and cost less than a euro, for less than €6 you can proceed cleaning the device for months without running out of cleaning equipment.
In short, don't be fooled by the expensive so-called superior cleaning kits, the content of the cleaning agent does not always differ much from what I use. It will be better for your wallet, you don't have to wait for the cleaning kit to arrive and be disappointed by it's limited number of uses. The cleaning alcohol I use by the way comes from my local drug store.

I dip the cotton swabs partially in the liquid, you don't want to have too much alcohol on the swab, otherwise it will be a mess when cleaning. I sweep the cotton swab firmly along the parts that need to be cleaned. When a swab is to dirty I grab a new one.
I check all cleaned parts and repeat the procedure if they are not completely clean yet.
The cleaning alcohol will evaporate quite quickly so no worry's about residue being left after cleaning.

Of all the devices I have to clean in this way, the reel to reel recorder is often the most time consuming. I suspect that this has to do with the many parts that the tape runs along, it is also quite a job to get everything clean, because not all parts are equally easy to reach.
The black residue on some of the swabs is from the rubber of the Pinch roller. I also clean this with the same alcohol, this is not recommended by some because alcohol can dry out the rubber. I have been working this way for years now and have not yet experienced any disadvantages to cleaning the rubber with alcohol.
If in any way you think it is better to use a other type of cleaning agent, go for it! My information is only a advise and not mandatory, however it is required to actually clean the pinch roller to prevent dirt building up on the rubber.
The brown mess on the swabs is of course oxide that came from the tape.
Now that all parts are clean again, the lower part can be screwed back into place and the tape recorder is ready for use again.
As a last mention, different formulations of tape (and brands) may leave more or less dirt after playback. I've noticed that my BASF tape leave way more oxide than many other reels of tape. Because of this I intend to only play these reels on more special occasions. The BASF reels I use are also the one's with the longest playing time so this could also be taken into account as there is more time for the oxide to build up during playback. Not to forget, the BASF tapes where 'new' when I started using them, maybe the buildup of dirt will be less when I've played them a few times over.

In addition to keeping the recorder clean, there is also the storage of the reels. Almost every other type of analog media has a handy way of storing it, the same applies to the tapes here, but there is just a little more to it.
First of all, there is the problem that the end of the tape does not stay neatly on the reel, so there is a chance that the tape with the music on it will also fall outside the reel and can be damaged.

They may be hard to get, but there are special clips that you can put around the reel to prevent the tape from coming off.

The clip must of course have the same size as the reel you clamp it around, with a small reel you need a smaller clip and vice versa.

With a clip, the tape stays neatly on the reel, you just have to make sure that you click the clip onto the reel with care, sometimes the tape slides along and can wrinkle when you put the clip around it.
Now that the tape remains neatly in place, the reel itself still needs to be stored properly.

If you are lucky you will sometimes come across these tins, although these are not originally intended for use as a storage, I can however use them to store my smaller reels of tape. They also like quite nice.
Although the tins are too small for the standard size of 17.8cm (7 inches), the smaller size of 14.3cm (5.5 inches) fits quite well. By the way, you can see the problem that arises if you do not use a clip on the reel, the tape spreads through the tin when i lift the reel and can therefore wrinkle when I put the reel back in.

Another option is to store the reels in the cardboard boxes they come in. This method of storage is much more convenient due to its square shape. But the cardboard box is of course not as sturdy as a tin...
Fortunately, there is a good alternative to the other two options. For the reels there are caddies where you can store the reels. a caddy is sturdy and has a door that you can open, after which you can easily take out the reel. Moreover, these caddies come in many different sizes, there is a matching caddy for almost every size of reel. Another advantage of these caddies is that you can click them together if they are of the same model, so you can form a sturdy box in which you can store your reels without much effort.
6. Buying new reels of tape.
So you want to buy new reels of tape? Then there is good news. Tape is still being sold but it depends on where you look and whether you're looking for used stock, unused old stock or brand new reels.
Buying used stock tapes can be done in several ways. You have your local thrift stores and flea markets. But as mentioned in chapter 2 (tape type and quality). You may end up buying tapes that tend to be of bad quality due to old tape quality, age or even careless storage. Nowadays you may find music stores that specializes in analog music and equipment. They do also sell used reels but may also sell new old stock. Which is your best bet when trying to get a hold of quality tapes that are unaffected by time and use. However you may find it easier to just look for them online.
I myself bought some new old stock reels through the Dutch second hand web shop Marktplaats. Used tapes are quite often offered here, it still depends on the seller whether they sell used or unused stocks, the prices though are still quite acceptable. Note that I only look for the 7" reels they do also sell 10" but the prices on those may be higher.

In addition to local web shops, you can also search internationally on Ebay. The offer is very broad here, but so are the prices...
Here you will easy find prerecorded tapes, like albums from the time when the tape recorder was still widely used.
prerecorded tapes are quite rare so prepare to pay a lot for such reels of tape. Although they may also sell used tapes in large batches cheaply, pay attention to the shipping costs and country of supply. As a tip, I would say that it is best to search for the offer from Germany (if you live close to the country), the tape recorder was a popular media type there so the offer on tapes may be bigger, better and cheaper than from other country's.

Finally, you can also look for new tapes with tape. You can buy newly produced tape at various web stores. Here is a clipping from the Dutch webshop: MFB Freaks.
I have never bought new tapes myself, but the offer is certainly not bad. A new tape can cost more than a used one, but you have the guarantee that it is of good quality.
So you have multiple sources for tapes. Should you start using a tape recorder and are looking for tapes to record with, it is best to look at these websites. Of course, visiting flea market and thrift store can also still be fun and exciting.

Personally, I went for tape from the BASF brand. The quality tape of this brand are often not bad, and if stored properly, they are still in reasonably good condition.
You can also search for brands such as TDK and Maxell, the quality of which is often not bad either.
On the other hand, you also have brands such as Sony and Philips, although I must admit that my experience with these brands is not as good, this is probably due to the fact that I have only had very old tapes of these, newer editions of these brands would probably sound better.
Apart from tape for your own recording purposes, pre-recorded tapes are of course also available, although there is a completely different take on this.

Recently I've become the proud owner of two such albums. Left the album 'Curtis' the debut album of Curtis Mayfield. On the right the album 'Mr. Bojangles' by Jerry Jeff Walker. Let's take a look at the contents of these two boxes.
The box containing the album Curtis is not original, I pasted the covers for this album on this box myself which originally was a BASF box containing a reel of tape for own recording purposes. This is because the original box of this album was unfortunately no longer present when I received the album.

Here's the same kind of box next to the box that I transformed.
How I managed this can be read in detail in Chapter 8: Stickers!.

Inside the box we find the album on a matching reel. The box is otherwise empty, but perhaps the original box used to contain some extras, such as a card with information or even advertising from the publisher: Curtom.
Here the reel of tape outside the box, the sticker contains information that may be of some importance.
The back is completely blank with only the Ampex brand stamped into the reel.
First of all, it states the playback speed of the tape, in this case 7½ IPS which is the highest speed you will find on a standard 7" tape recorder. This means that the tape has extra good sound quality.
There is also another code at the top right, in this case "M 8005". this is the serial number for this production of pre-recorded tapes of this album. Although this number is not particularly special at first, it will come in handy if you want to look up background information about this album.

Here's a snippet from the Discogs website with information on the reel in question.
On this page you will find, for example, information about the production year (1970 in this case), the table of contents and the producers.
But here you will also find information about the value of a reel like this. If you look in the top right corner, you can already see what the collector's value can be for an album...
Although the average price for this album is around €50, the actual requested prices can still differ greatly. According to Discogs, there is a single issue for sale for a ridiculous amount of € 1,139.99! Here is a link to the relevant page on Discogs.
Let's compare the price with Ebay.
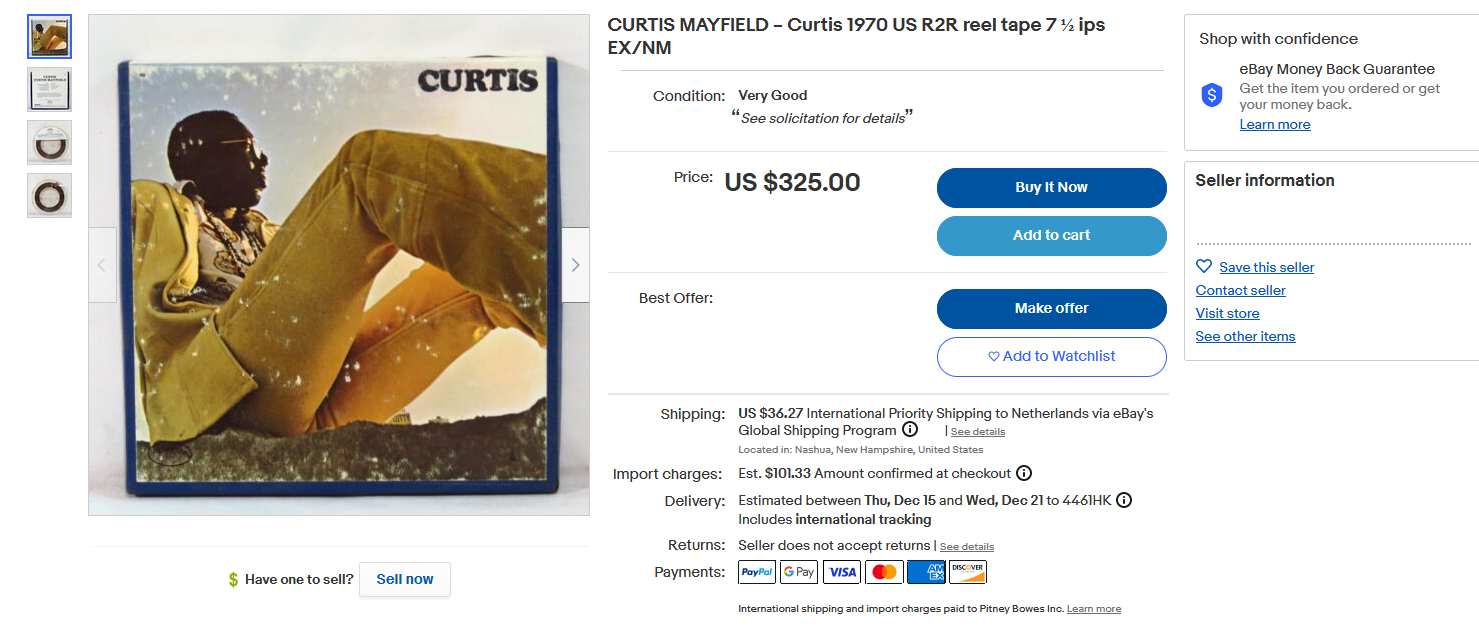
Here too one is put on for sale, again a very high amount is asked for the album on tape. But why's the price so high? This has several reasons.
First of all, the album Curtis is the artist's debut album, which alone makes this one somewhat special. But it is the media on which the album is recorded together with the age and quality that makes the price so high, especially if it is a popular album, in this case the price can quickly run into the hundreds or even thousands.
It is of course still based on what the collector is prepared to pay for such an album. After all, I would never have bought this album for this price. How I got it can be called a coincidence rather than that I was seriously looking for it, you could say that it was a stroke of luck.
Let's take a look at the other album I have laying around, in this case Mr. Bojangles from Jerry Jeff Walker. On the back cover alone you can find a lot of information about the album along with some extras.
It is also interesting to name the publisher Atco, it is not a well-known publisher, nor are the artists from this publisher, but I dp happen to have a complete collection of records by the pianist Bent Fabric that were released under the publisher Atco, about Bent Fabric. I wrote a blog.

In the inside of the box we find the reel of tape, together with an extra card from Ampex.
In this case, the card is an advertisement for an Ampex catalogue. Although the catalog is probably no longer available, it is always interesting to find such old advertisements with an album.

Also on this reel is a similar sticker with information about the content and the album. Again we find an indication for the speed of the tape, in this case 3¾ IPS. The standard playback speed, the quality of the music will therefore be slightly less good compared to the previous album, but nevertheless it certainly does not sound bad.

It is interesting to show the difference between this reel and a 'normal' 7" reel. What is striking is that the center (where the tape rests) is much larger on the album. You see this more often on pre-recorded tapes, the reason is that an album often does not last longer than half an hour to forty-five minutes, so not much space is needed on the reel to store the tape in. Why such albums were not released on smaller reels is unclear to me, probably because it has something to do with the fact that this type of reel is simply the standard format and so it is cheaper to release an album on a 7" reel instead of a smaller format.
This type of reel is actually also called a 'Cine reel'.

I'm also putting the serial number (AT-259 in this case) through Discogs for background information. The album was released on September 25, 1986 to be exact. Currently there are no copies for sale and therefore no price is known, probably because this album is much less popular than the previous copy. Here is the link to that page.
I'm took a look on Ebay, but again there is not a single copy put up for sale, for those who are secretly interested in the value of such an album. There are copies available on vinyl (new in packaging) currently asking $36. My guess is that the reel of tape is not much higher in value. Perhaps the price would be around $80, but I don't think it will yield much more at the current moment.

Finally, we put the two albums side by side, you will probably notice that the album Mr. Bojangles contains much less tape than Curtis's. The reason, of course, lies in the playback speed. because 3¾ IPS is about half of 7½ IPS, the tape is also half less in length. In the end, both albums have about the same playing time with the biggest difference being the sound quality between the two.
I myself have no other pre-recorded tapes besides these two albums, the main reason is not really the price but the general use and age of the tape. Setting up such a tape takes a lot of time and given the play time is not very long, you will have to get up again after about 20 minutes to turn the reel around, a lot of work to listen to a single album, moreover the sound quality on these tapes can have deteriorated a lot after so many years, with these two albums I was lucky. After all, they are already over 60 years old, which makes it a small miracle that they still sound so fantastic!
I have gotten the albums simultaneously at a local record store. I was handed over these tapes after a short conversation with the owner of the store who happened to have them behind the counter, I was allowed to decide what I wanted to pay for it. I talked to the owner again after I noticed the value of the two albums. The artists were completely unknown to me, but that is what makes this hobby so interesting, you get to know new artists every time, with music that you would otherwise never have listened to and would never have learned to appreciate!
As a summary of this chapter, it is wise to avoid pre-recorded albums as much as possible unless you really want to collect them or can get them for cheap. I myself mainly use the reel to reel recorder for long playlists of at least 1 to 4 hours playing time. It is therefore best to look at reels for own recording purposes. This may be in the form of unused old tapes or completely new tapes. For unused tapes, look especially for reels from after 1960 or preferably even after 1970. The tape on these newer reels is often better and if properly stored by the previous owner, can still sound rather good. However, there is always the risk that unused reels will no longer play well purely due to their age and condition, in which case you are still safest if you go for the new production, provided you have the money to spare.
You may in any other case try to get a hold on used old reels, though I must say I've only had bad experience in reusing reels of tape. Mostly because the former user has not took care of the reels or they are already worn from repeated use.
7. Editing Tape.
Editing tape is generally referred to as 'splicing', since splicing stands for separating, which is usually the case when you edit tape.
First of all, it is strongly recommended to look for a so-called 'splice set', roughly translated a cut and paste set specifically for tape.

Shown above is such a set that I purchased a few years ago. The photo on the box shows the content, I have written the texts around it with the passing of time.

Inside the box are (in my case) the following parts, I put "in my case" between brackets because there is more in my set than is normally the case.

The roll of white tape is so-called leader tape. You mainly use this at the beginning and end of a reel of tape. This type of tape is referred to as 'leader tape' in the sense that it serves as an introduction to the rest of the tape that contains music. I will refer to this piece of tape as 'blank' tape because no further information can be stored in it, since the tape itself is actually nothing more than a piece of smooth plastic.

The small blue roll is adhesive tape, which you mainly use to attach two parts of tape together.

In addition, there is also the cutting board and a knife to neatly cut through the tape.

Something that is not included in this set as standard and therefore had to be bought separately is this roll with sensing foil. You use the foil at the end of the tape to indicate whether a tape has come to an end.
If you are looking for a set splicing set yourself, it is best to look online. There are many different sets available. Make sure that the set contains everything you think you need, also make sure that the width of the tape in the set corresponds to the type of media you want to edit. After all, tape for a reel recorder or 8-track is wider than that on a compact cassette.

I almost forgot to mention it, but a big recommendation is a good pair of tweezers. The tape is quite difficult to handle with our large clumsy fingers. You can work way more precise with tweezers and the chance of ruining your splicing action is much smaller if you use tweezers.
Speaking of clumsy fingers, your fingernails mat also come in 'handy'...

Although the cutting board is a necessity, mine is unfortunately unusable, the slot where you should put the tape is just too narrow for me, probably a manufacturing defect. Instead I use an alternative cutting board that is actually intended for cassette tape. Nevertheless it works just as well with tape for the reel recorder. In addition, it has two pegs that hold the tape while you work on it.

As an example for our splicing work, I'm taking a pre-recorded reel of tape, to which I want to add a piece of leader tape.

I lay out the parts I need and take the beginning of the tape from the reel.
The first step in this case is to cut the end piece of the tape, as it is deformed and wrinkled, sticking something on a crumpled piece of tape is not only very difficult, but will also cause problems when playing the tape.

The goal is to add a piece of leader tape to the magnetic tape, for this I cut a piece of blank tape with a length of about 60 centimeters. You will need the length to guide the tape from one reel to the other, the blank tape is better suited for handling, this prevents damage to the magnetic tape on which the music is stored which can be quite fragile.
I clamp the blank tape to the cutting board opposite from the magnetic tape, I let the two pieces of tape overlap a little bit. I then take a short length of the adhesive tape and cut it to size, you try to keep the length of the adhesive tape as short as possible, because it is quite stiff and bends less easily than the magnetic and blank tape.
It is also very important that you stick together the two pieces of tape as straight as possible to each other, otherwise this will later cause problems when playing the tape, as will be shown in a video later.
Something that is not always advised is to stick a piece of adhesive tape on the other side of the tape as well. After all, this makes this piece of tape even stiffer and less flexible, but however, bonding both sides does ensures that the two pieces are less likely to be ripped apart when in use.

The reason I do bond the other side with adhesive tape is clearly visible in this photo. the magnetic tape curls up a bit, so you have the greater chance that it will catch on something and pull itself away from the blank piece of tape.
As I mentioned earlier, the part of tape with the adhesive on it is noticeably stiffer and doesn't bend as well compared to the rest. So you have to make the decision yourself whether you want to bond both sides or just one side.

The reel of tape now has a nice leader piece. This makes it better manageable and it won't be a major problem if the end piece gets wrinkled, after all there is no recording on it. In addition, the lead-in tape gives the option of recording from the beginning of the magnetic tape.
In addition to the blank tape, we also have the sensing foil, this tape has a metal layer that has the function of reversing the playback direction on the reel recorder. The foil is certainly not a requirement, but it does provide a lot of convenience. Of course, the recorder must have the option to reverse the direction. In other cases, the sensing foil on a recorder may be used to stop it automatically when the end of the tape is reached, my recorder does not have this last option, but it can however reverse the playback when detecting such a piece of foil.
At the end of this chapter I will give a better picture of the function of the sensing foil with a short film.
For now I'll cut off a piece of the foil, the bottom of the foil also has an adhesive coating, so you don't have to stick the foil to the tape with extra adhesive tape.

I cut the foil at an angle, this has a good reason. This reduces the chance of the foil being ripped off when it comes into contact with the many parts of the recorder.
Where you stick the foil may differ from person to person, you are just as able to stick it on the magnetic tape without any problems, I however prefer to stick it on the blank piece just before the magnetic tape starts, that way I can still remove it (together with the blank tape) without having to cut off a piece of the magnetic tape.
If you ask yourself on which side should I stick the foil? Here's the answer, when it comes to the beginning of the tape, you stick the foil on the inside of the tape. If you stick the foil to the end of the tape, you stick it on the outside of the tape.
This has to do with the position of the detection sensors on the reel recorder. Below is a video where you can see the sensing foil and sensors in action, as well as what can happen if you do not stick the leader tape straight opposite to the magnetic tape:
You can see in the first video that the sensing foil is directed upwards and in the second film that it is directed downwards. This has to do with the position of the detection sensor on the recorder, on the right side of the recorder the tape passes under the sensor, on the left side the tape passes over the sensor.
I will also come back to the bloopers, because what went wrong here? I don't dare to say for sure, but I do have my suspicions, on the first two bloopers I had not guided the tape properly around all axes, perhaps this suppressed the operation of the sensing foil and sensor. On the third video I stuck the foil to the bottom, it does not make contact with the sensor on the right, but does with the sensor on the left, nevertheless the left sensor only works if the recorder plays from left to right and not in reverse direction as shown in the video.
In the end I replaced the sensing foil after which it was detected properly.
You can also see what can go wrong if the leader tape is not stuck on properly, the tape slips from between the Pinch roller and Capstan, with the risk of damage.
In short, editing tape looks and sounds simple, but it is a precision job where you have to check the result, is the leader tape perpendicular to the magnetic tape? Is the sensing foil on the right side and is it also properly detected by the machine? It is therefore important that you always check the result of your splicing work. Everything may look good at first glance, but your recorder may think otherwise!
8. Stickers!

With other types of media such as the compact cassette or the 8-track cartridge I have made new cards and stickers many times. Reel to reel tapes are an exception here, you generally do not stick stickers with illustrations on the reels, but there is of course the box in which you keep the reel that may be worth a sticker. This brings us to the exceptional case of a pre-recorded tape with the album Curtis, Curtis Mayfield's debut album.

Although I have the original reel with tape, the box is unfortunately not original. What had happened to the original will always remain a mystery. The album itself is quite unique to find on a 7" reel, so it would certainly be nice if the box also contains the correct cover.
The reel (and presumably also the tape) is from Ampex, so the Maxell box doesn't fit this at all.
We will exchange the Maxell box for another first.

This BASF box will become our new candidate to store the reel in, but first I will give it a makeover.

I measure the dimensions of the box. In Microsoft Office - Word I create a template based on these measurements.

After some searching I find the right covers of the album. Both the front and back! I always try to go for images with the highest possible resolution. I paste the images on the Word document and adjust them so that they match the box later on.
An observant reader will probably notice, the 'back cover' does not fit perfectly with the front, the colors do not match well and the left edge of the back reflects light, presumably because this is a photo and not a scanned image, nevertheless I can't find an alternative and will have to make do with it.

Before I print the actual sticker, I make a test print on a normal sheet of A4 paper. I use this to check whether the printer (which has been off for a while) still prints properly and whether the sizes are correct. I make some final changes to the document and start printing the stickers.
While Curtis rolls out of my printer, I color the BASF box completely black, the brightly colored and white parts must be dark so that they do not shine through the sticker.
The colors and texts on the box are now a lot darker and the stickers have come out of the printer nicely, the next step is to cut the stickers to size after which I can stick them on the box. The black strips below the images are for the edges of the box, these are intentionally larger than the box edges so that they overlap, so I will (hopefully) not be left with any ugly seams afterward.
After cutting the stickers to size I start with sticking the edges on the box, I cut away the small recess with which you open the box.

The edges are done and as you can see the result is not bad (if I do say so myself). The next and most difficult step is to stick the two large stickers with the images.

To stick the sticker on the box without creases, I first stick the edge on the box and carefully pull out the underlying sheet, on top I slide over a ruler at the same time so no creases may develop in the process.


For the back I use the same technique as for the front. I cut off the black edges that were around the image because otherwise they would overlap too much, they will probably come loose, which would make the entire image prone to come loose. Once again the result is great!

Something I didn't think about is that the two stickers (despite the fact that the colors don't match) still form a nice whole when the box is fully opened. Now only one thing remains.

An attentive eye could see that the box is not original, but should this album ever go back on sale in the future, I want to make sure that it is clear that this is not the original box. So in the inside I write that the spool of tape is original, but the box is a non original work.

With this the album has a nice fitting box again. The templates (without the relevant cover) can be downloaded from the 'Downloads' page, click on the link to go to the relevant page.
- Sony TC-252 Tape Recorder Repair
- My experience with tape recorders Blog
- Magnetic Tape Gallery