
Elcaset information
The Elcaset is literally a large Cassette 'El' in 'El'caset therefore stands for L or Large, far fetched but I read this somewhere. When starting the Elcaset, keep in mind that the equipment and cassettes are at least 40 years old and should therefore be handled with care.
The equipment is otherwise of very good quality provided you have an optimally functioning machine and tapes, tapes are not cheap and can show defects, even 'new' out of packaging. An Elcaset machine can also be expensive to purchase and can suffer from cures after so many years.
Well let's take a closer look at the Elcaset.

Subjects:
- What is an Elcaset?
- Tape types and quality
- The Elcaset recorder
- Recording music
- Maintenance and Adjustment
- Buy new tapes
- Make your own insert cards
1. What is an Elcaset?
An Elcaset is actually almost the same as a normal cassette tape, but twice bigger and thicker. The appearance is also different, as is its operation.
First of all, the tape on an Elcaset is wider than that of a cassette, to be precise 1⁄4 Inch or 6.4mm compared to the 1⁄8 Inch (3.17mm) of the compact cassette. The size of tape is basically the same as on tape recorders and 8-Tracks.
The same tape in turn is thinner than the usual one, so it fits more on an Elcaset but at the same time makes it fragile, so it is not recommended to grab the tape yourself with your fingers. Some even use velvet gloves!
An Elcaset has two movable clips on the sides. These serve to protect the tape and, together with the recording protection, are the only movable parts on the housing.
A striking detail is that you use an Elcaset 'upside down' compared to other cassette types.
The recording protection is reusable, with other cassette types you have to break it.
Finally, there are holes in the side where a sensor looks in to see when a tape has ended or not, there are also detection holes in it to see what type of tape it is and whether something has been recorded with noise reduction, the latter must be you'll break out again.
2. Tape types and quality
There have never been many different types of tapes, with only three different brands (including the designer Sony itself). Highest quality tapes are also so rare that it is almost impossible to get them! Below an overview:

First of all, the Sony SLH LC-90. Type I
Although the tape is a type I (Ferrous / Iron Oxide).
Is the quality really not bad!
This tape has 90 minutes of playing time divided over 45 minutes per side. There are also variants of 60 minutes total.
According to the standards set by Sony, all Type I tapes are blue in color.
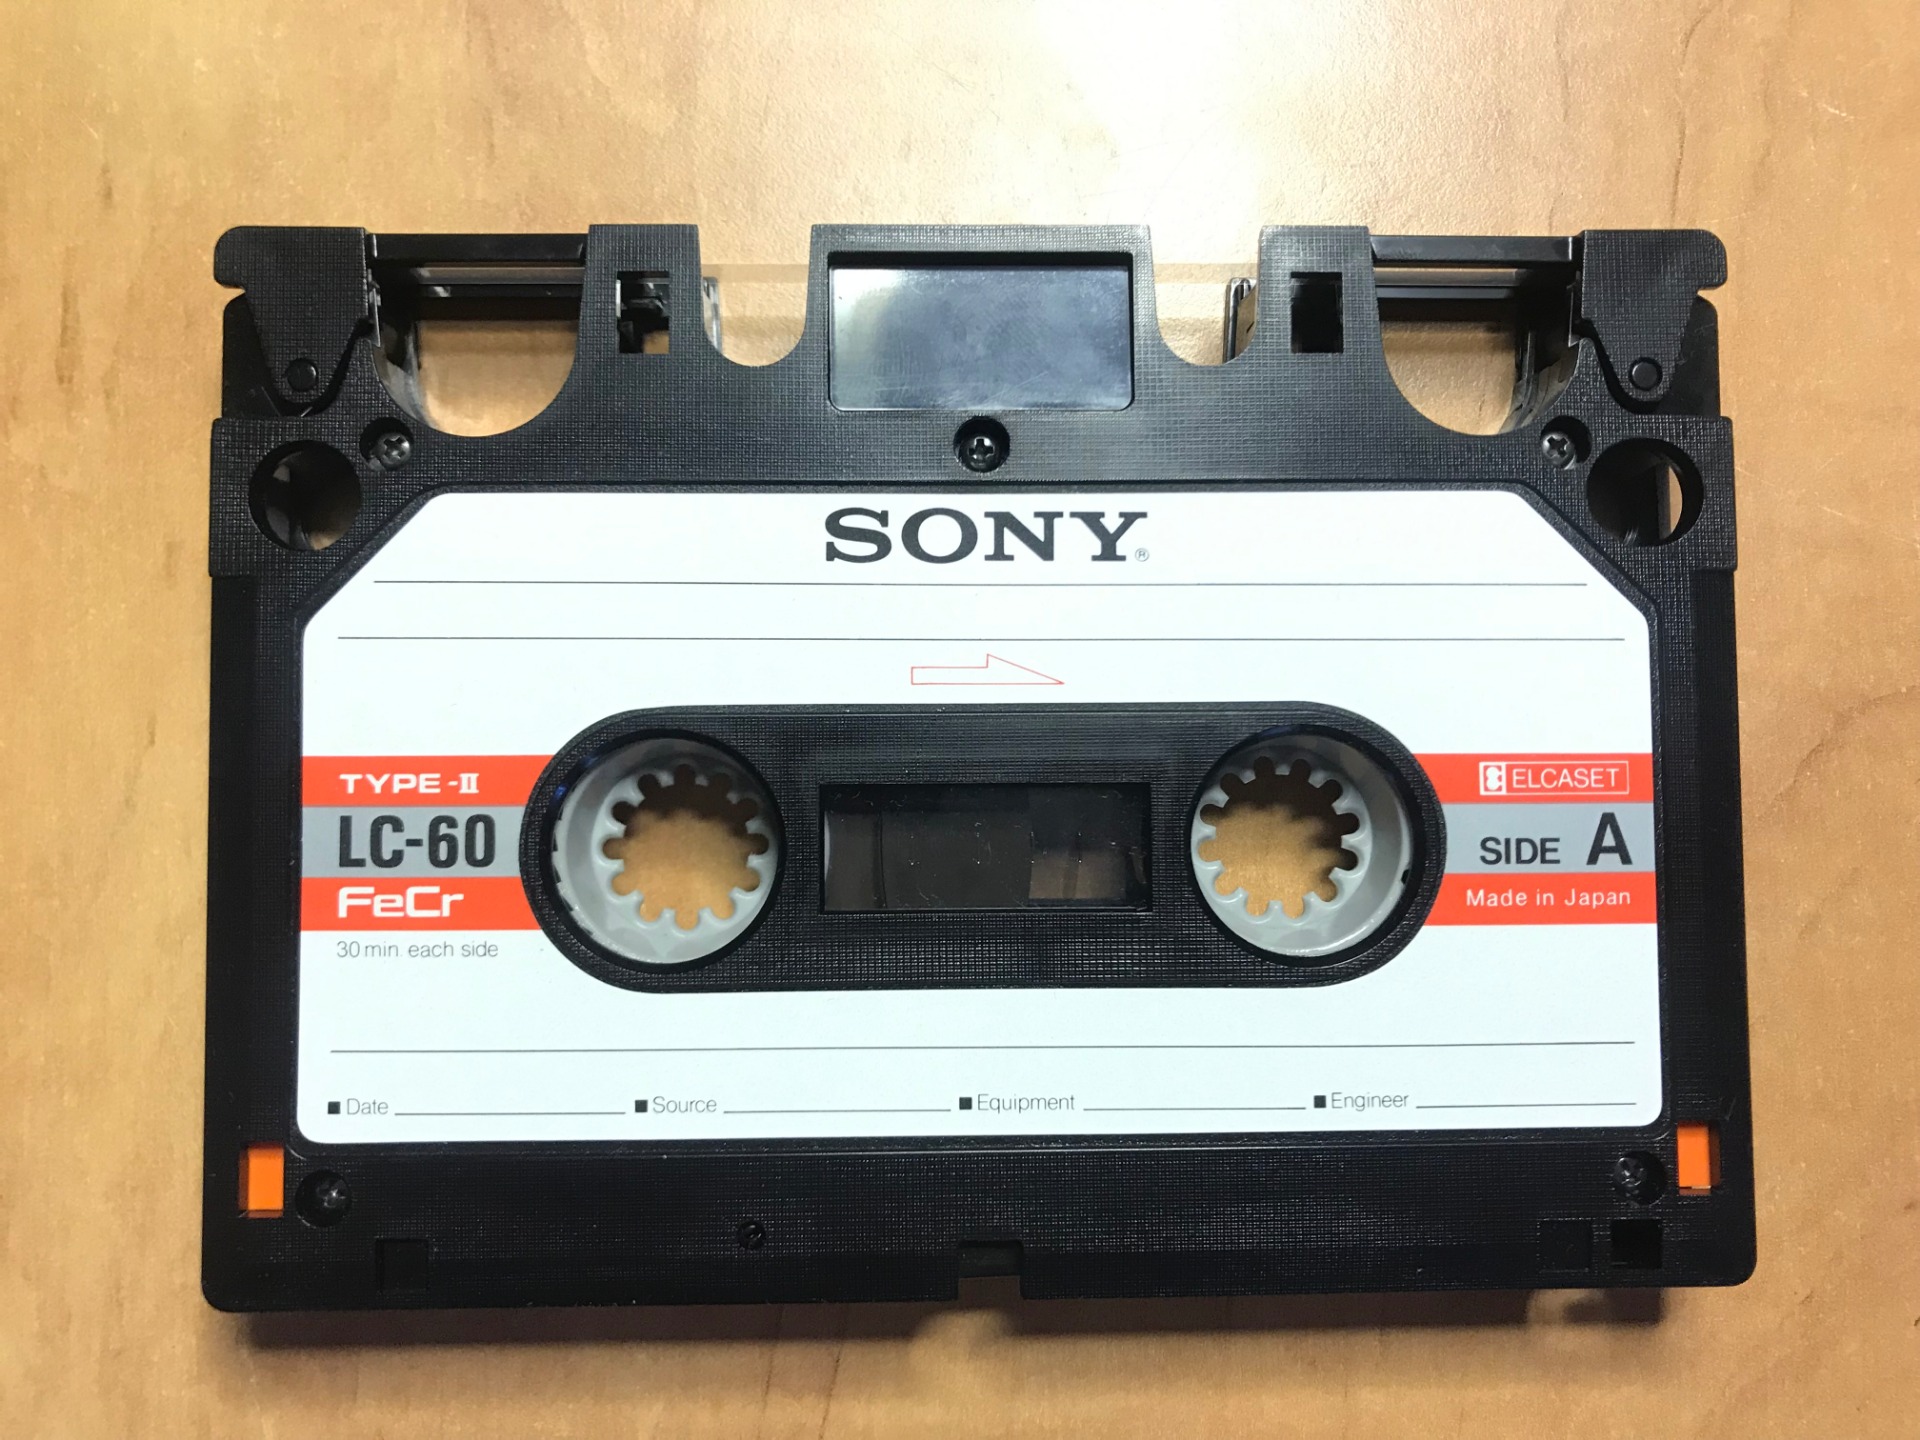
After this you have the Sony FeCr LC-60. Type II
This is a 60-minute tape (2x30 minutes), although you also have it in the 90-minute variant. The tape itself is of better quality, FeCr (or Ferro-Chromium). This is a type of tape that was also briefly found on cassette tapes (as Type IV) but never caught on.
For recognisability, the Type II tapes are colored red.

Then there's the Sony LCDR-275 T-180GL. Type III
(Photo copied from the internet).
Type III tape contains Cr02 (Chromium). This tape has a total playing time of 180 minutes, spread over 90 minutes per side. There should also be tapes with less playing time.
Type III tapes are quite rare, I have come across a few on a webshop for no less than €200!
Chrome tapes are yellow/orange in color.

There's also Maxell. Here's an LC-60. Type I
Maxell tapes are also not often encountered, as far as I know there is only the Type I tape.
It has a playback time of 60 minutes.
I have not come across any other Maxell tapes and I doubt whether they ever existed.
(Photo from internet)

Finally, Technics has also produced tapes. Here's a Technics RT-60XALC. Type III
A chrome tape of 60 minutes of total playing time.
Like Sony, Technics has released a tape of each type, but to a much lesser extent than Sony itself.
(Photo from internet)

I've made a table with all the brands and types of tapes that would have been available.
It is not easy to find information about the types of tapes so I have to make do with what the internet can tell me. Photos, videos and sales of tapes give me insight into the different types.
Should I encounter other types over time, I will update this table.

This handy flyer comes with every 'new' tape that comes out of the packaging. You can click on it, it might come in handy if you would mess with it yourself. It is available in the languages English, French, German and Spanish.
If you are interested in one of these translations, please let us know on the contact page.

An Elcaset contains (as mentioned earlier) the following important parts:
- Movable Clips to protect the tape when not in use.
- Overwrite protection These are tabs that you can press (I'll get to this later).
- Brake This ensures that the coils cannot move when not in use.
In the topic 'Recording music' I go into more detail about the functions of the tape.
On the repair page of the Elcaset I also tell about these functions.
In terms of quality, the case shows that a lot of time has gone into creating a reliable medium, one that is easy to use as well as easy to maintain (to a certain extent), remember that we are still talking about a type of media that has only been on the market for two years!
The sound quality is determined by the type of tape you use, which is reflected in the color of the tape. Ferrous is brown, after all, this is iron oxide or rust. A Ferro-Chrome tape is black in color. As I have already discussed with the Compact Cassette, the darker the colour, the better the quality.

3. The Elcaset recorder
Despite the fact that the Elcaset was only really active on the market for two years, quite a few recorders have been released for this type of media by different manufacturers, below is an overview of a number of models that have appeared on the market.
There have also been some prototypes, if you are really interested in the Elcaset recorders I recommend this website , it covers the coming and going of the Elcaset as well as some prototype models that you can find here on the same website.
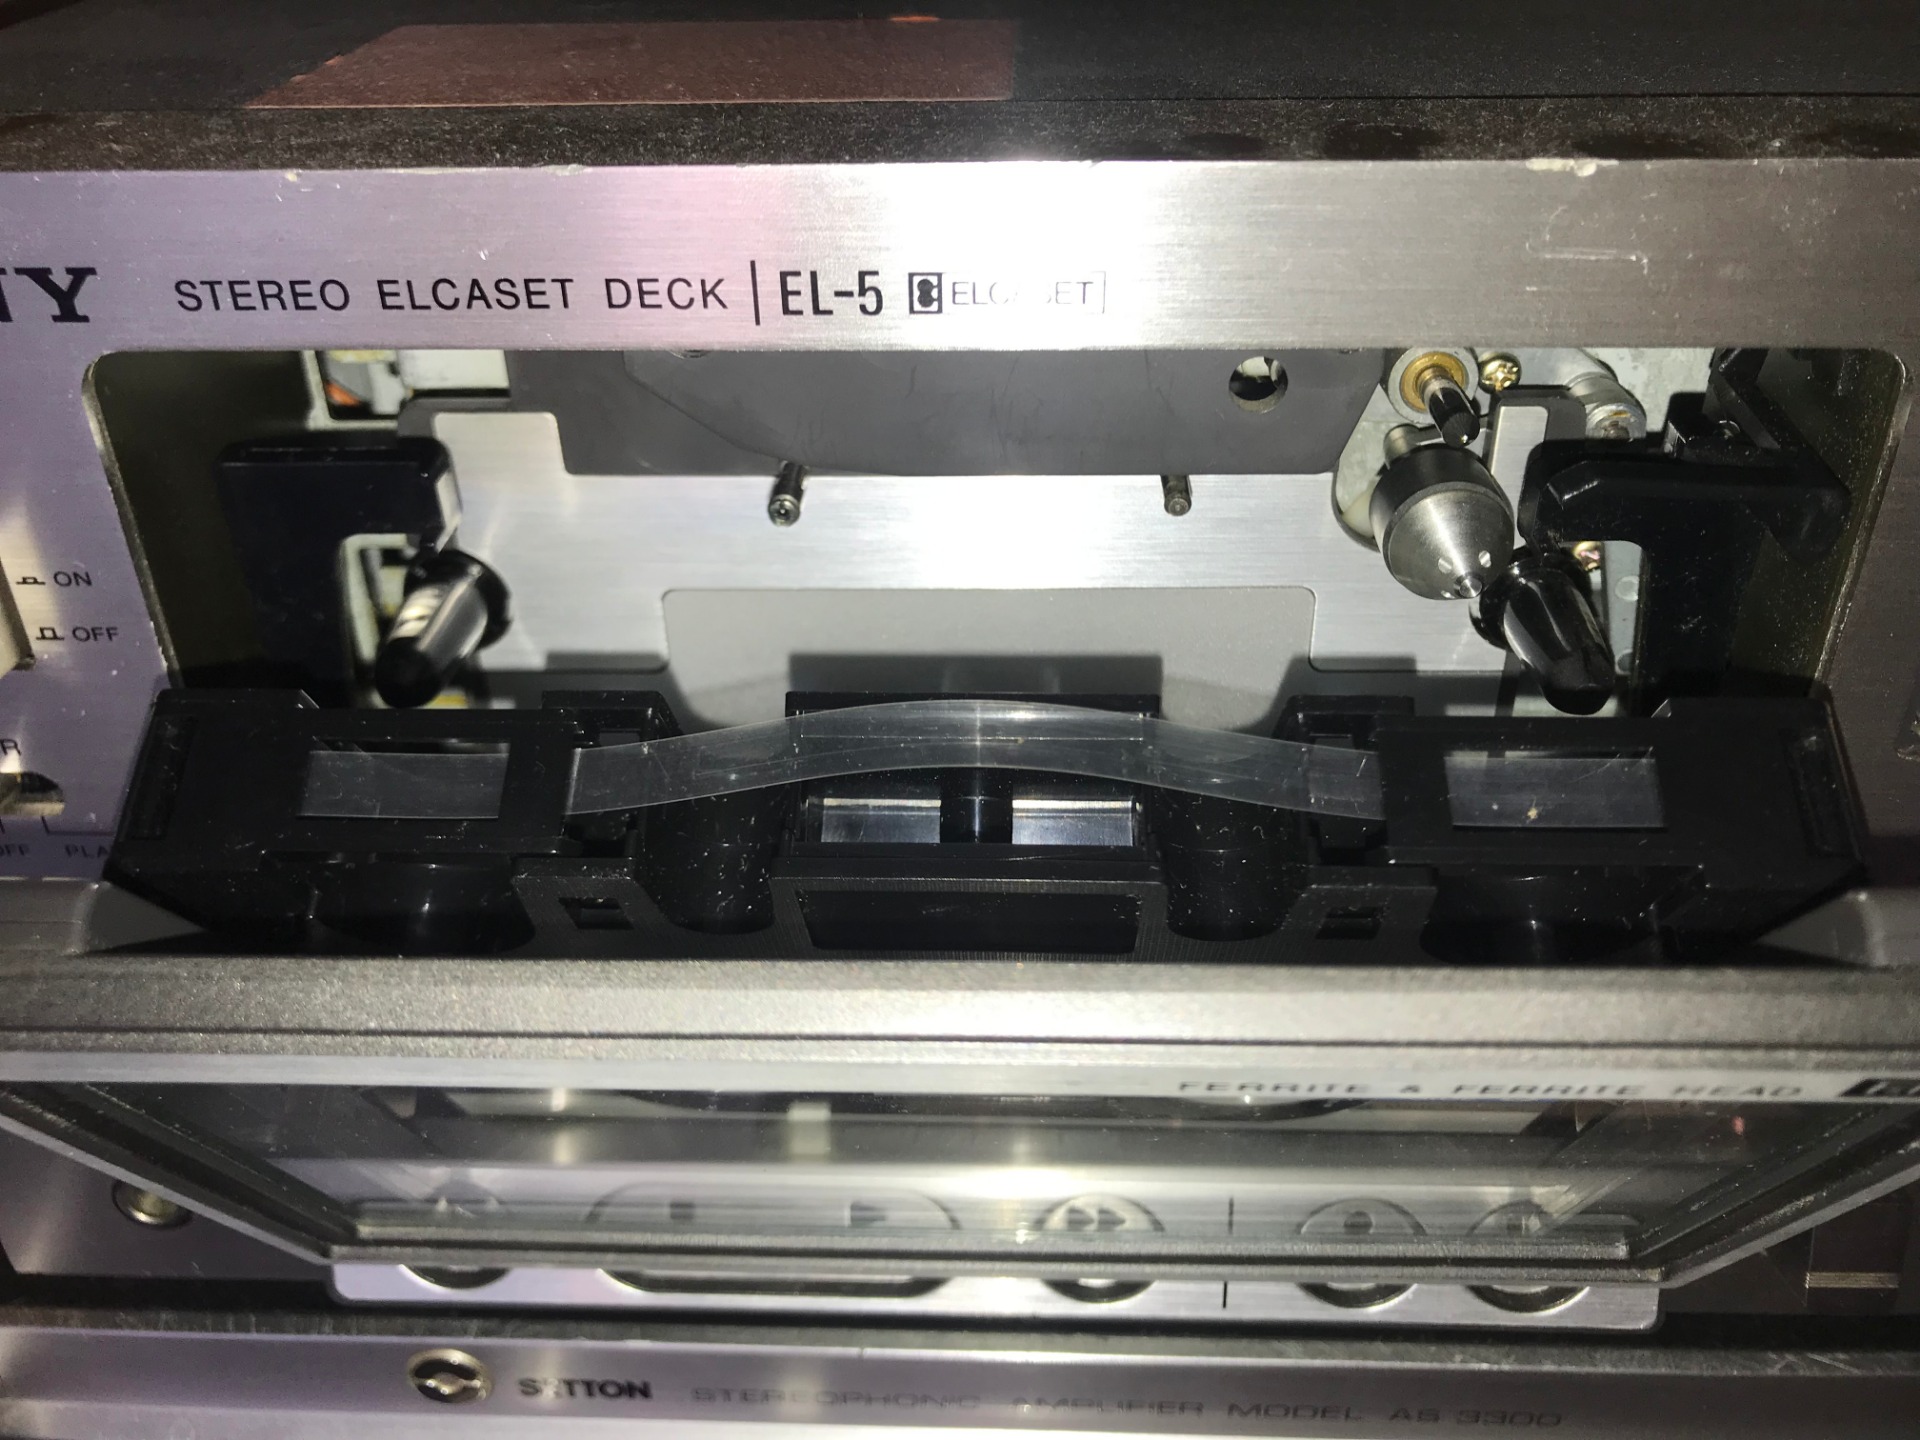
I myself am therefore the proud owner of a Sony EL-5 Elcaset recorder from 1976. A 'mid-range' model from the series of four recorders. Let's take a look at the functions that the EL-5 is rich in, these are very similar to many other models.

Above, the level control of the sound to be recorded. Although not clearly visible, this is a two-piece button, the top one is the left channel with the right channel hidden underneath.
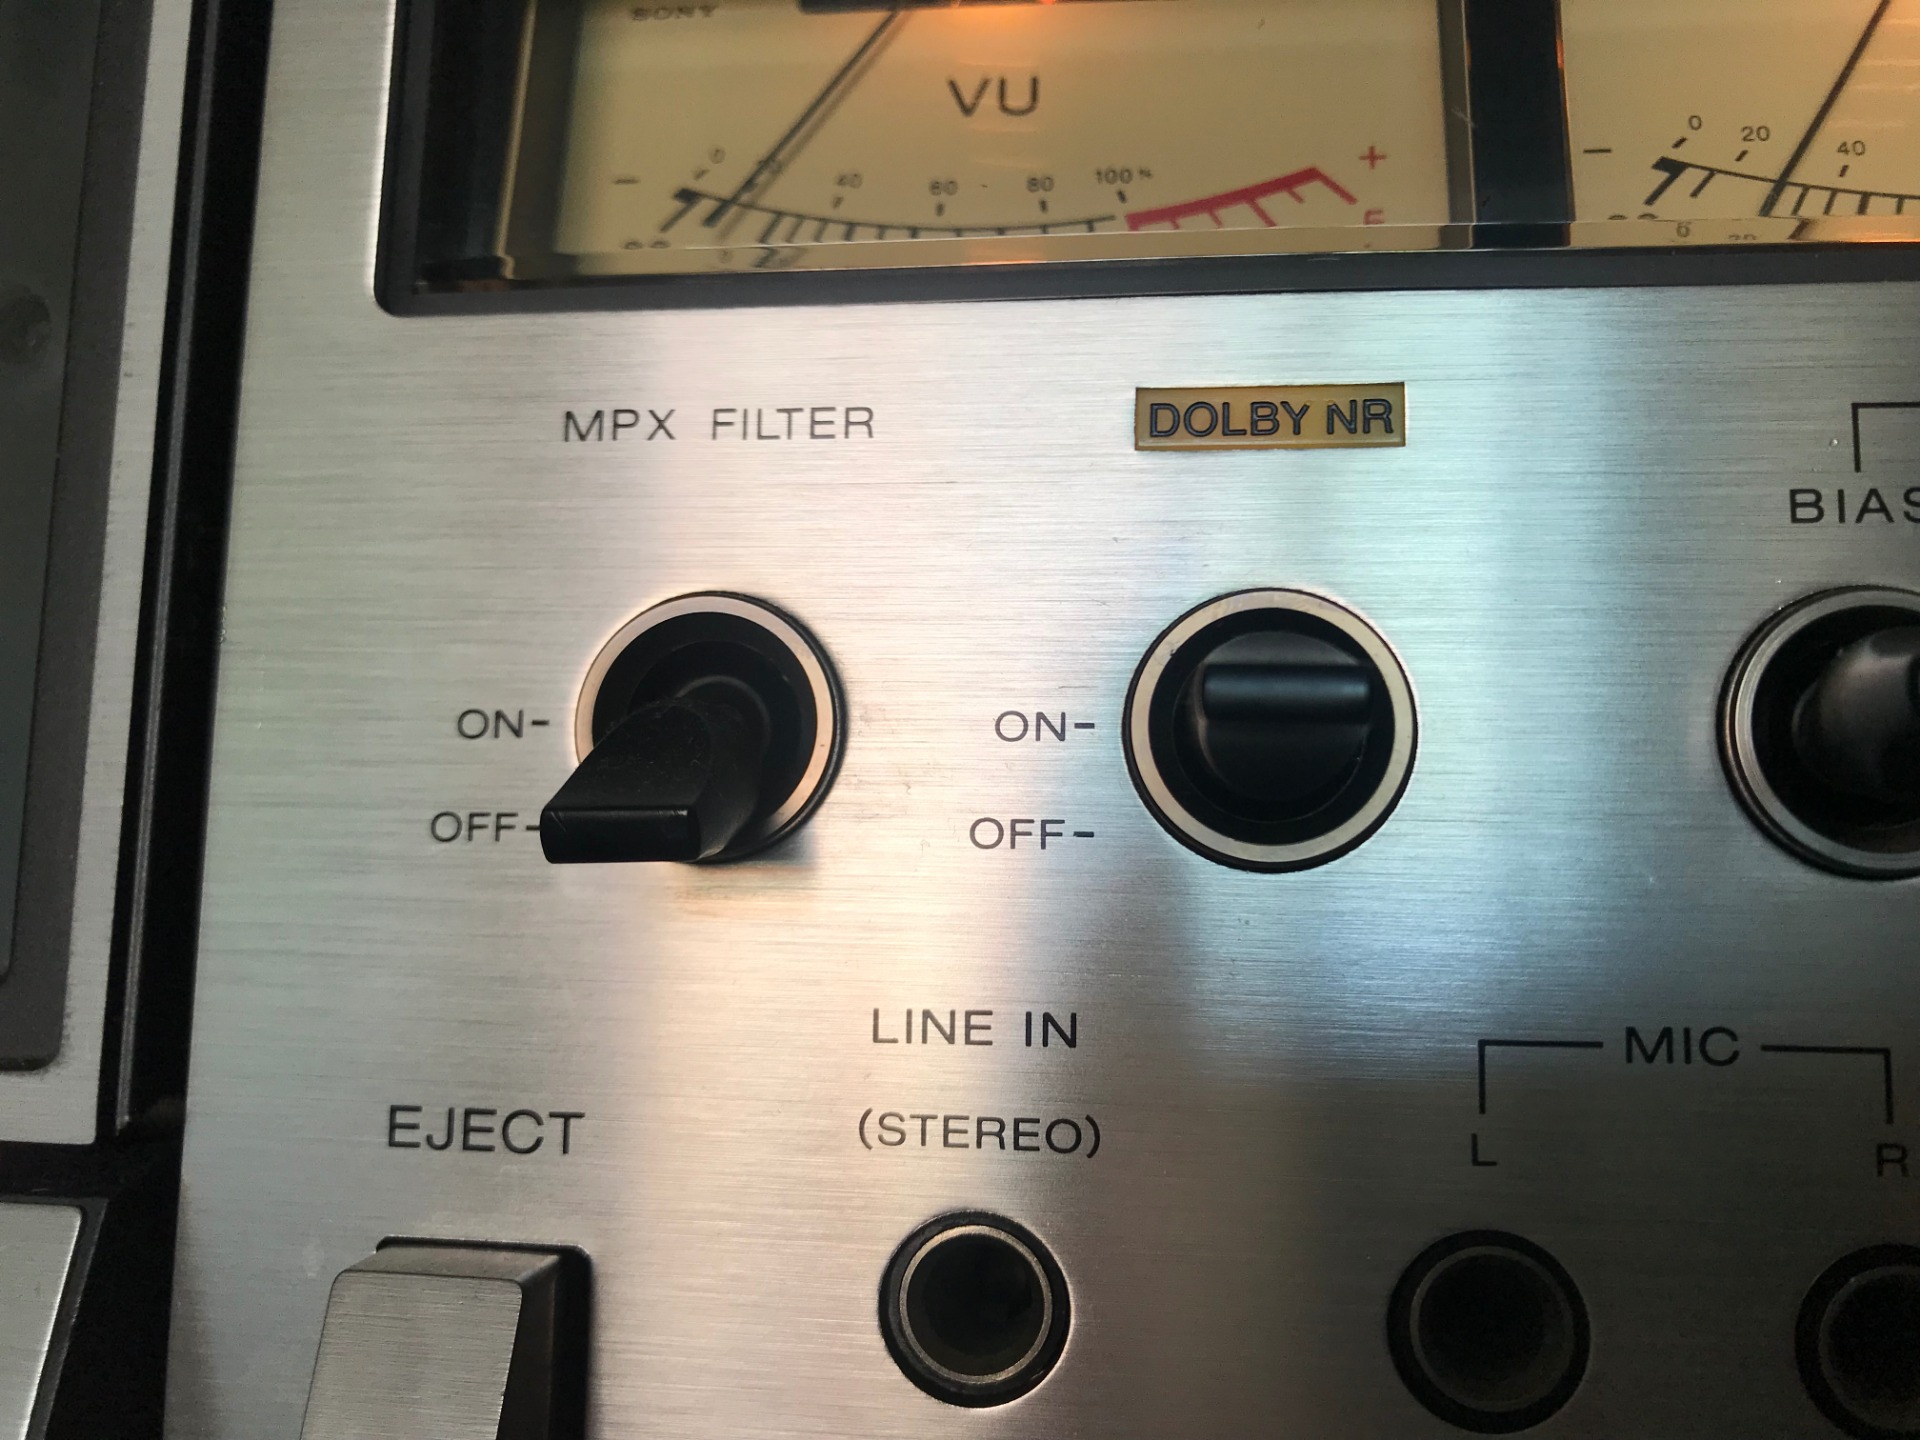
Here the toggle switches for turning noise cancellations on or off, the left one is the MPX Filter. This filters radio noise, useful if you make recordings from the radio itself. On the right is the switch for Dolby B noise reduction. I almost always have this on and it does filter a large portion of noise. There is also an indicator lamp built in.

Here from top to bottom the following:
The main switch to turn the device on or off, below a switch to start the device in play mode or recording mode by means of an external timer.
Below that is the corresponding function with which you set from which point it should start.
The counter sits below that and does what the name says. It keeps track of the position of the tape, in inches per second.
Below that is the connection for headphones, about the button combination above I will come back later, they are quite complicated and I still have to figure out how this really works.

The large control above is again double, although it is intended for the incoming sound from a microphone. The smaller one on the left is a single for the output sound to a headphone jack.

Then there is the adjustment for the type of Elcaset that you are going to use, although divided over both Bias and Equalizer you always use them in the same position, this is also made clear in the middle of these switches.
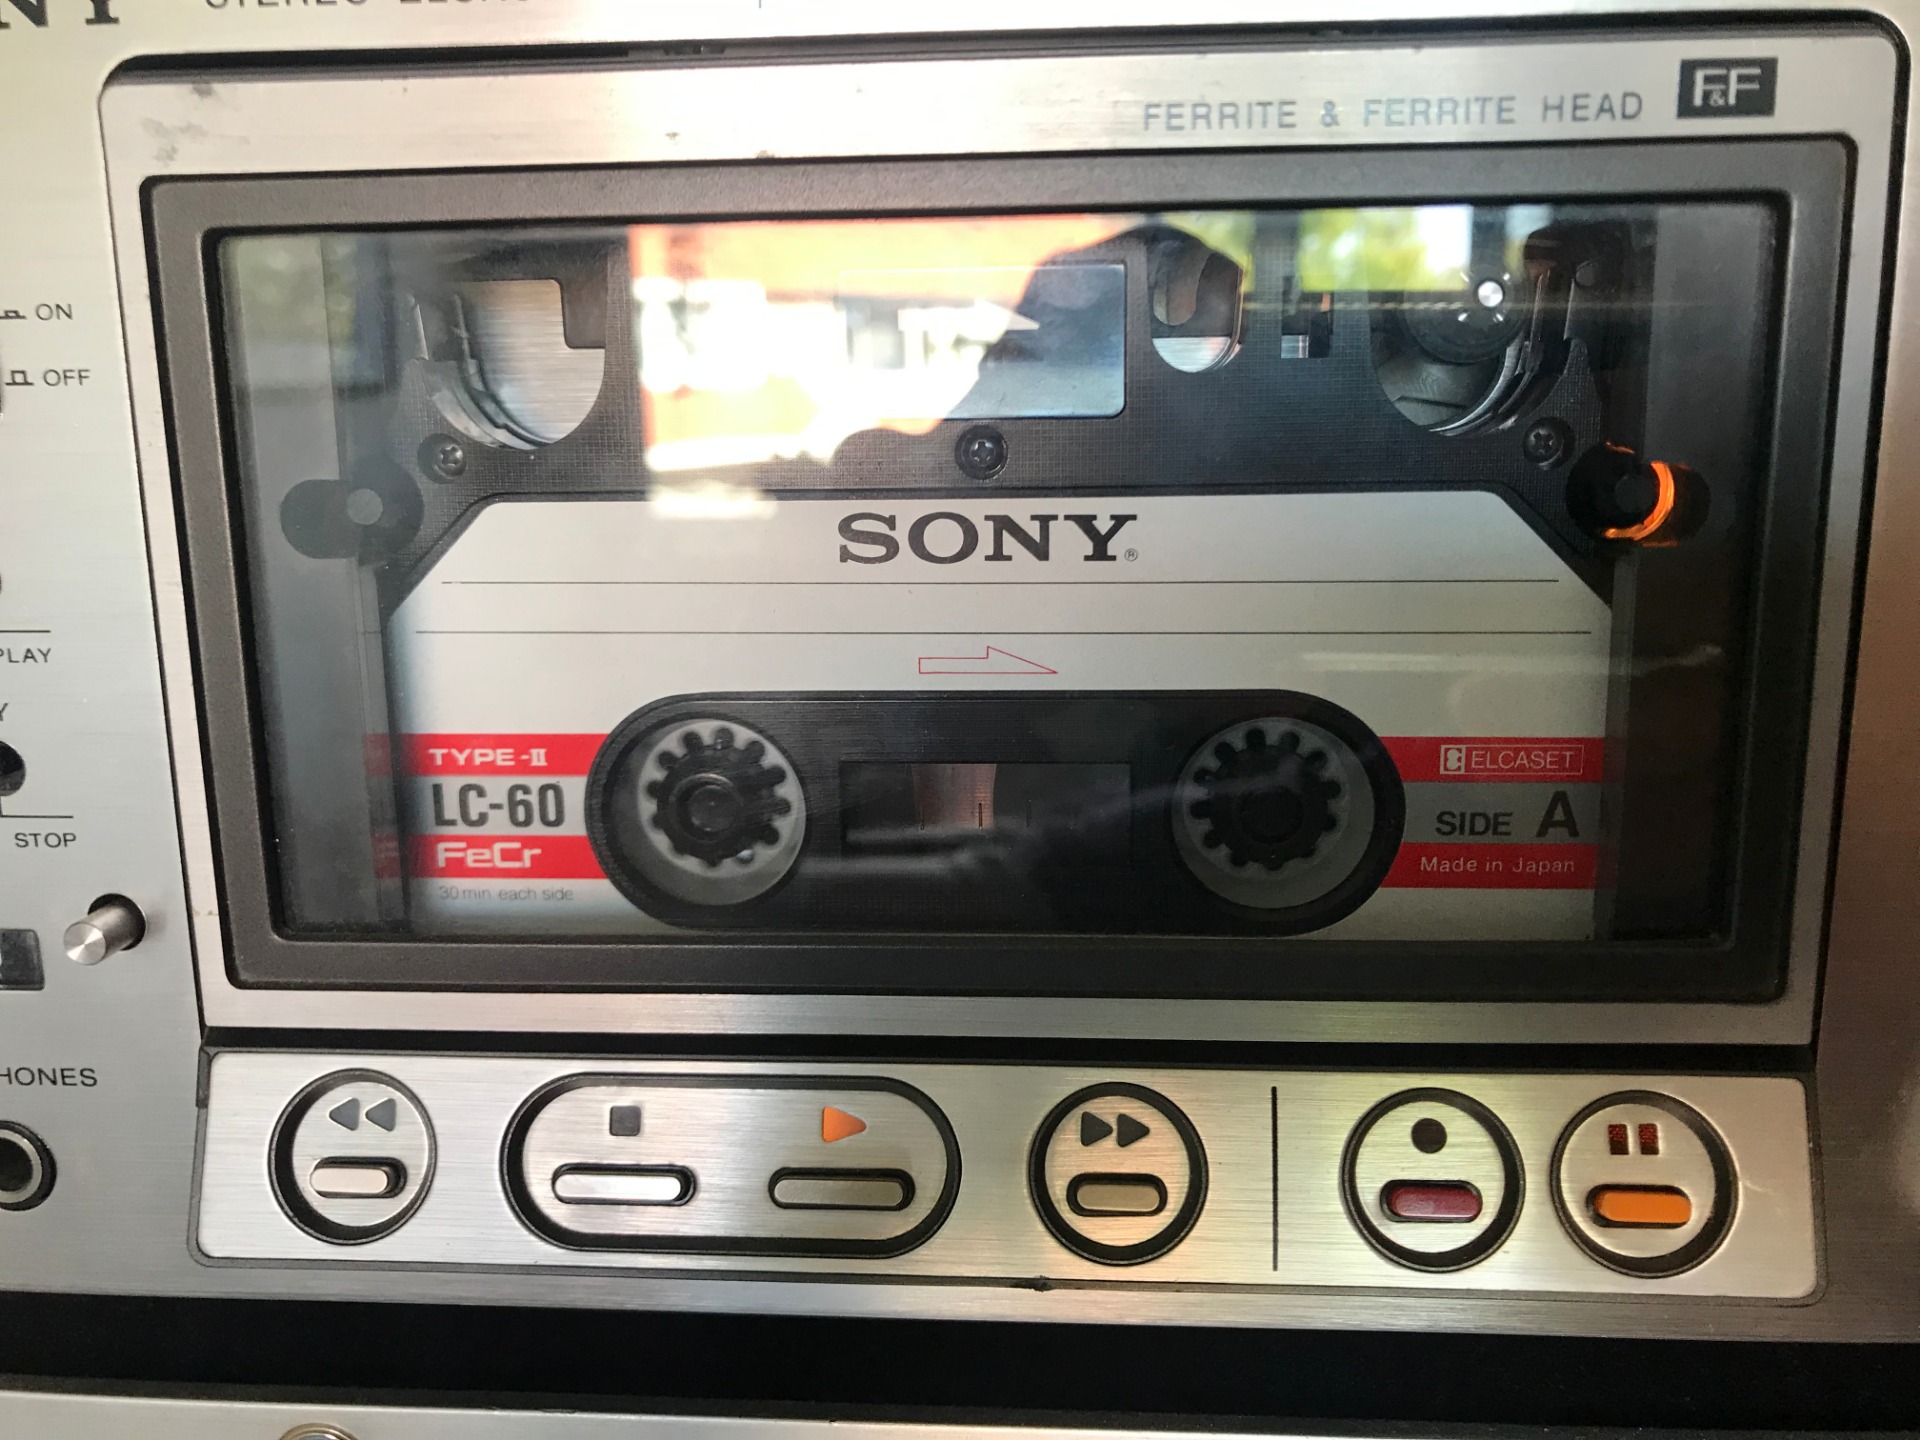
Not to forget, of course, the operation of the tape itself. Left to right:
- Rewind
- Stop
- Start
- Fast forward
- Record
- Pause
The buttons sometimes work in combination with each other, in the next topic 'Recording music' I go deeper into a number of buttons mentioned.

Could you afford this luxury, the Elcaset series from (as far as I know) Sony comes with the option of connecting a remote control, or with a cord. This through the rear.
I don't and don't need one. The remote control resembles the operation that you see on the recorder itself. You still have to operate the rotary and toggle switches on the device itself.

Finally, on the back there is a small rotary knob for setting the outgoing volume. Handy for when it doesn't meet expectations.
I haven't used it myself yet, I'm happy with what it's set to now. In addition, I still control the volume via the amplifier to which it is connected.
On other models you will often find some extra options, but these are often luxurious functions.
4. Recording music
Now we're going to talk about the most important (and longest) topic. Here we deal with recording music on the cassette.
We start with the most important part of recording: the source.
Over the years I have used a variety of sources to record music on analog media. In my case, the source has always been digital. I play music through a complex network of connections to one of the many recording devices that I have.

This small box (media streamer) has its own hard drive. I send music via my regular computer to this box, the box itself is connected to a 'Switchbox' with RCA cables. The switch box itself distributes the sound over different channels to my recording equipment.

To be precise, there are two switch boxes, one is in series to the other. After all, I have so many channels to choose from that a single box is no longer sufficient, there is a sticker on both cabinets for a reason, otherwise the overview is difficult for me to keep up with.

Because it sounds quite complicated when I have to describe it, an overview can be seen above that hopefully makes it clearer. I use the computer to prepare playlists, which I copy via my local network to the media streamer, from here I play music to switchbox 1, which is on channel 1 and send it to switchbox 2 which is on channel 3 and the sound back to the Elcaset recorder.
In short, another complicated scheme to describe how I record my music...
Let's just say I use a digital source to capture all my music on a physical media.

Finally, the cables connect to the 'LINE IN' of the Elcaset Recorder. White for the left channel, red for the right channel.
Mnemonic, if you take the first letters of the color and the channel, 'R'ed and 'R'ight match so you always know how to connect these cables.
Or you put a small sticker somewhere on a covered spot ;-)


Creating a playlist involves a lot for me, I have many different recording options so I also have my own layout to keep a good overview as can be seen in the pictures above.

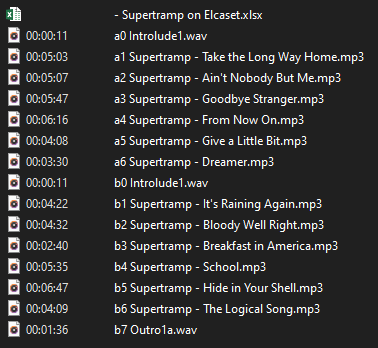
When I start a new playlist, I create a new folder, in which I copy the songs that I want to record. Once I have made a selection I select all songs and right click on Properties. When I click on the Details tab, I can see the total playing time of the selection. The goal is to make the playlist not much longer than the total playback time of a cassette, in this case 60 minutes total. After this I divide the songs on both sides of the cassette and put the songs in a specific order. I change the title of each song by putting a letter and number in front of it. I write all this on Excel together with the times.

The Excel file itself is a template I made to quickly and easily calculate the total playback time of a playlist. When I'm done I save this file and copy the songs to the media streamer. After this I can prepare the Elcaset recorder and the cassette for recording.
The Excel document is downloadable at the bottom of the Downloads page.
The user manual of the EL-5 is very well designed, under the heading 'Recording' you will find information about setting up the recorder correctly. The photo can be clicked to enlarge.
- The Timer function, it should be in the middle.
- The power button, you turn this on (logical).
- Open the door of the recorder and place the Elcaset (not yet, I will discuss that later).
- Set the tape type switches to the correct position.
- activate Dolby noise reduction if necessary.
- activate the MPX filter, only if you are going to make a recording from the radio, otherwise leave it off.
- Reset the counter so that it reads 000.


We now take an Elcaset tape, make sure the A-side is facing you, then the tape (visible through the window) should be on the left and the screws facing up. Sony says this is the official A-side, this doesn't seem very special, but if you have to open a band, this is handy to keep on.
When using a new cassette, make sure that you have checked the tape first that it runs properly, a 'new' unused tape can cause problems when using it, in this case read the repair page of the Elcaset which you can find here. Scroll down to the topic 'New Cassette'.
Before the cassette can be used, I turn the right reel clockwise with a finger that fits the hole, with this you tighten the tape. Do not turn it further than it allows, otherwise you will damage the tape. You will usually hear a single to three 'clicks' before it is tight.
Above is an overview of the overwrite protection. You can press this inwards if you want to prevent overwriting a previous recording. You can also press this up again if you want to record over an already existing recording.
In this case, they must be up, otherwise the recorder will refuse to record.

We can't start recording without first discussing the VU meters. The needles on the meters indicate the actual volume when sound is input to the LINE IN (and also during tape playback). The volume distribution is displayed in two ways. The lower scale is in Decibel and ranges from -20 to +5. The top scale is the percentage from 0% to 100% and is mainly used when you record with noise reduction.
Below is a snippet from the manual about setting your recording volume:

The VU-meter goes from -20 to +5, the intention is that during recording the VU-meters move between -20 and 0. Only a short peak may exceed 0 but must not exceed +5 . I always keep an upper limit of +3 to avoid disturbance of the sound.
Easier said than done, because every song is different, one may have higher peaks where the other is softer....
It is therefore useful to first determine at which level you should record, you can make an average based on the numbers you use. Or you can set the recording level for each track separately.

Before recording can really start, I start the playlist on the digital source and look at the VU meters for each song. To the right of the meters is the knob that allows you to control the recording level. I adjust this to a point where only the peaks of each number are +3. While the rest of the number is between -20 and 0. I write the readout of the knob on a piece of paper.
Once I've checked all the songs and noted their volume, I can finally start recording the music, at least almost then...

Although I already talked about pulling a tape tight, I go one step further by forwarding it a little bit until the white area on the tape is just visible, you should not see the tape itself. I do this manually, by pressing the brake and turning the right reel until the white part comes into view. Only then do you pull it tight to prevent slack. If you do not do the latter, there is a chance that the tape will jam during use.
I do this so that after starting the recording I don't have to wait for the tape (on which the music can be recorded) to reach the heads. After starting the recording mode on the recorder, I can almost immediately start playing on the digital source.
Only now do I place the cassette in the deck.

Check again whether all settings are correct, look at the following parts:
- Is the dial for incoming sound correct
- Have you set the correct tape type
- Is Dolby on or off
- Is the rotary knob of your Microphone set to 0 (this will prevent any noise.)
- Is the Elcaset with the A side facing you
- Has the tape on the tape been wound forward far enough (to the white part).
- Are other functions off (such as the timer settings and MPX filter).
If everything above is set up correctly, the recording can finally start!

I first press the play button with two fingers and immediately after that the record button.
You can also press the pause button beforehand, but that button doesn't always work for me.
As soon as you have pressed both buttons and you see the tape spinning, I start playing on the digital source. I try to do all these actions as quickly as possible.

Now pay close attention to the VU meters, they must run synchronously and not exceed the 0 limit (the red area) for too long. They should also not hang too low.
If I can trust a device I'll do some household chores in the meantime, as long as you can still hear the music playing and see the tape spinning you should be fine. When a song is finished, I adjust the volume knob to the next song.

As soon as the playlist is ready, I slowly turn the volume knob back to 0. I let the cassette run until the tape is completely at its end. The recorder should then switch off automatically as soon as the sensor sees the transparent piece of tape.
By doing this you ensure a smooth ending, if there are still old recordings on it you immediately overwrite them, otherwise you will hear them back the moment you have stopped recording manually.

When you're all done recording, you can take out the cassette. Make sure that the tape is in the correct position when removing, this is not always the case as can be seen in the two examples above.
You press down the brake again and turn the right reel clockwise until the tape is back in the housing and is rid of any slack, possibly hold the clip up if it clamps the tape.
After this, turn the cassette over, put it back in the recorder and start recording side B. I proceed in the same way as described earlier until side B has also finished recording and the recorder stops automatically.
When I take the cassette out of the recorder the second time, I leave a bit of slack that you had to remove earlier. I turn the reel through so that the tape no longer sticks out, but do not twist it tight. Should you store the Elcaset while it is taut, the tape may stretch over time and become damaged.

Don't forget to press the recording protection for both sides!

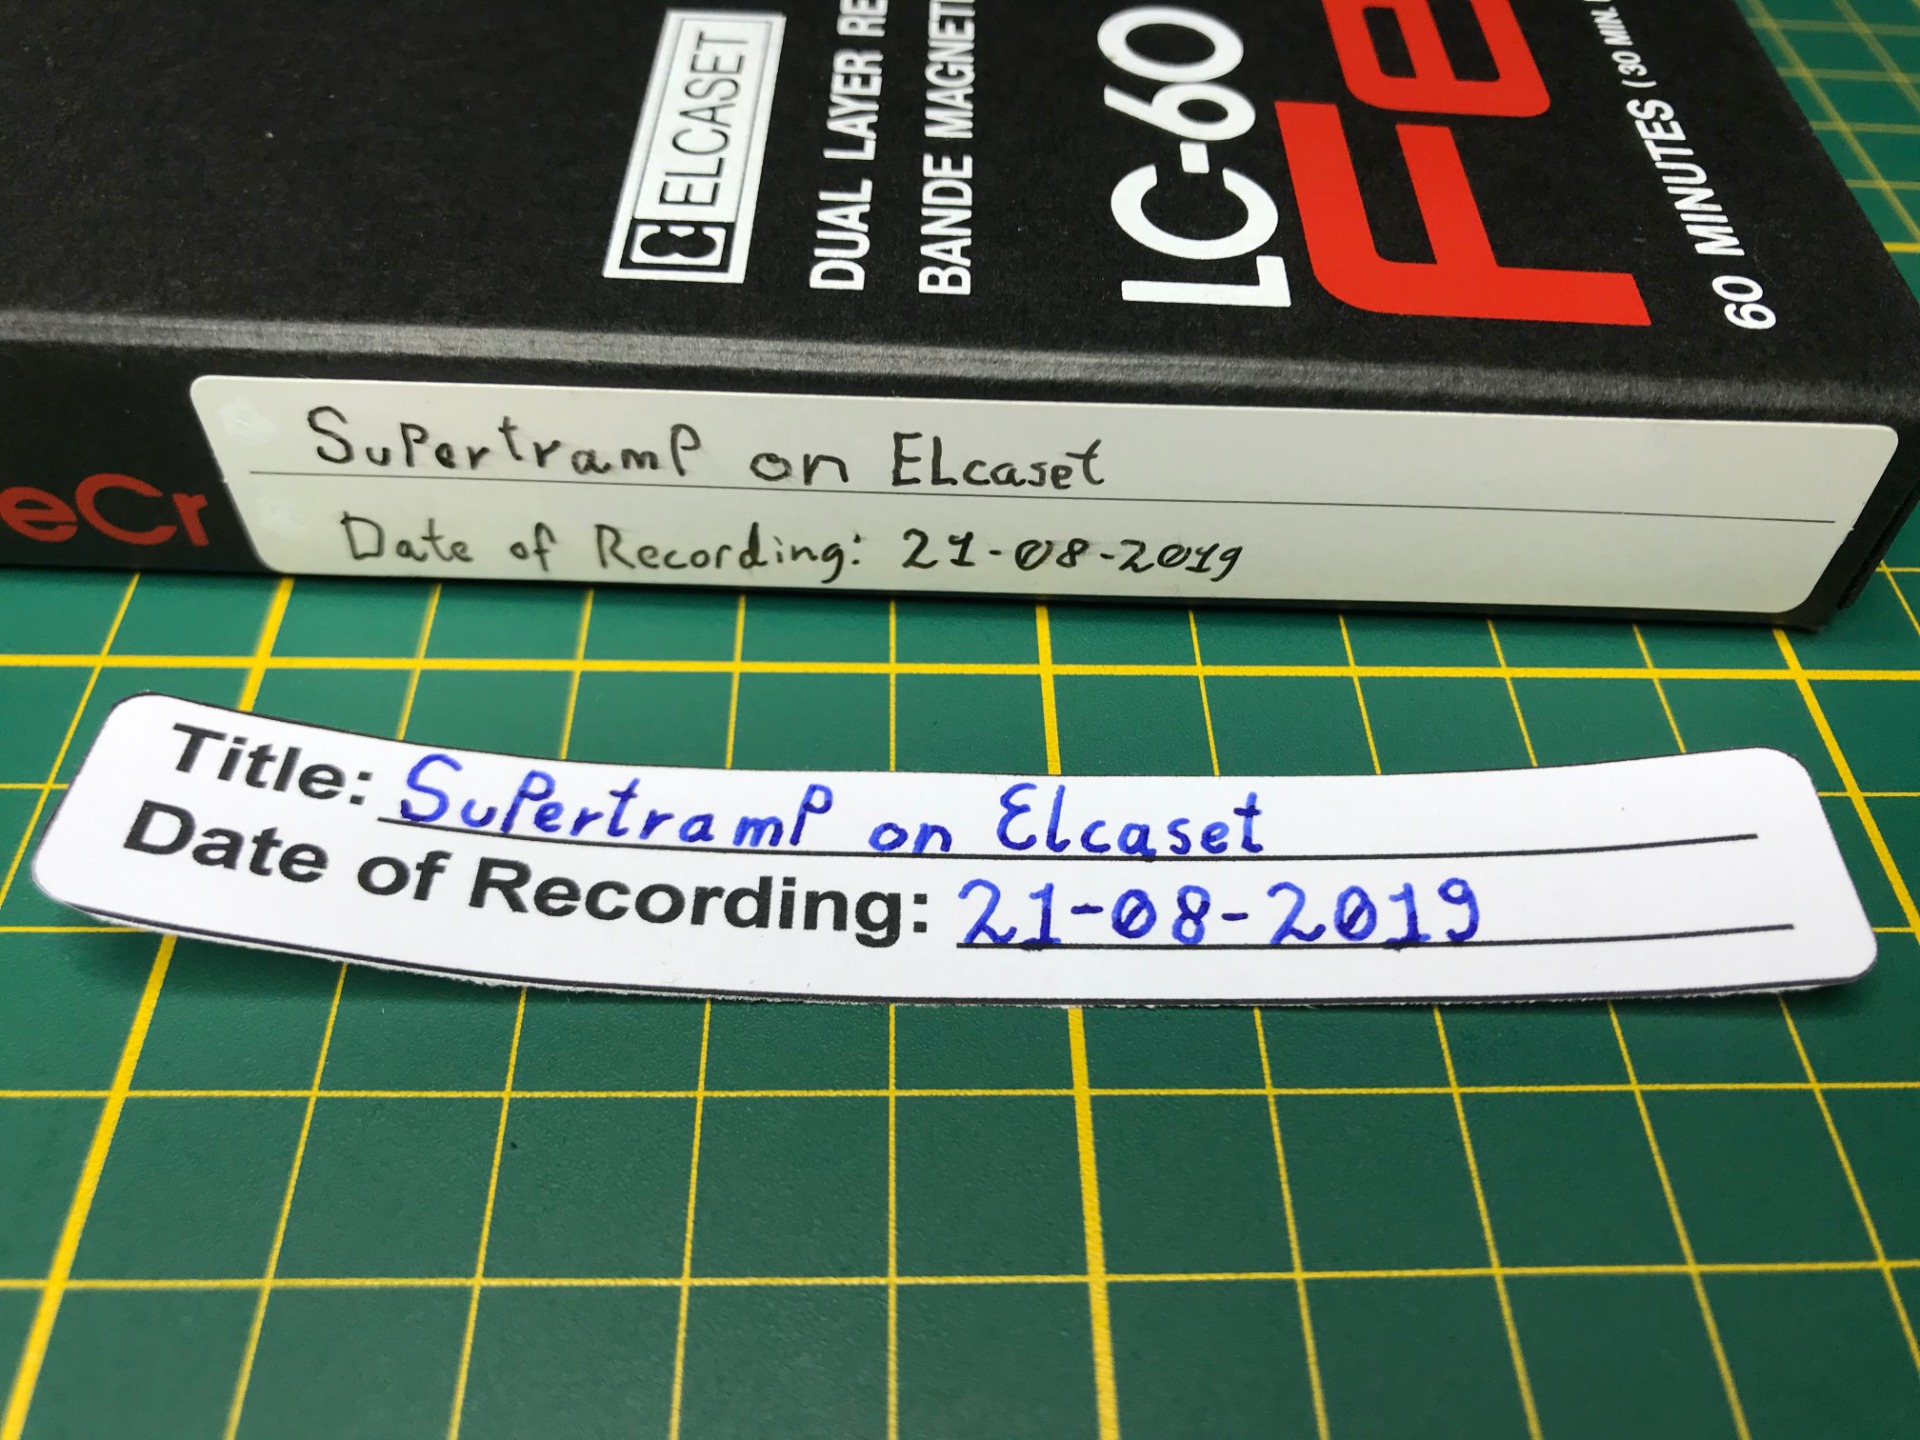
Because I made my recording on a new tape I still have to put the many stickers on it, I have to admit that these stickers don't always stick that well after +40 years. Sometimes the edges may come loose again. To fix this I glue the edges with a glue stick, a small bit of glue should be enough.

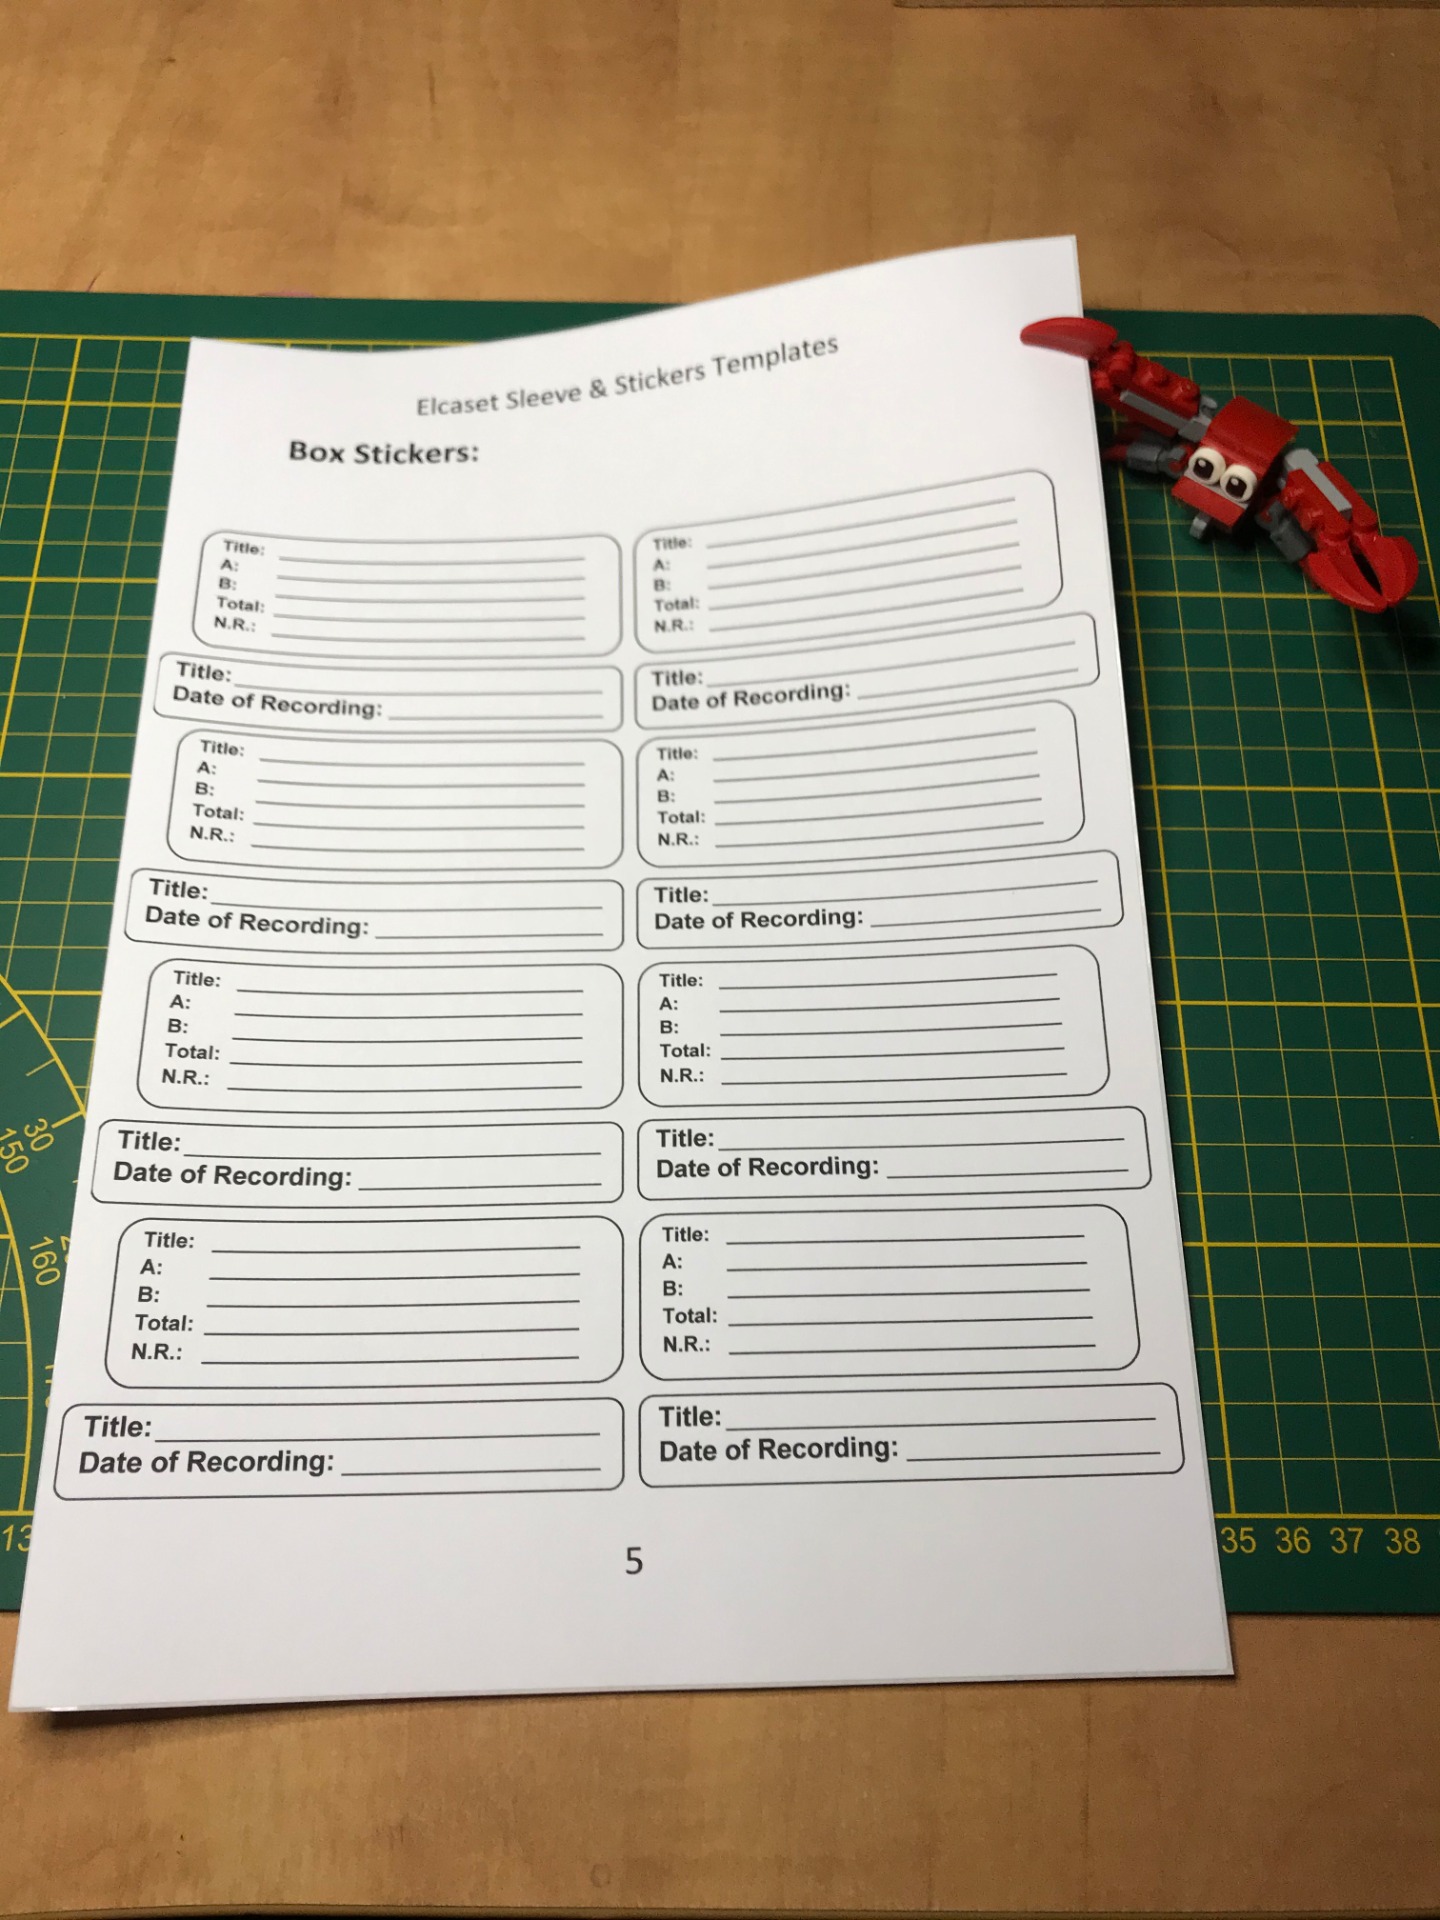
The sticker sheet contains an instruction of where to place which stickers.


Because it is also the first time that I have to stick these stickers, I find out the hard way that it is wise to write down the data before I stick the stickers on. My handwriting is not bad but if you have to do this on an unstable surface this is the result....
I am also left-handed so I have to be careful not to smear everything and let the ink dry in between.

And so I can add another Elcaset to the collection. I'm a bit bummed about the sloppy handwriting and the smudges, but I'll have to make do with it.
Update: I have now replaced the stickers on the cover with new homemade stickers on which the handwriting is a bit better. Unfortunately, the text on the cassette is still as shown above.
5. Maintenance and Adjustment
The Elcaset recorder generally needs little maintenance, although it is advisable to clean the heads after playing a few times (every 10 hours).

Below is a brief overview of cleaning in action.

The manual states that you should place the device in a well-ventilated area away from sources that generate heat. Always place the device horizontally when you use it, all standard rules that everyone actually understands, at least, I hope...
More interesting is the image with the difference between a clean and a very dirty head. It is therefore important that you keep it clean, this also extends the life of your heads and tapes!

Adjustment itself is hardly necessary, only possibility to adjust is on the back, the aforementioned rotary knob. Inside the machine you can of course also adjust some potentiometers, but this falls under repair for me since you need the right knowledge for this.
The latter should not be necessary either, this has all been done for you from the factory.

Finally, the page about problems and solutions. This can come in handy when the Elcaset recorder does things that are not supposed to happen.
Striking is the last problem "Howling or Hum noise" I used to have my Elcaset sitting on top of my amplifier but fortunately did not experience this problem. This has to do with the insulation of both the Elcaset recorder and the amplifier, a cheap amplifier can be poorly insulated against static electricity, so it can happen (especially after having been switched on for a while) that you will hear a buzzing sound.
You can solve this by placing the Elcaset elsewhere or switching your equipment off and on for a while. But moving remains the best solution.
6. Buy new tapes
We now come to the last topic, one that can determine whether you ever start with Elcaset or abandon the whole thing.
Elcaset tapes are expensive and hard to get! The only source for tapes is through used websites, Ebay to be exact!
Genuine new tapes are no longer made since the medium flopped. Tapes offered for sale may be used but with a bit of luck you will find a batch sale of new tapes that are still in foil or even in the original box!
I have to admit that most tapes are still in pretty good condition, partly because the medium hasn't been popular for long.


As you can see, prices vary widely, but the average is currently somewhere between $40 and $50 per tape (excluding shipping). I was able to get them for an average of $30 per tape. The price has risen sharply in a few months. (average price estimate is from mid-2020)
If you look at the photos, you will see that a few greatly exaggerate the price. Others give a discount if you buy a batch (which is also the best option).
You can also buy new labels for a reasonable price, but here too it is advisable to go for a batch since the shipping costs are again high.
Keep in mind that this is a snapshot, the supply is currently (mid 2020) fairly stable but prices change a lot.
Look carefully at the country where you buy the tapes, a tape from Germany is cheaper than from America, because of shipping costs, the sales prices also differ per country.
For now I have yet to experience that no tapes are sold, but there is a chance that this will happen in the future. Analog media is growing in popularity and the more people (like me) buy these tapes the rarer and more expensive they become!

I don't think I need to give any further examples, I recently managed to get a complete set myself, it wasn't cheap, but in the long run it should save me costs and I can use it again for the time being.
Finally, I really don't want to scare you, but here's a small overview of the prices of Elcaset recorders.... Of course also a snapshot, I expect these prices to increase as they become rarer. Mine (Sony EL-5) I scored 'cheap' because it didn't work well.

It is important that you first look up information about the medium and its recorders, check the prices carefully and record them over a period of a month or two, so that you can make an average of what the total picture will cost. I save this data in a table and update it until I make a purchase, also think of parts such as new belts or buttons, not all devices are immediately usable!
So much for the Sony Elcaset, a product built on quality, but ultimately a failure on the market. The competition at the time was tough, many different types of sound media and only a few that became popular, the Elcaset was not one of them.
7. Make your own insert cards
and more*
Another small bonus topic, I recently became the proud owner of a decent printer. This allows me to print new stickers and cards for all kinds of media, including the Elcaset.
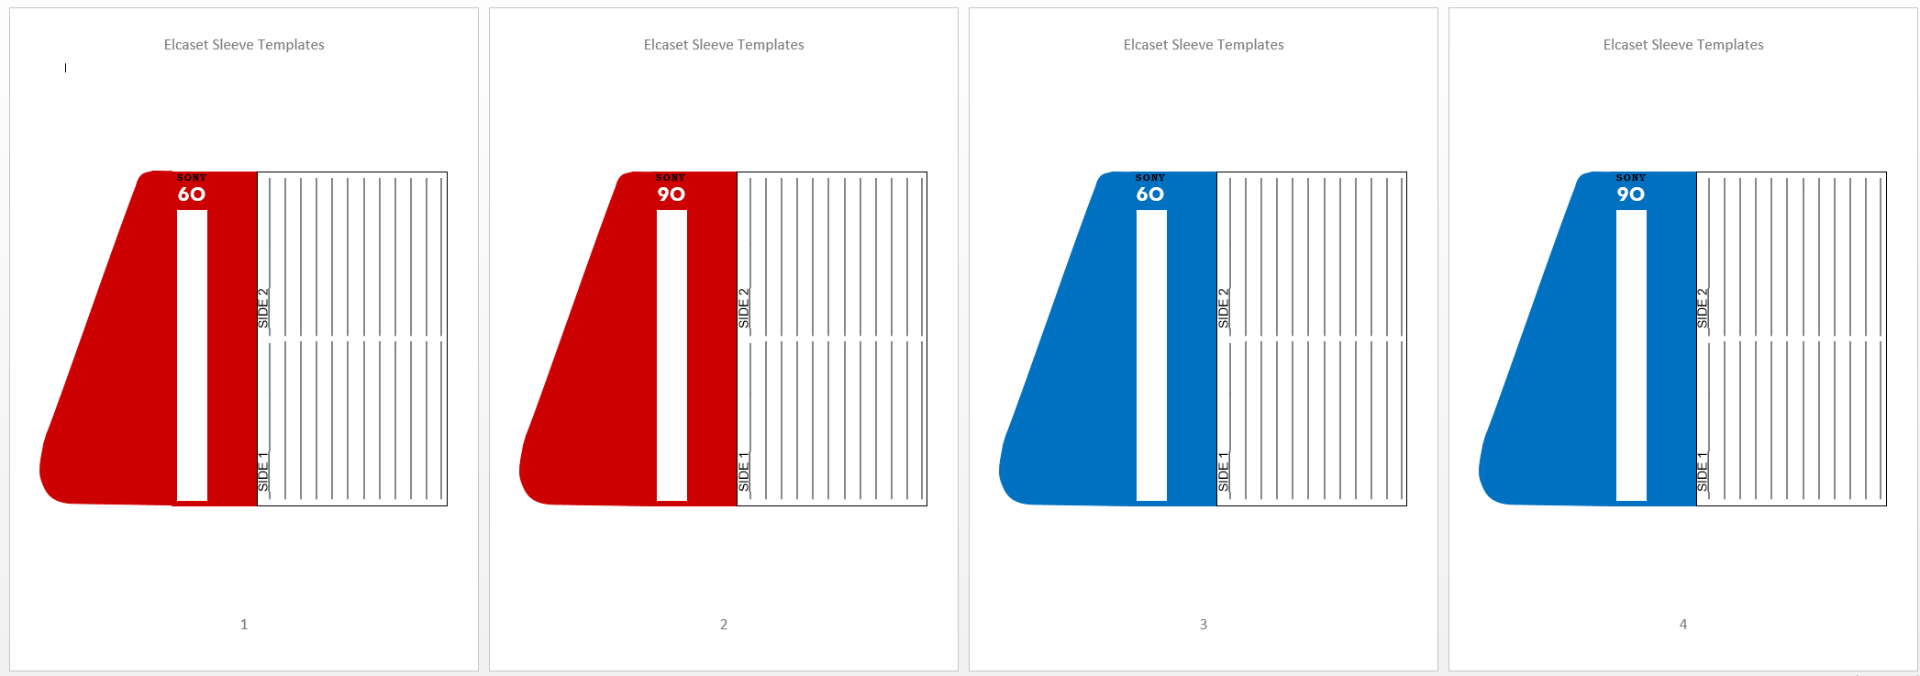
Here are the templates that I made myself, because I no longer have an original card for every cassette and if I still have them, they are written on or discolored...

To provide some extra strength, I use special paper that is twice the thickness of a standard A4 sheet. I also choose on the computer to print at the highest/finest possible quality, you use more ink but the result is worth it.

With a paper cutter, I cut away the unnecessary parts, this gives a better result than cutting and is many times faster. It can be difficult at first to cut everything neatly straight, but after a while you get used to it.

I will still have to do the round parts with the scissors...

I know the folding lines by heart, with a ruler I stop the card where the fold line will be, first I deliberately bend it the wrong way.

When the fold lines are in, I bend the card the right way again and finish the fold.
In fact, it's ready now, you could fill it in before folding, but I'm going to do it differently.

I used to write down the titles with a typewriter for a nostalgic finish.
However, my handwriting has developed far enough to write down the titles by hand.
It also gives a nice personal finish to the card when written by hand.
Of course I have to be careful not to make typos, I am tempted to start over again if I do so.

After typing, the card is warped a bit, but this can't hurt.

For comparison, the old card on the left and the new printed card on the right.
Another difference is that the new cards are not as shiny as the old ones, I don't miss it. It also makes it easier to take pictures with the lamp placed above it.
The curve at the top isn't quite the same, but I'm still satisfied.
The special cut in the card has yet to come, I have lost my cutting set at the moment...


It is wise to cut the corners of the card, so there is less chance of the card wrinkling when you put it in the sleeve.


The new slide-in cards give the Elcaset a fresh look again. Fortunately, the original cover itself still looks good too.

I go one step further because I like to go for complete perfection.
There are also stickers on the cover, which I replace with these printed stickers.

The new stickers are different from the original ones, but they have the same size.
These have prescribed text, I only have to fill them in.

Here the difference with the original stickers.


Before I stick the stickers, I make the old one black, so there is less chance that something of the old sticker will show through later.
I'm going to go through the tapes I've already recorded and make them equal to one another.

Here the end result.
The templates for the stickers and cards can be downloaded from this page for you to tinker with.
As stated before, it is my personal preference to do this with double thick A4 paper.