
Minidisc
The Minidisc is an optical medium, and works with a laser. The CDs themselves are small and come in a cartridge. There are also different types of Minidiscs. Playback equipment is still fairly modern and is often crammed with functions.
Not a distant relative of the CD per se, but it does give you capabilities that are unique to other portable mediums. Also, the whole concept is not yet very outdated and still fits well with this time.

Subjects:
- What is a Minidisc?
- Types of Minidiscs and Quality.
- Minidisc player/recorder.
- Record your own music.
- Portable players.
- New Minidiscs and Devices.
- Stickers!
1. What is a Minidisc?

A Minidisc (written in Dutch as Minidisk) is basically a small CD in a cartridge that you don't have to open.
I consider the Minidisc to be a mix between the CD and Compact Cassette.
reading and writing is done via a laser as with the CD. However, you cannot burn music to the disc, but you have to record it live like with the Cassette.
Playback is like with the CD, you can access songs directly without having to wind you can also shuffle or repeat them.
A Minidisc serves the same purposes as the Cassette. It is compact and portable. Players, recorders and Walkmans have also appeared on the market.
The Minidisc is robust as a Cassette with its housing, but delivers the quality you expect from the CD.
It is clear that the Minidisc would be the successor of the classic tape.
But after just under ten years it was replaced by the CD and Mp3 player.
In addition, the Minidisc has functions that you do not have on CD or Cassette, tracks can still be fully edited after recording, you can trim, split, merge, rename, delete and more. In theory, the disc is also infinitely reusable.
A Minidisc, just like Cassette's, has an overwrite protection.
You do this by operating the slide on the side, closed is writable, open is secured.


2. Types of Minidiscs and Quality.
Although there have been several types of MiniDisc on the market, we will talk about one specific type on this page, the 74 minute standard MiniDisc. Some manufacturers manage to stretch this to 80 minutes. Below is a simplified explanation of the MDLP (MiniDisc Long Play), Hi-MD and NetMD.
in 2000 the MDLP came on the market, the advantages of this type are the higher recording times which is double or even a quadruple of the standard MD. The downside is that this comes at the expense of quality. Especially at the quadruple recording time, the quality is reduced considerably to save space. Finally, the MDLP is quite rare and can only be used on compatible players, also both MDLP and player/recorder are very expensive...

in 2001, Sony released the NetMD player. This system makes it possible to burn digital files directly to an MD (such as the CD). But this requires a specific player as well as special software (SonicStage) which only works on (older) Windows versions. I should also not forget to mention that it takes a special cable to connect the recorder to the PC.
In 2004 Sony released the successor, the Hi-MD, with which up to 45 CDs could be recorded. Furthermore, this type of MD could also be used for data storage up to 1GB. I can tell a lot about this type but we'll keep it short here. Hi-MD never really caught on, partly due to the many problems associated with this type as well as the rising popularity of the CD, USB and solid storage methods on MP3 players.
Before the NetMD and HI-MD, Sony released a storage version of the MD in 1993 with 140Mb of storage capacity (later upgraded to 650Mb). This was only used in Sony's own line of Camcorders, cheap and this variant was not a success either.
Regarding quality, it differs per type of MD, the standard version works with a compression technique called ATRAC, any form of compression equals loss of quality. Still, the sound quality comes close to CD/mp3. With later MD versions, the quality was slightly upscaled (other recording techniques) but was canceled out if you opted for more storage space. Quality is of course also strongly determined by the source from which you record the music.

Albums have also been released on Minidisc, large editions have never been produced, making it difficult to get hold of here. If they appear on an online store, they also go for top amounts. More on this later.
3. Minidisc player/recorders.

Initially, another player would be shown here. But due to unexpected problems, we're going to look at his substitute.
The Yamaha MDX-9 Minidisc recorder (with remote control)!
We are going to take a closer look at the device, it contains a lot of functions that I will not describe all of them, I will supplement information with the manual.


For a fairly modern device, there is still a Timer function built in.
This allows you to have the recorder switched on at any time via an external timer, in case you would like to record something when you are away from home. You can also let it play at a specific time of the day. Maybe nice for when you just come home at a fixed time?
If you want to play music via a timer, it is wise to also connect the amplifier to the timer. Otherwise, it must remain on all day, which is not wise...
When recording, this is not necessary.
Below it is the Power button. To the right of it (the black spot) is the infrared receiver of the remote control, so aim for that if you want to make use of that luxury.
The MiniDisc logo is universal, it is the symbol for this type of media.

- With the DISPLAY button you can switch the screen between the title, time, etc.
- The TITLE, CHARA(CTER) and DELETE/CANCEL buttons I will come back to later, you use these for entering and editing titles.
- With the EDIT button you can edit, move, split, merge, delete and more the tracks on a Minidisc! (A sort of options menu).
- On the far right is the SET/ENTER button, which you use in conjunction with the EDIT button.
- Above the opening for the Minidisc, on the right the button to eject it.

The most commonly used buttons are located here.
- Use the rotary knob on the left to scroll through numbers.
- Above it are the buttons to fast-forward through a song, by the way, this winds faster when the song is paused.
- With the Input button, you can switch through the different inputs of the device, I am currently recording via an analog channel, I would use the optical input I can record digitally.
- The record level knob is for the incoming sound, for both channels. It is difficult to read what the level is without numbering.
- The small button is the Rec(order) button. once you press this, the device switches to recording mode (it doesn't start recording right away).
- To the right are the Stop and shared Play/Pause buttons.
Of course there's the screen, I don't have any other device in my collection that has a digital screen. Personally, I think this yellow/orange LCD screen has something to offer.
The screen displays all functions that are enabled and displays information about the MD and contents.
The volume bars are also displayed on the screen, because the screen has sunk into the frame, I can't see the bottom soundbar from my position...


Two excerpts from the manual, about the functions of the screen during playback or during pause.


Before I forget, we still have the remote itself.
There are so many functions on it that I won't even describe them, the manual describes them all, but not just on one page. You can do so much more with the remote than with the device alone!


The connection methods of the device, I connected my analog input to the computer, the output to the amplifier (on the Aux connection).
Compared to my other audio stuff, the device is a big exception, almost everything on this device is controlled digitally, even the buttons are not directly responsible for the actions. Only the Power button may in theory still be called analog.
I have already recorded digitally via the optical cable from my regular computer, but this PC has a strange problem that causes a lot of noise, I now record everything via a separate compact computer. There is no digital connection (yet), so everything will be analog for the time being.
4. Record your own music.
Now we've come to the fun part, recording music on a Minidisc!
About the Minidisc itself, it is not only a carrier of your music, but also contains all the information needed to play the music.
The number of tracks, their duration and of course the titles of both tracks and Minidisc.
However, not all information is captured automatically. A large part has to be filled in by the user.
Let the action begin...

I have already made a note of the incoming volume in advance, for this Minidisc it will be an easy recording, I play most songs at a volume level of 5.
Recording can be quite difficult, especially if songs come very close to each other (little silence ) and many differences in volume.

We're going to refer to the manual more often, let's at least reverse the 'colors' to match the website layout :-)
It is mentioned that you can easily listen to the incoming sound without inserting a Minidisc so you can decide at what level you want to record each song.


Take a blank MD, or Erase a used disc.


TOC stands for Table Of Content... (scrolls through manual quickly).

Yes, Table of Content(s). This means the information associated with the numbers. After recording and when ejecting the MD, the unit records the information on the disc. Until then it is stored in (volatile) memory in the device itself, only the music is recorded directly on the disc.
I've already experienced that after recording and editing, the writing took much longer than expected. After a minute the machine spit out my disc but hadn't recorded anything...
I suspect this happens when the device has to remember too much information (the memory is full). I had performed many actions without writing this in between.
On the second attempt, however, all information was recorded on the Minidisc.
Back to recording.

Press the REC button, the screen will indicate that it is now in standby.
You can start recording by pressing the Play/Pause button.
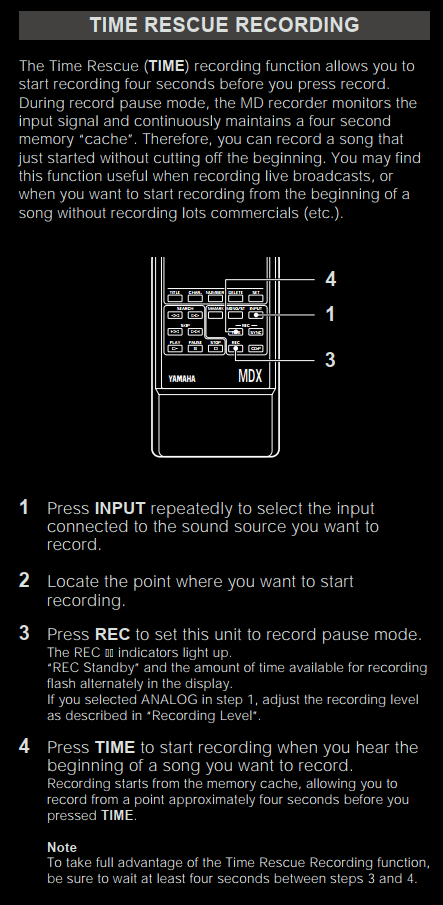
Time rescue and Synchro recording, with this you can not only start recording a few seconds before pressing the button, but also start recording as soon as sound is detected.
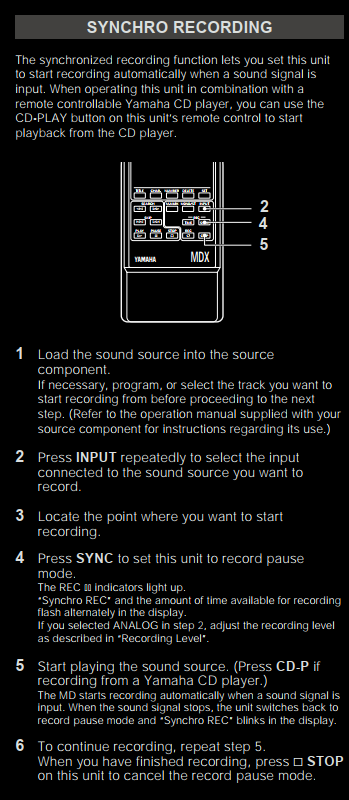

I also want to mention that you can record a Minidisc in Mono, this doubles your recording time! But sound is much better in Stereo, especially if you listen to it on the go (with headphones or earphones).

While recording, there are more active functions in the picture.
An important one is 'MANUAL', explained below:

A snippet from the manual on how to enable Auto or Manual Marking.
This allows you to take control into your own hands and determine when a song starts or ends. But you can also let the device do it.
I myself have chosen Manual Marking from the beginning and have never tried Auto Marking.

As soon as a song is about to end, I hold my finger on the REC button and press it silently to announce the next song. The device remembers this and will write this on the Minidisc when it is ejected.
On Auto mode, it marks the next track after a 1.5 second silence.
In my case it often happens that numbers follow each other with little silence in between, because of this the device does not recognize this.
A solution to this is to add a silence to all songs yourself, but that is too much work for me.

It sometimes happens that I press the button too late, I then stop the recording.
I look up the number and scroll to the end. Now if I press EDIT several times I can split the song. Press SET/ENTER to perform this action.
The device will then play a sample of where you left off. Pressing SET again will highlight where the new track begins.
I find it easier to mark the songs during recording than to do this afterwards. Scrolling through tracks takes a long time and it's not easy to split a track from the sample.

I delete the next song where I stopped recording.
Do this again by pressing the EDIT button until the Erase function appears.
Press SET to delete the number.

Did the split not go well? If you press Stop first and then EDIT you will be given an Undo option. This extra option sometimes comes in handy.
Don't scroll through the EDIT menu too fast, the option to delete everything is also there!

After splitting, I press Stop to go back to the general view. Now press rec to continue recording from the end. If you don't press Stop, you run the risk of overwriting the current number (it also warns you about this).

When we are 18 songs further, the Minidisc is completely full. The playlist is almost over, the last peaks in the sound fade.
When the last track is finished, I press stop and eject the disc.

Still, it is exciting for a while, but after just under 10 seconds the Minidisc comes out. The writing was successful.

In my setup (and collection) there is no other device that I have a remote control (except the other Minidisc recorder).
I put the disc back in to start writing the titles. I also put the recording date after the title of the disc.
It seems very simple to do from the lazy chair, but it is actually a time-consuming job to fill in all the titles correctly, you quickly lose half an hour.
The principle is the same as with an old mobile phone, above the numbers are letters. But the layout is different. You also need to confirm each letter you choose.
I also use capital letters, which makes it even more complicated. A Shift button does not exist. So you have to switch back to lowercase after every capital letter. Don't forget to confirm the letter first....
Once you have entered a title, press the TITLE button again and check for typos.
Repeat this 19 times in total and all the information is recorded, not on the disc but on the device. cast it out again and hope the writing goes well.
Now don't forget to enable the recording protection, not only protect you, your recording but also writing information is now no longer possible.
The slider can also be put back if you want to make some adjustments later.
5. Portable Players.
Yes, portable Minidisc Walkmans. That completes the Minidisc picture.

Here's a pile of players, I had actually counted on two players, but there were more...

Here's a better overview. Introduce:
- JVC XM-P55 (top left)
- Sharp MD-ST521-A (top right)
- Sony MZ-E65 (bottom left)
- Sony MZ-E20 (bottom right)
My idea was to buy a neat (special) and an everyday model.
The choice fell on the two candidates on the right. The Sharp MD-ST521-A and the Sony MZ-20. I got the Sony MZ-65 as a gift from an acquaintance, I eventually bought the JVC XM-P55 as a backup with good reason. (explanation to follow).


All players have a mechanical slide for opening the lid.
The general controls are often located on the side and bottom of the device.
Some have features that others don't, some are newer (and more compact), others are more robust and have more battery storage.


I bought the Sony MD-E20 (from 1997) on a second-hand website. The previous owner had his name and house number engraved on it, I masked this via Paint.
It is packed with features, a 'Mega Bass' Boost and AVLS (Automatic Volume Limiter System). With the latter function, you limit the volume to below a threshold, which reduces noise during playback and can limit hearing damage. I have it turned off...
On the bottom you have buttons to repeat or shuffle the songs or playlist.
There is also a slide to lock everything. This way nothing is accidentally pressed when you have it in your pocket.
The operation of the Minidisc itself is on the side of the device, the screen is next to it.
It's the only player I own with a built-in LCD screen, although there's no backlighting, the screen is still pretty easy to read when in the right light.
Finally, the volume control on the top.
It's my everyday Walkman, I use it on my bike and when I travel by train.
It is robust, plays well and has a large battery capacity.
The other three players are very different from the ones mentioned earlier. They all have something in common but are also different from each other.

The first notable thing is that they have some sort of remote control. A compact LCD screen and many buttons. They all still work, but I'd rather not use them.
Although they are made for convenience, I find the operation very uncomfortable. They are also very fragile, the cables will never last long and the connection to the device is also unique and irreplaceable...
Yet sometimes there are functions that you cannot operate on the device itself. This makes the extensions necessary to get the most out of the player.

But you can also use the player without the extension, you might miss some special features but I'll be happy with it. In addition, I rarely touch the device once I've started it, just to adjust the volume a bit.

Both the Sharp and JVC have the option to add an extra battery compartment.
Unfortunately I don't have the Sharp's, but the JVC does have one.
It contains one AA battery. Sufficient to power the device for a good few hours.
Yet this is the alternative method, because there is another type of battery that can be used.

The other option is a 'Gum' battery. These standard rechargeable batteries have been specially developed for these types of compact players.
They are rare and need a special charger...

The Sharp also uses this type of battery, but this one is slightly different...

So both players have different types of batteries. Both batteries need a different charger, they are no longer produced (as far as I know)...
Because I don't have an AA battery holder for the Sharp, I can't use it yet, hence the purchase of the JVC player .
I don't use the flat batteries, they are old and I don't trust them anymore.

You can of course also install an AA holder, but it doesn't look very neat.


Before we continue, a view of the inside, you put the Minidisc itself in a sled that is often in the lid of the player. Click it all the way in before closing the lid.
6. New Minidiscs and devices.
Minidiscs are still fairly easy to get, the pictures shown here are from the national second hand market webshop, Refer to Ebay instead in case you live outside the Netherlands.

For now I only type in the word Minidisc, the results are varied, the prices also remain fairly low.


With ease you can get a complete set that you can use for months.
So commercial albums have been released on Minidisc.
These are often not cheap and rare.
I was able to find one that sells on a 2nd hand website for €20. But if you look further, the prices go up quickly. A hundred euros or more is not uncommon when you search for albums on Minidisc.
Due to the rarity and price I have never looked at them seriously myself, I prefer to record them myself.


Walkmans are also easy to get for acceptable prices (or by bidding), mostly Sony models (they have introduced the Minidisc after all).
They often still look neat and work well.


The recorders can be a bit more expensive, unless you look hard. Some are not aware of the 'current' price and sell a whole tower for a small amount, sometimes a good Minidisc recorder is hidden in between!
Prices will rise in the future, but for now they are still widely available.
Of course you don't have to look online, thrift shops (especially in cities) sometimes sell devices to play or record Minidiscs, the prices here may vary though.
All prices mentioned are quoted on January 2020
7. Stickers!

I make stickers on the computer. Through the program Microsoft Office - Word, you can draw shapes based on real sizes. By measuring existing stickers or adhesive locations with a ruler, it is possible to make new stickers yourself.


With this hobby you must have a broad taste in music, after all I also have to take into account that I have other media on which I want to record music. For the Minidisc I currently have 8 discs and have about 6 more in the planning, after this the recording will stop for the time being.
The templates can be downloaded on this page.