
Cantata 700 cassette
repair part 1
Once on the market as background music for factory floors or in shops. from the 1960s well into the 1990s. Of course, nowadays superfluous and replaced by digital media. Nevertheless, these tapes can still sound quite good if you give them enough love and maintain them well...

First a word beforehand. Shown here is a still pristine cassette of Christmas music, to be precise, this is the "Christmas Rhythmic Library 266" (RX-266 for short).
Each cassette has its own genre and type number.
This cassette has seen very few running hours and even came with the original cover. Logical, of course, given that the cassette is seasonal. After all, there are also cassettes with general music that have been played much more often, so you can see this clearly on the cassette.

The cassettes fit on this device of the same name, the 3M Cantata 700 BMS
(BMS stands for Background Music System). The device is not discussed much further here. For this I advise you to read the repair and information page of the type of medium.

For the past month I've scoured the internet looking for such cassettes and managed to get my hands on eight in all. These came in last week.
But the catalog is much bigger than that!
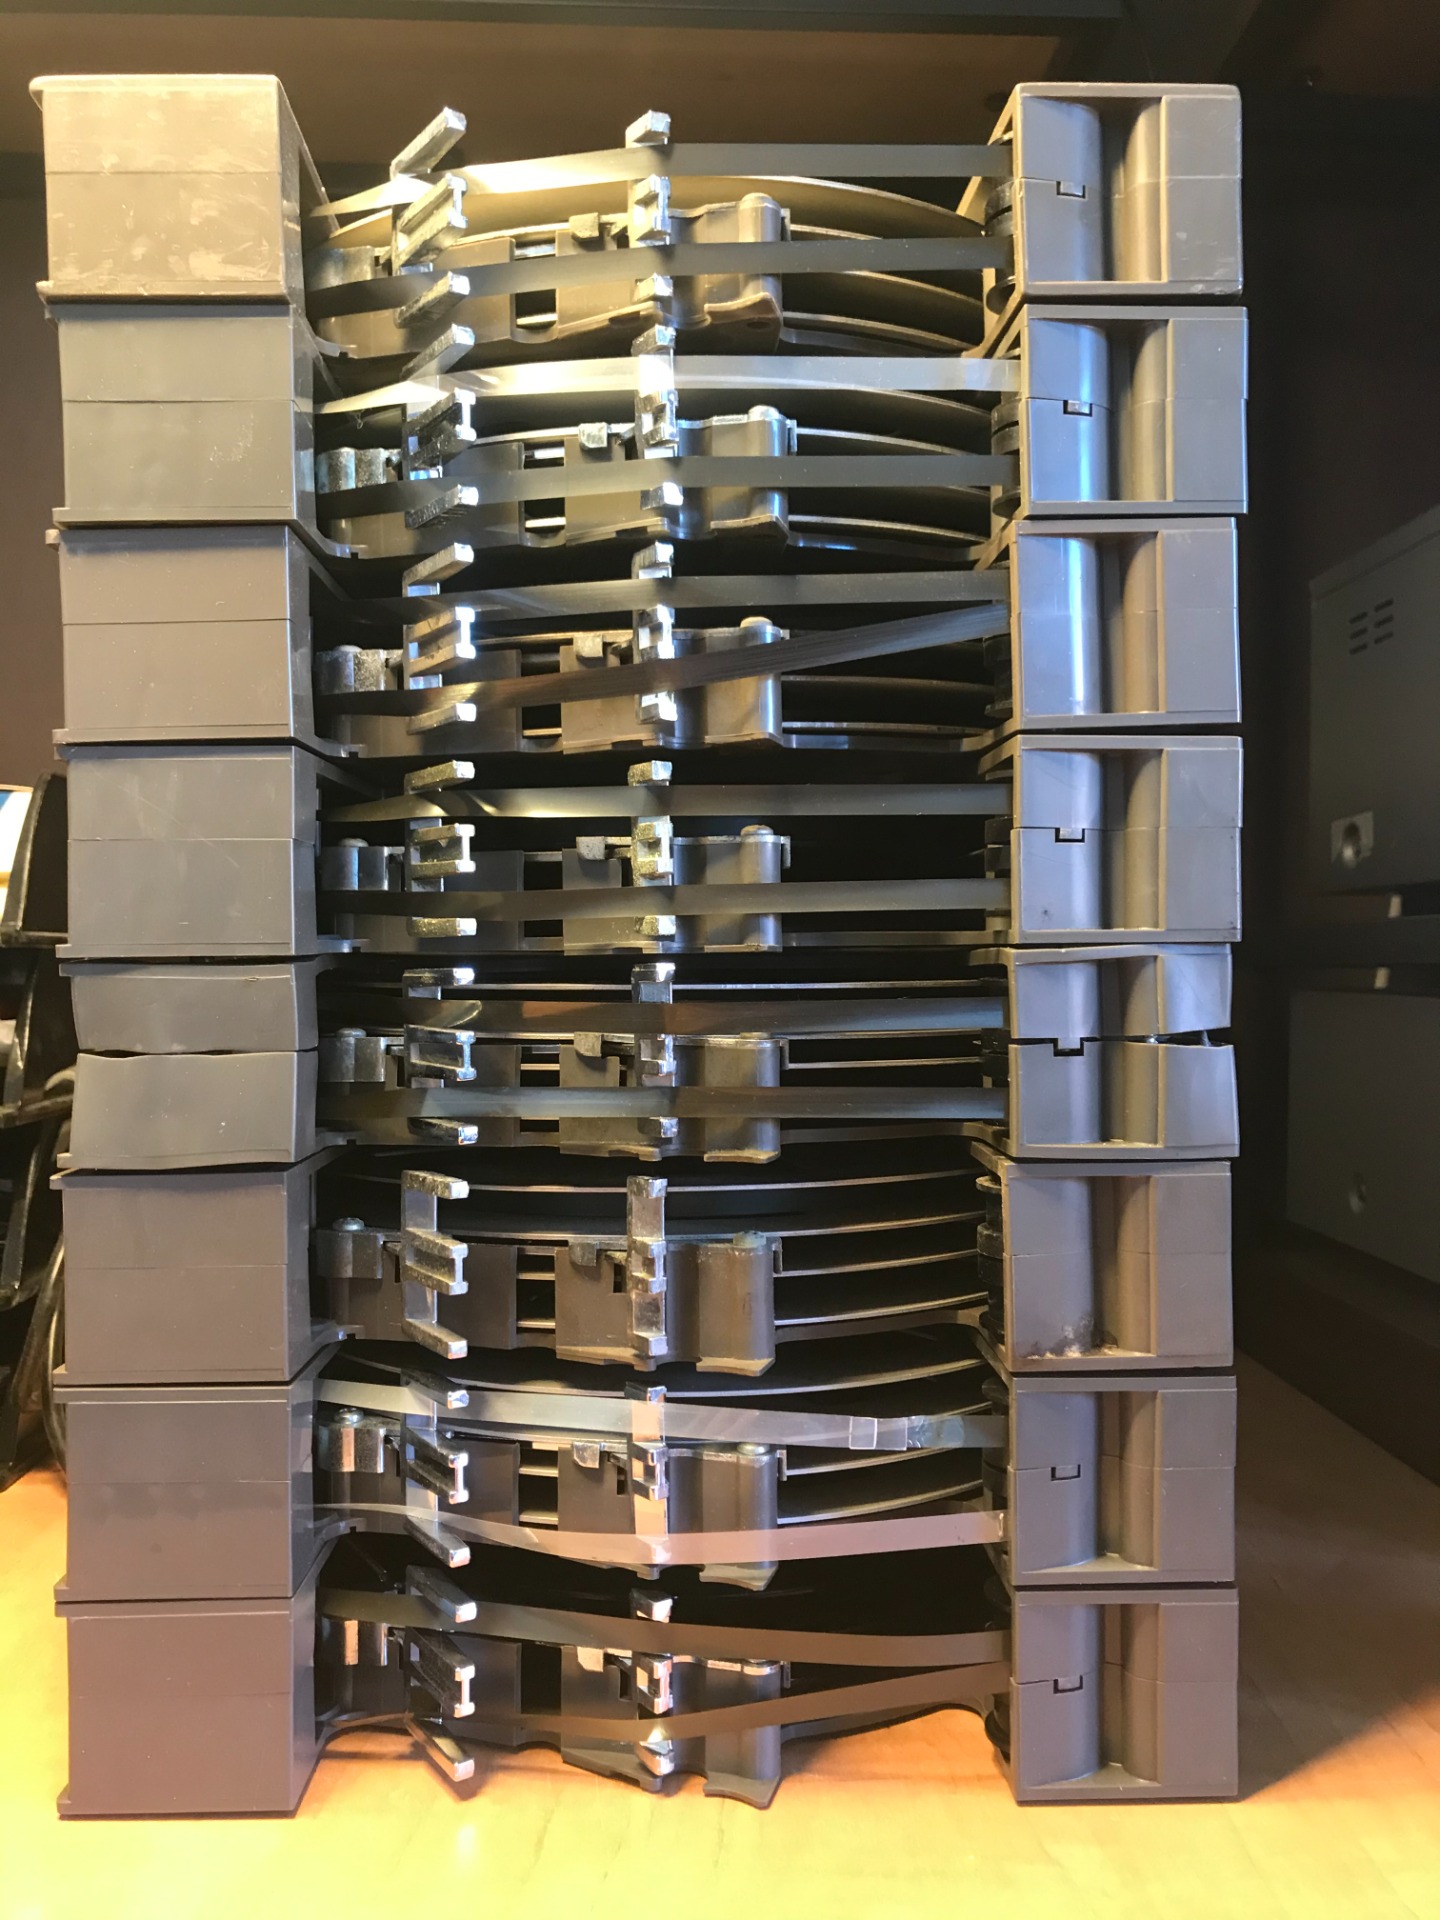


I go through the eight cassettes one by one, take them apart, see where maintenance or repair is needed, and finally test them on the machine to see if they work properly again. I then keep track of the situation in the catalog. And the progress is described below.
Incidentally, each cassette has its own story to tell, the oddities that I encounter often point to this.
The requirements to repair these cassettes vary a lot, usually some grease and alcohol is enough. But for some it takes more to get it going again. Below is a complete list of parts I used.
- Phillips screwdriver (PH1)
- A large stock of cotton swabs
- Grease (preferably ball bearing grease)
- 96% alcohol (Ketonatus)
- Nylon webbing with abrasive grain (Scotch-brite)
- Damp household wipes
- tissues
- Tweezers
- Phillips head screws (ball head) 4.0mm diameter, 25mm long.
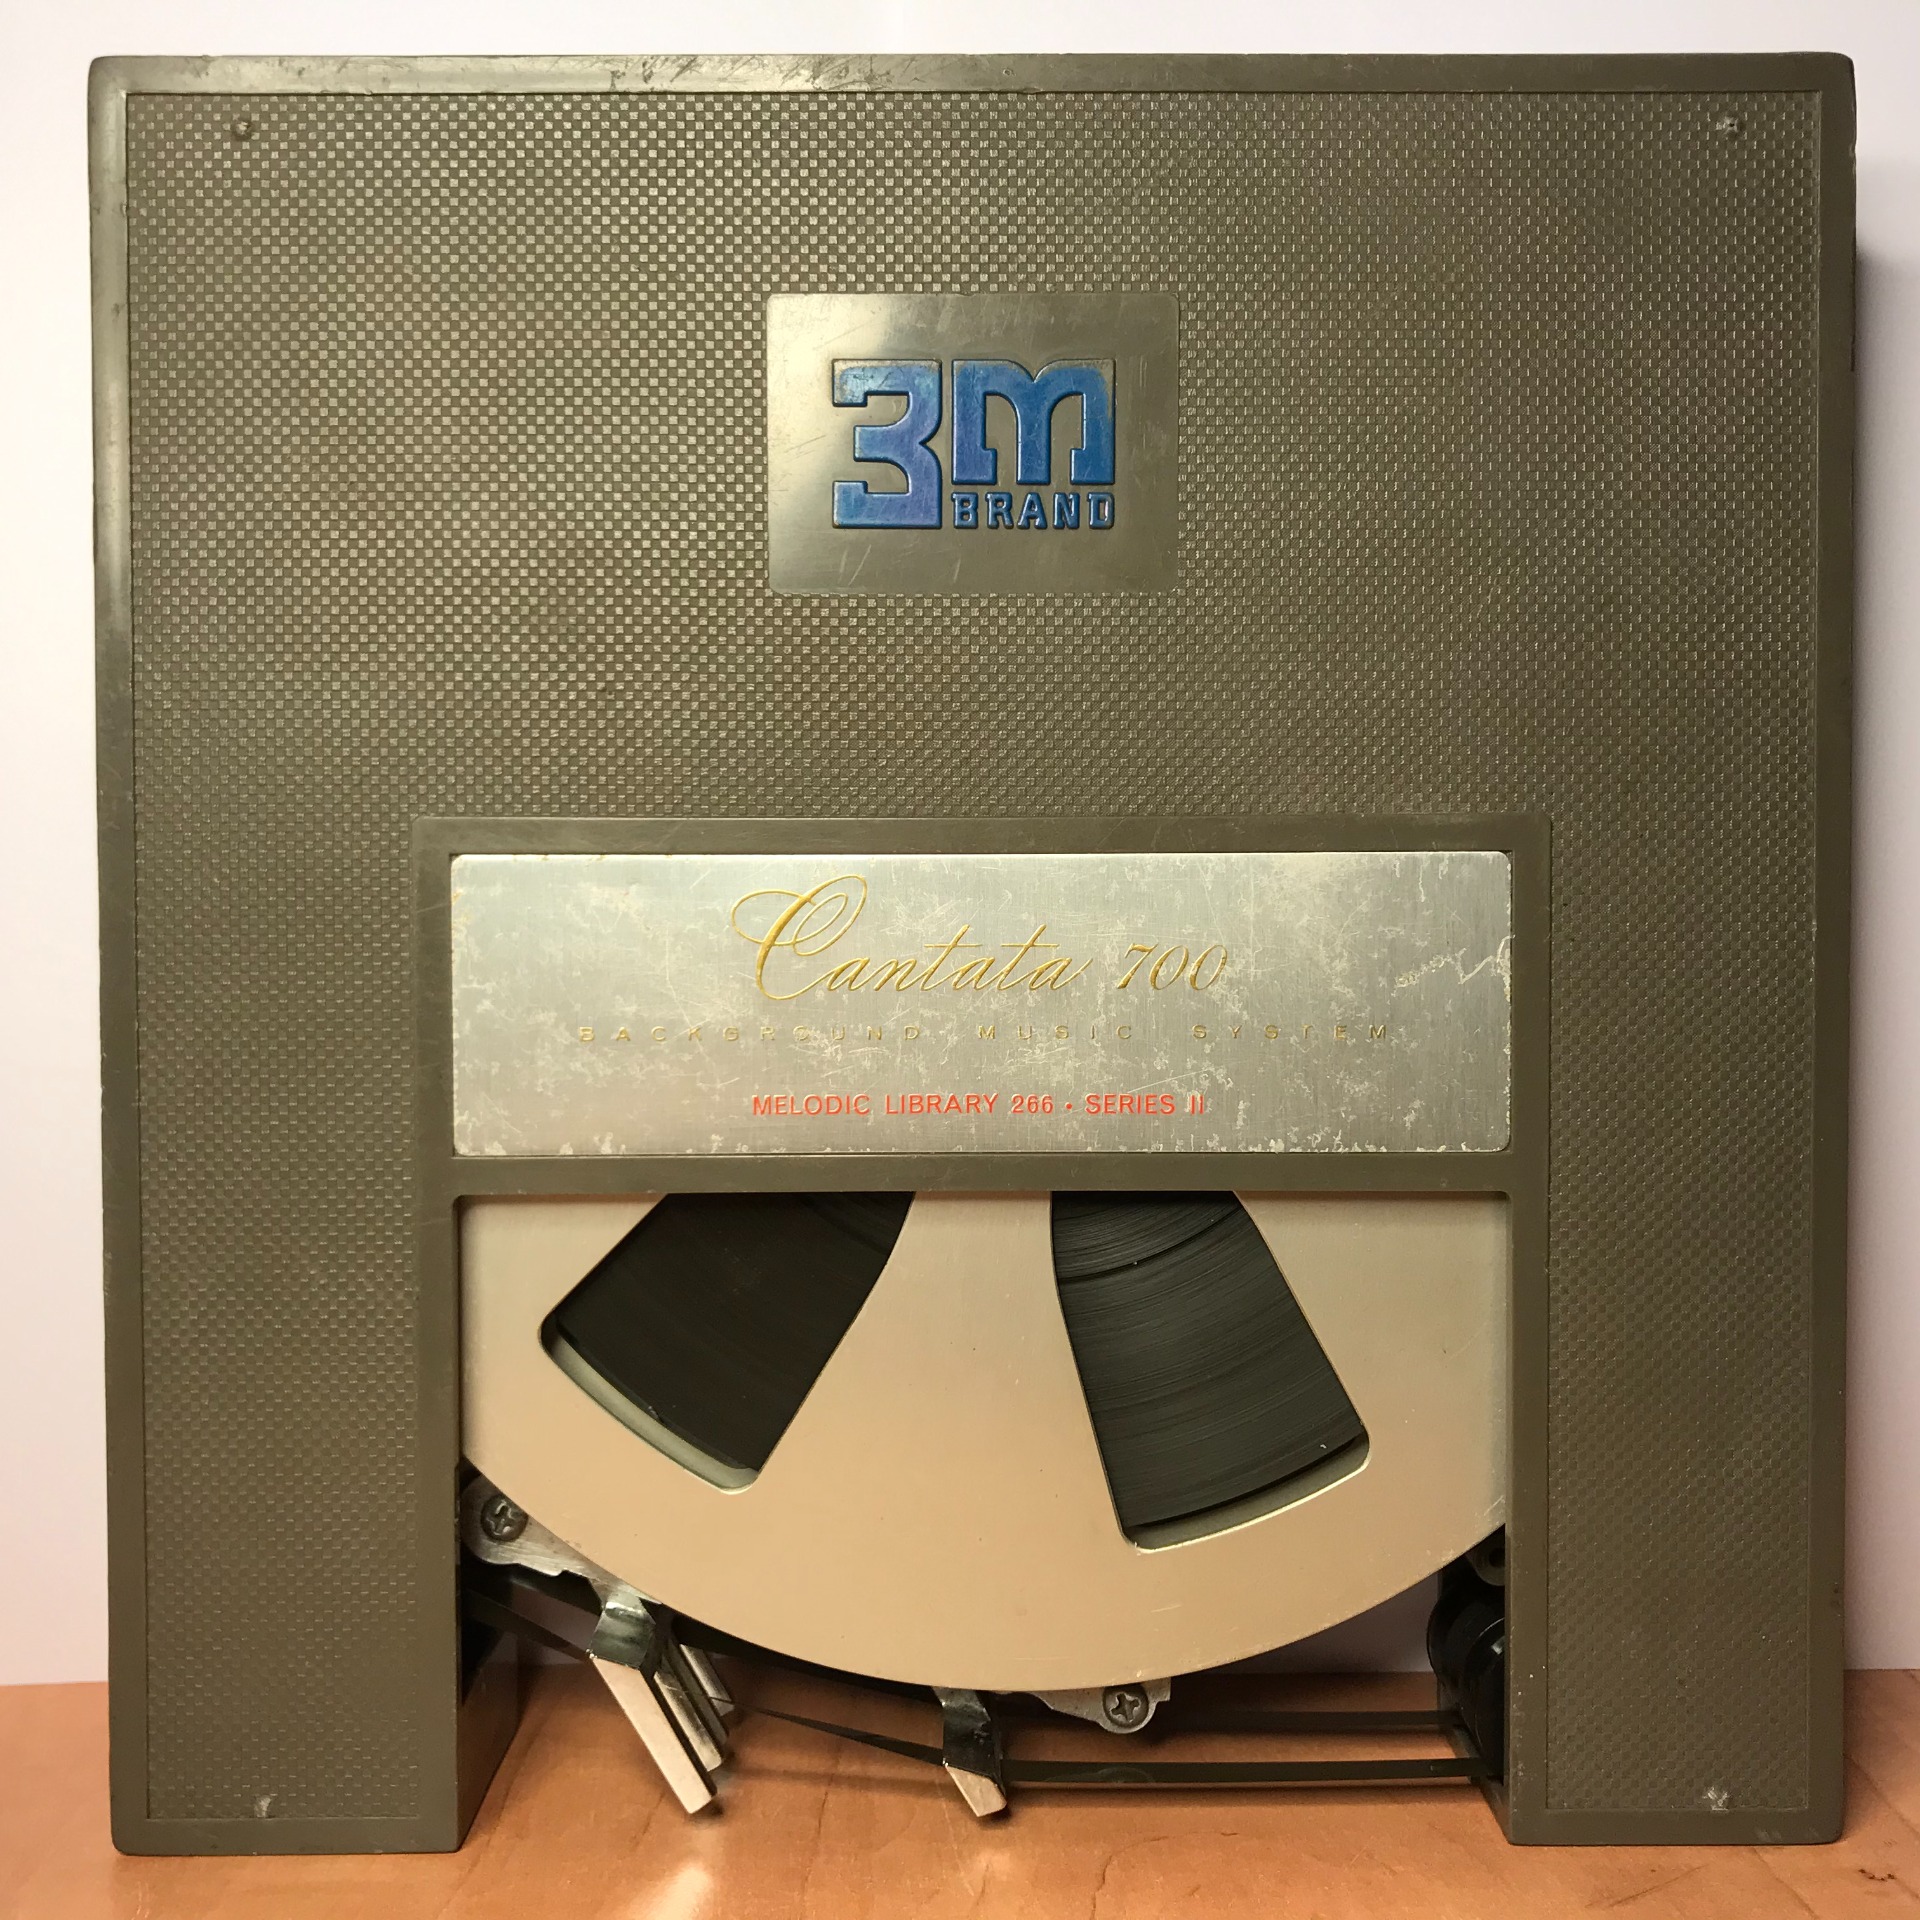
The first cassette is the "Melodic Library 266. Series II" (M-266).
The housing has quite a few traces of use and during the test run the cassette does not run very smoothly. Time to take him apart.

If you turn the cassette over you will find the screws that hold the housing closed. There are 6 in total. Although I am missing three screws in this cassette.

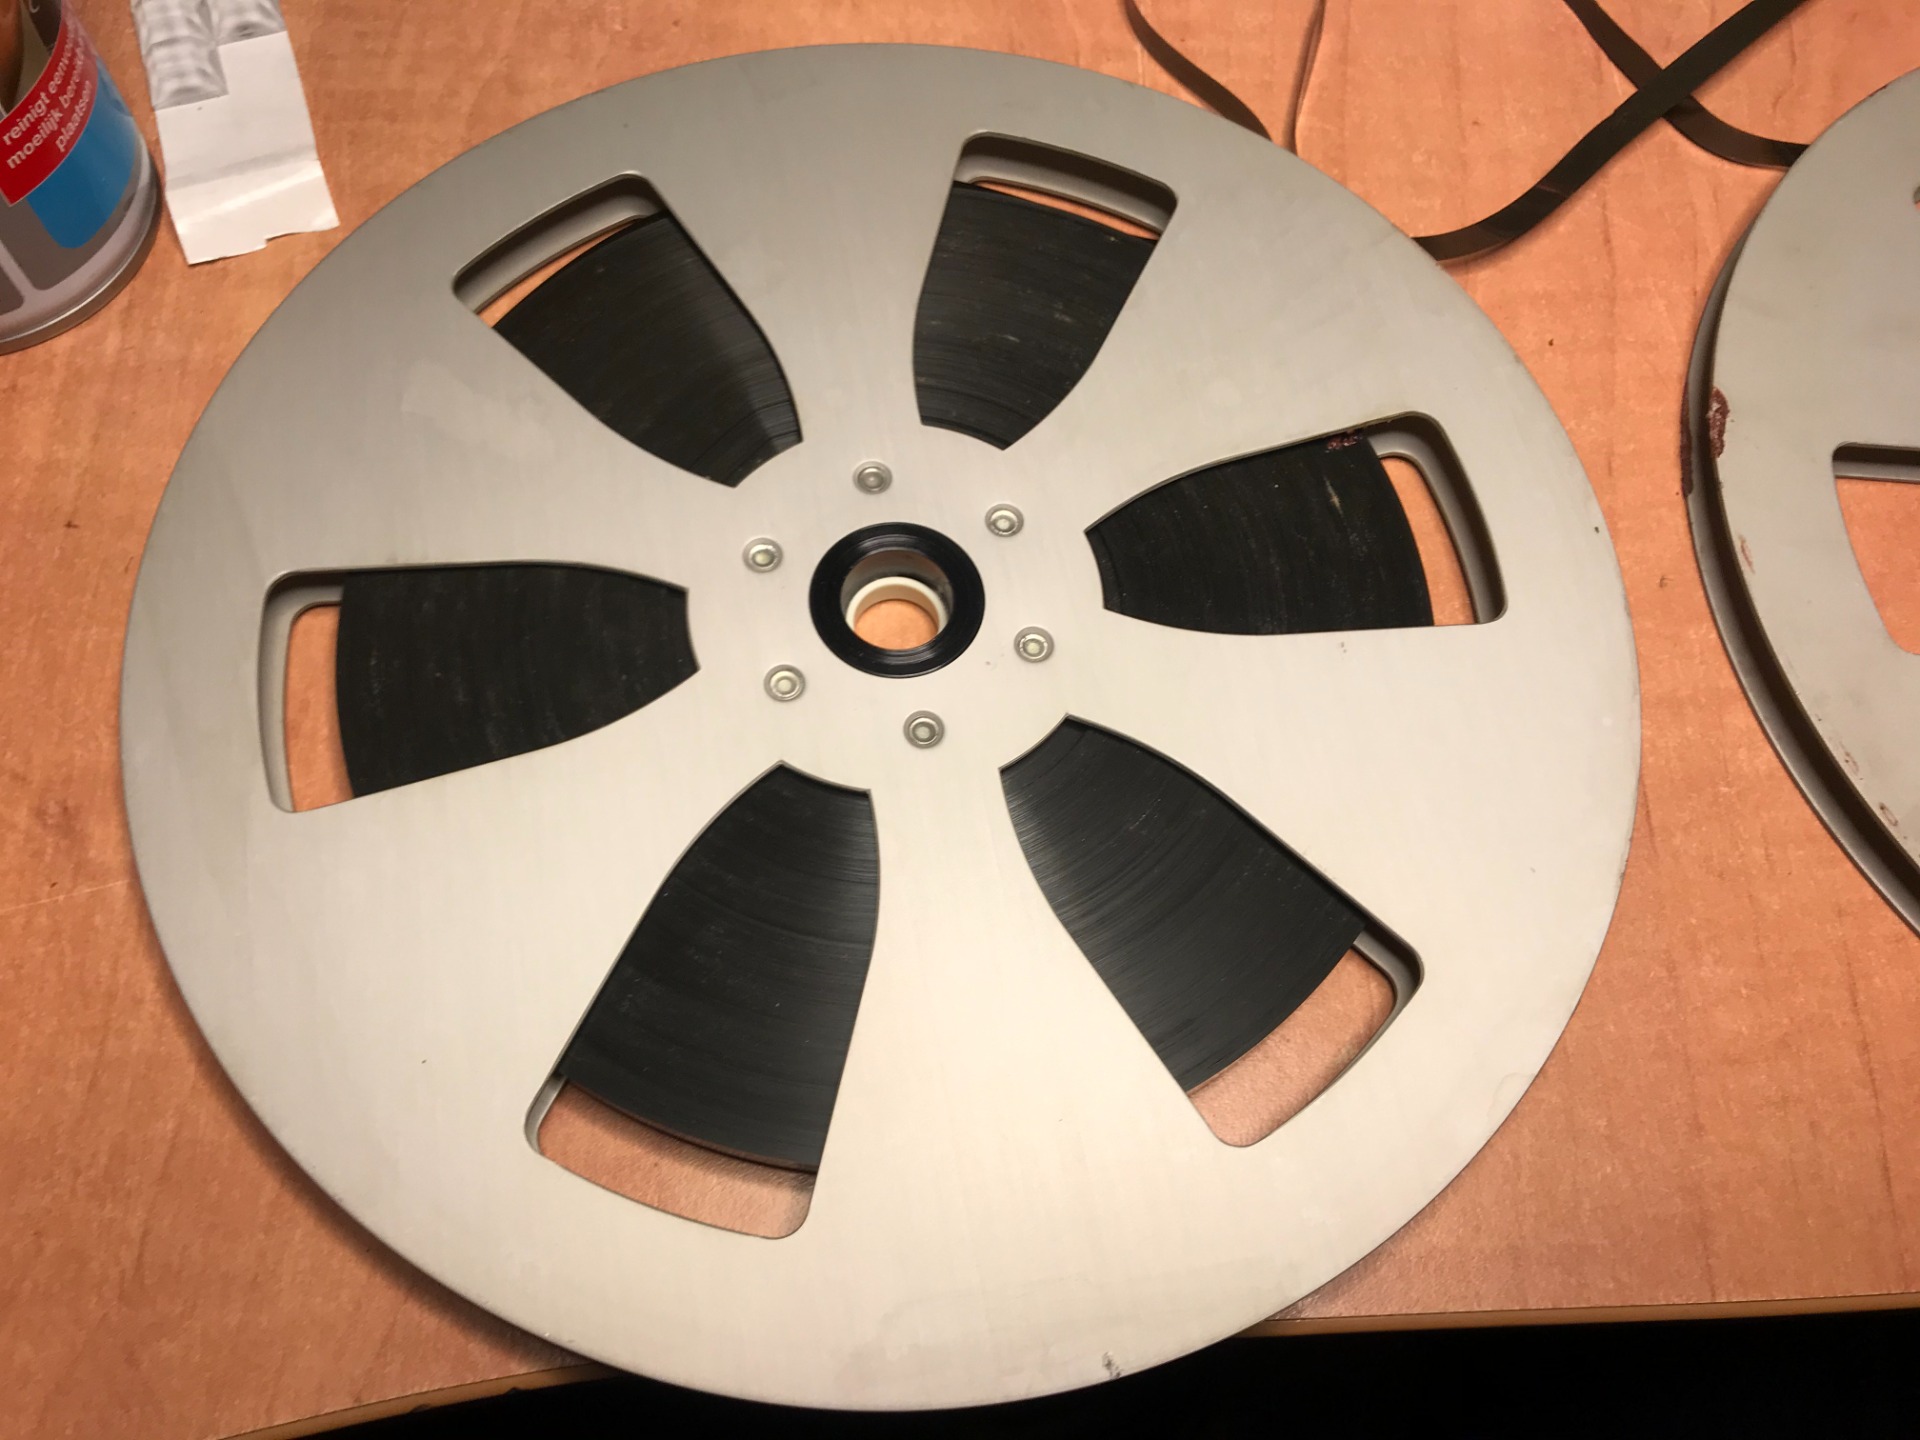
Once the screws are loose, first turn the cassette over before lifting the lid off. Otherwise, all kinds of parts will fall out of the cassette, including the reels. Here is a view of the inside of the cassette.

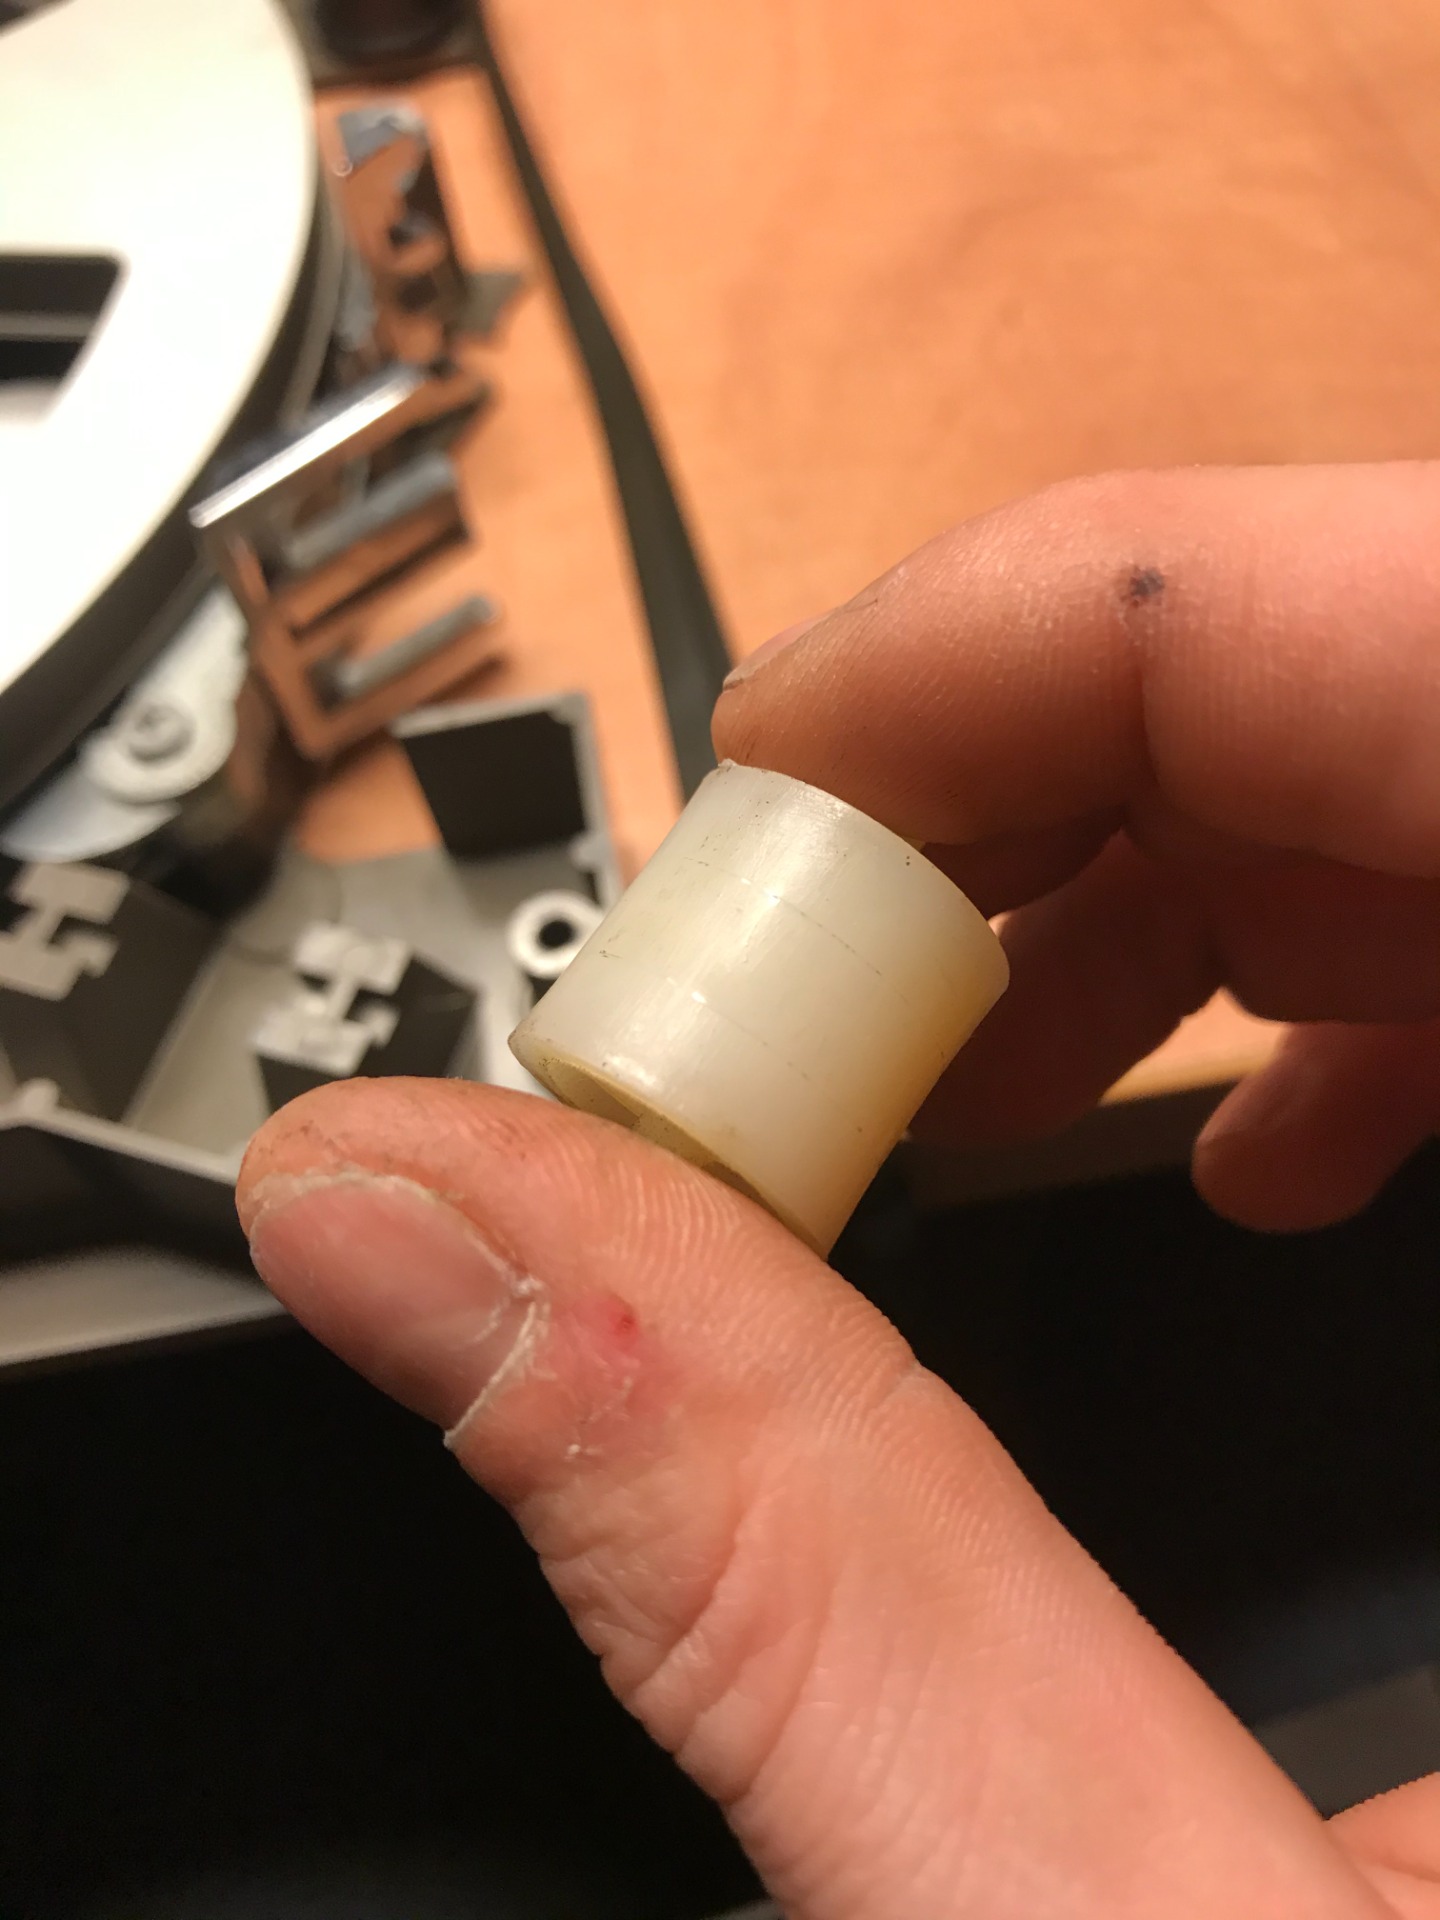
A cassette contains two reels, the tape runs from one reel via a few reels to the other reel. The turning point of the tape is accompanied by this white roll. This is clamped with two legs.
The white roller should not rotate and is only a static part.
You can usually remove the roll from the housing without much effort.

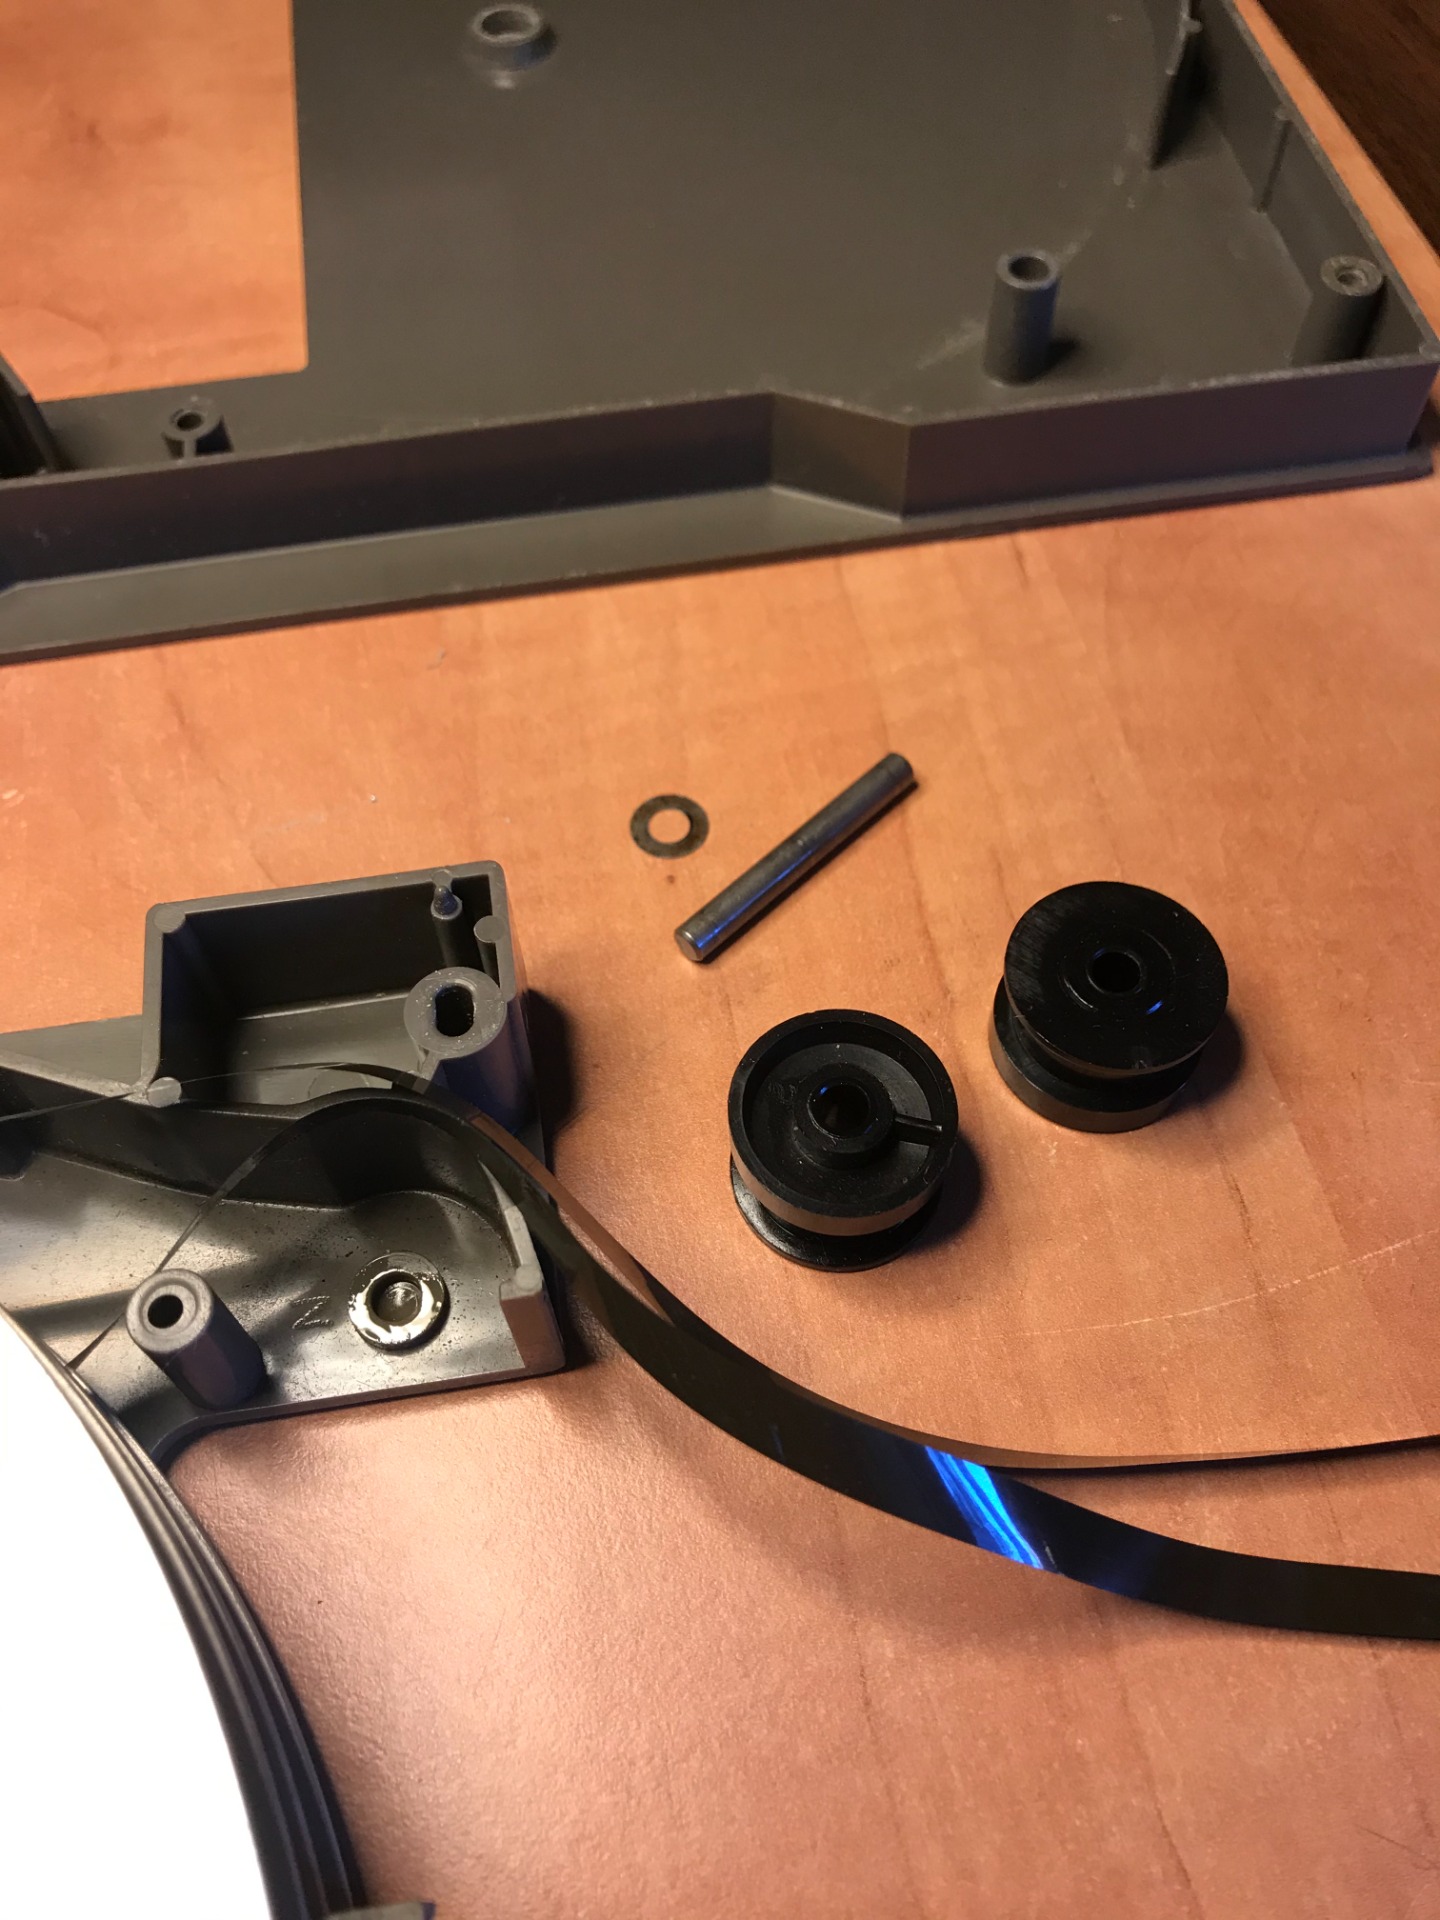
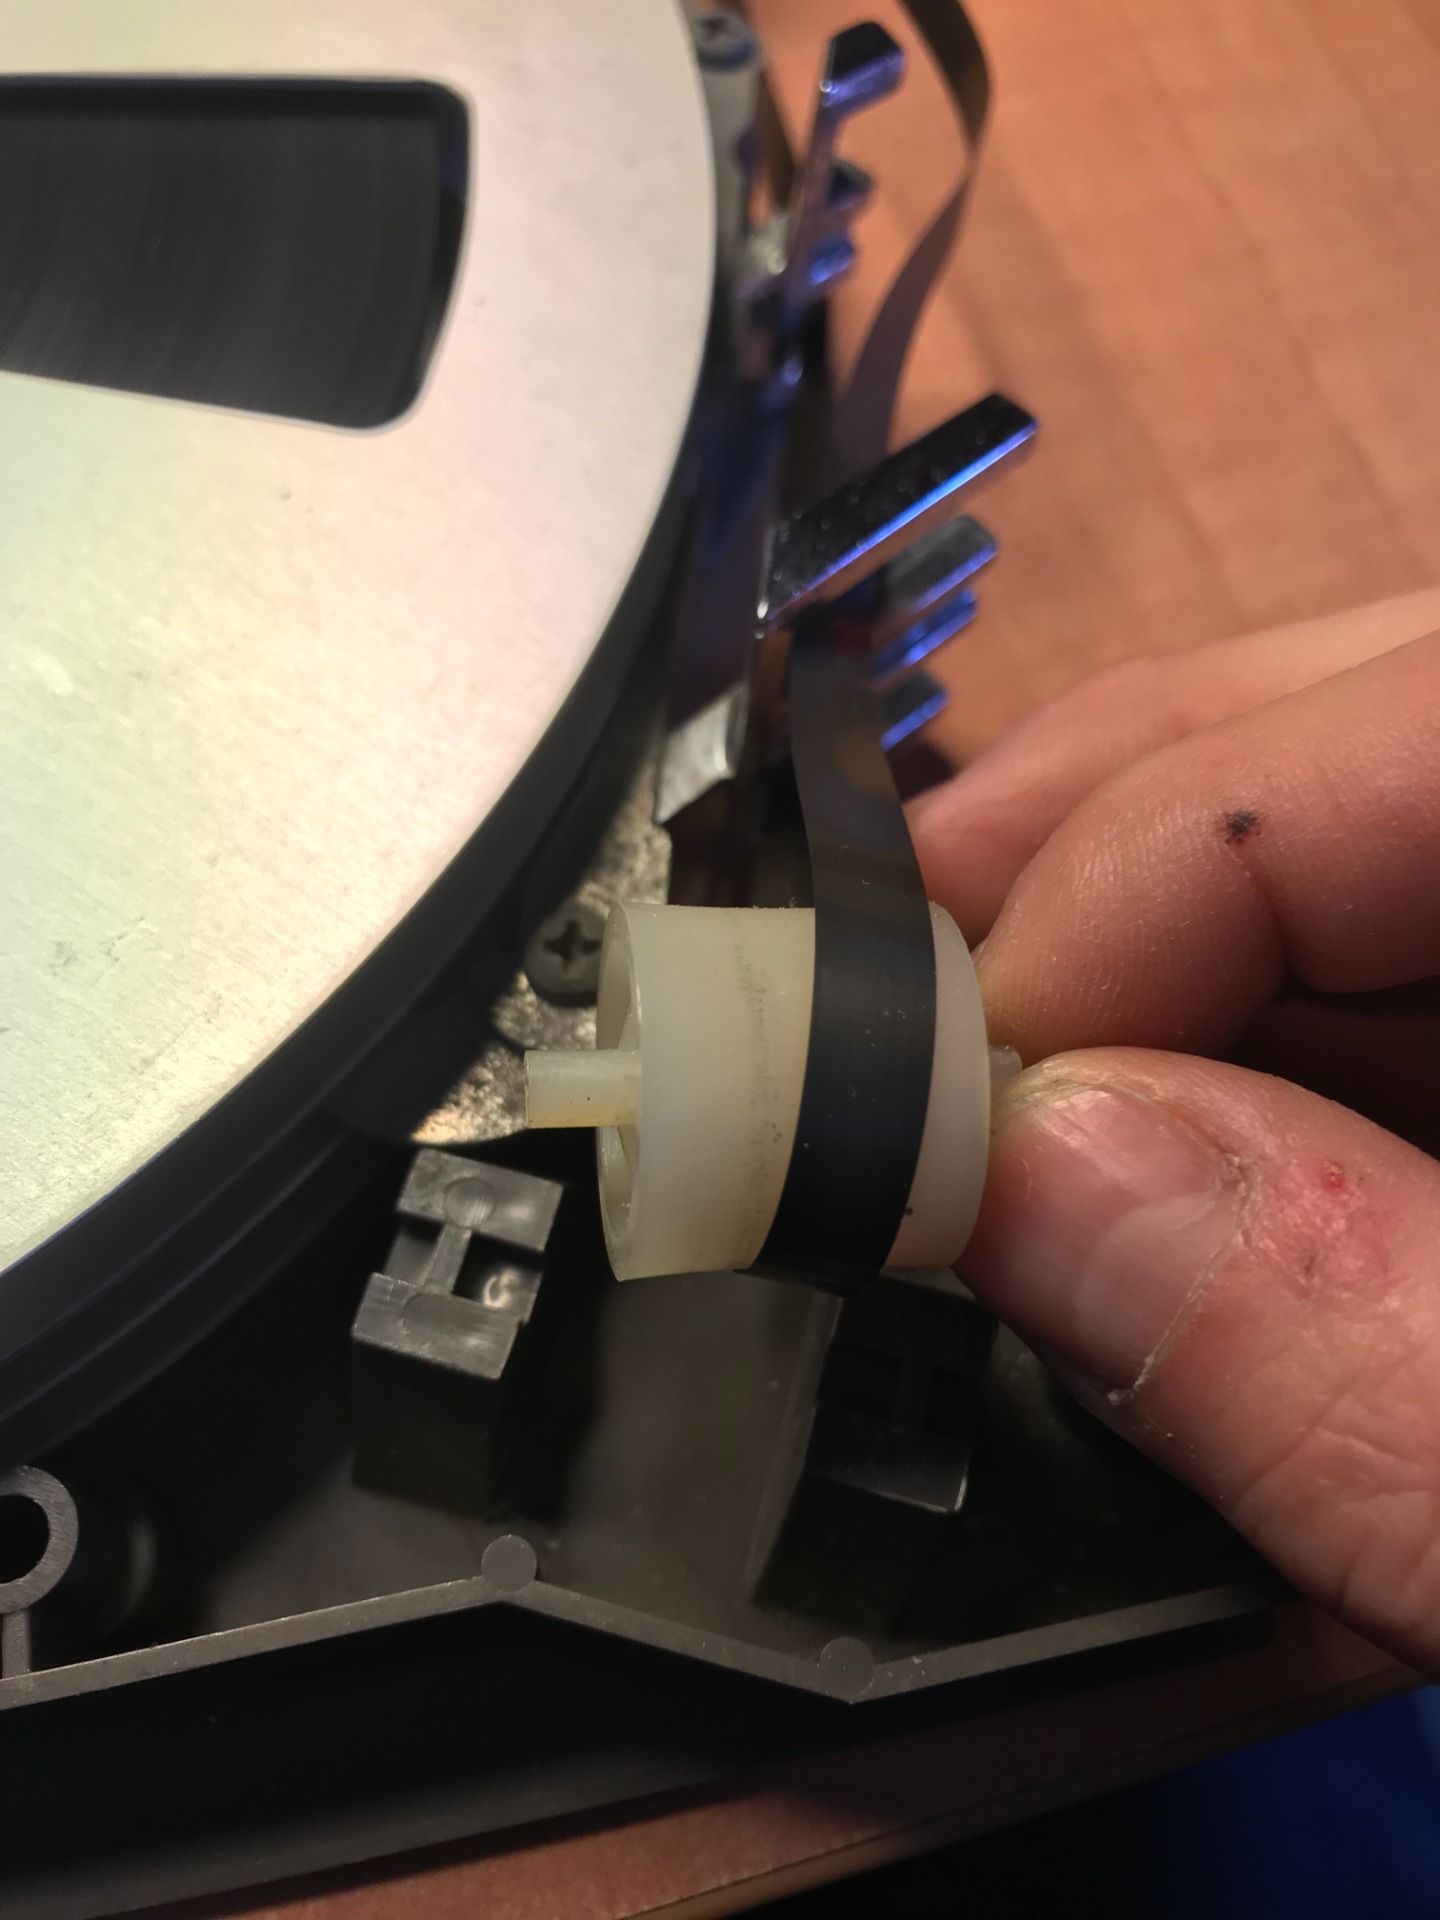
Where the tape comes off the reel, there are also two black rollers on a shaft. The reels can spin freely.
Removing the rollers and the shaft is also easy, pay attention to the O-rings that are between the black rollers!

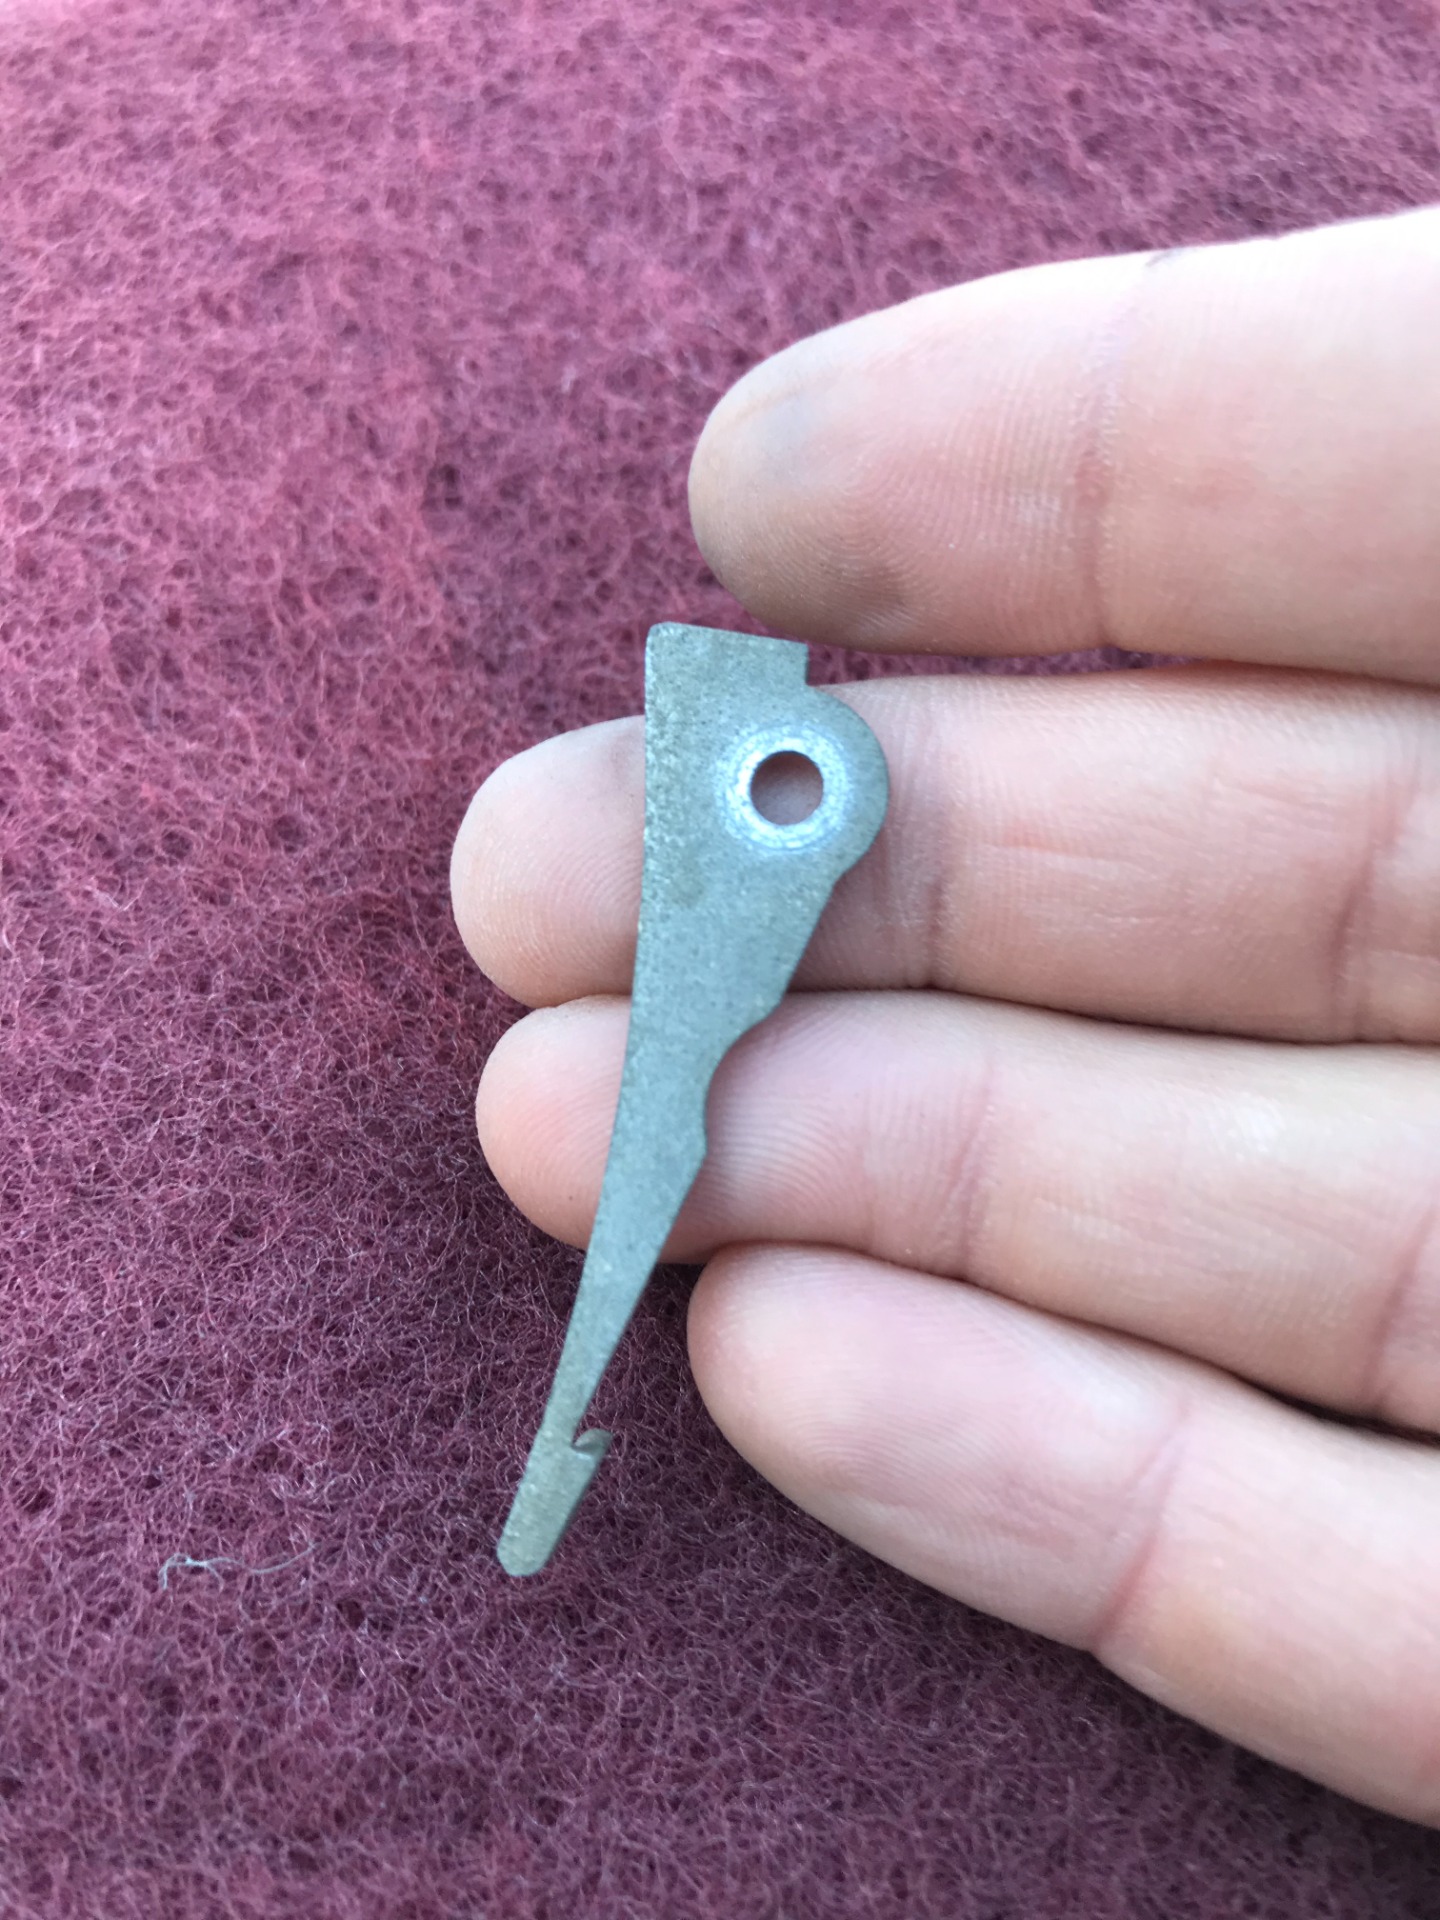
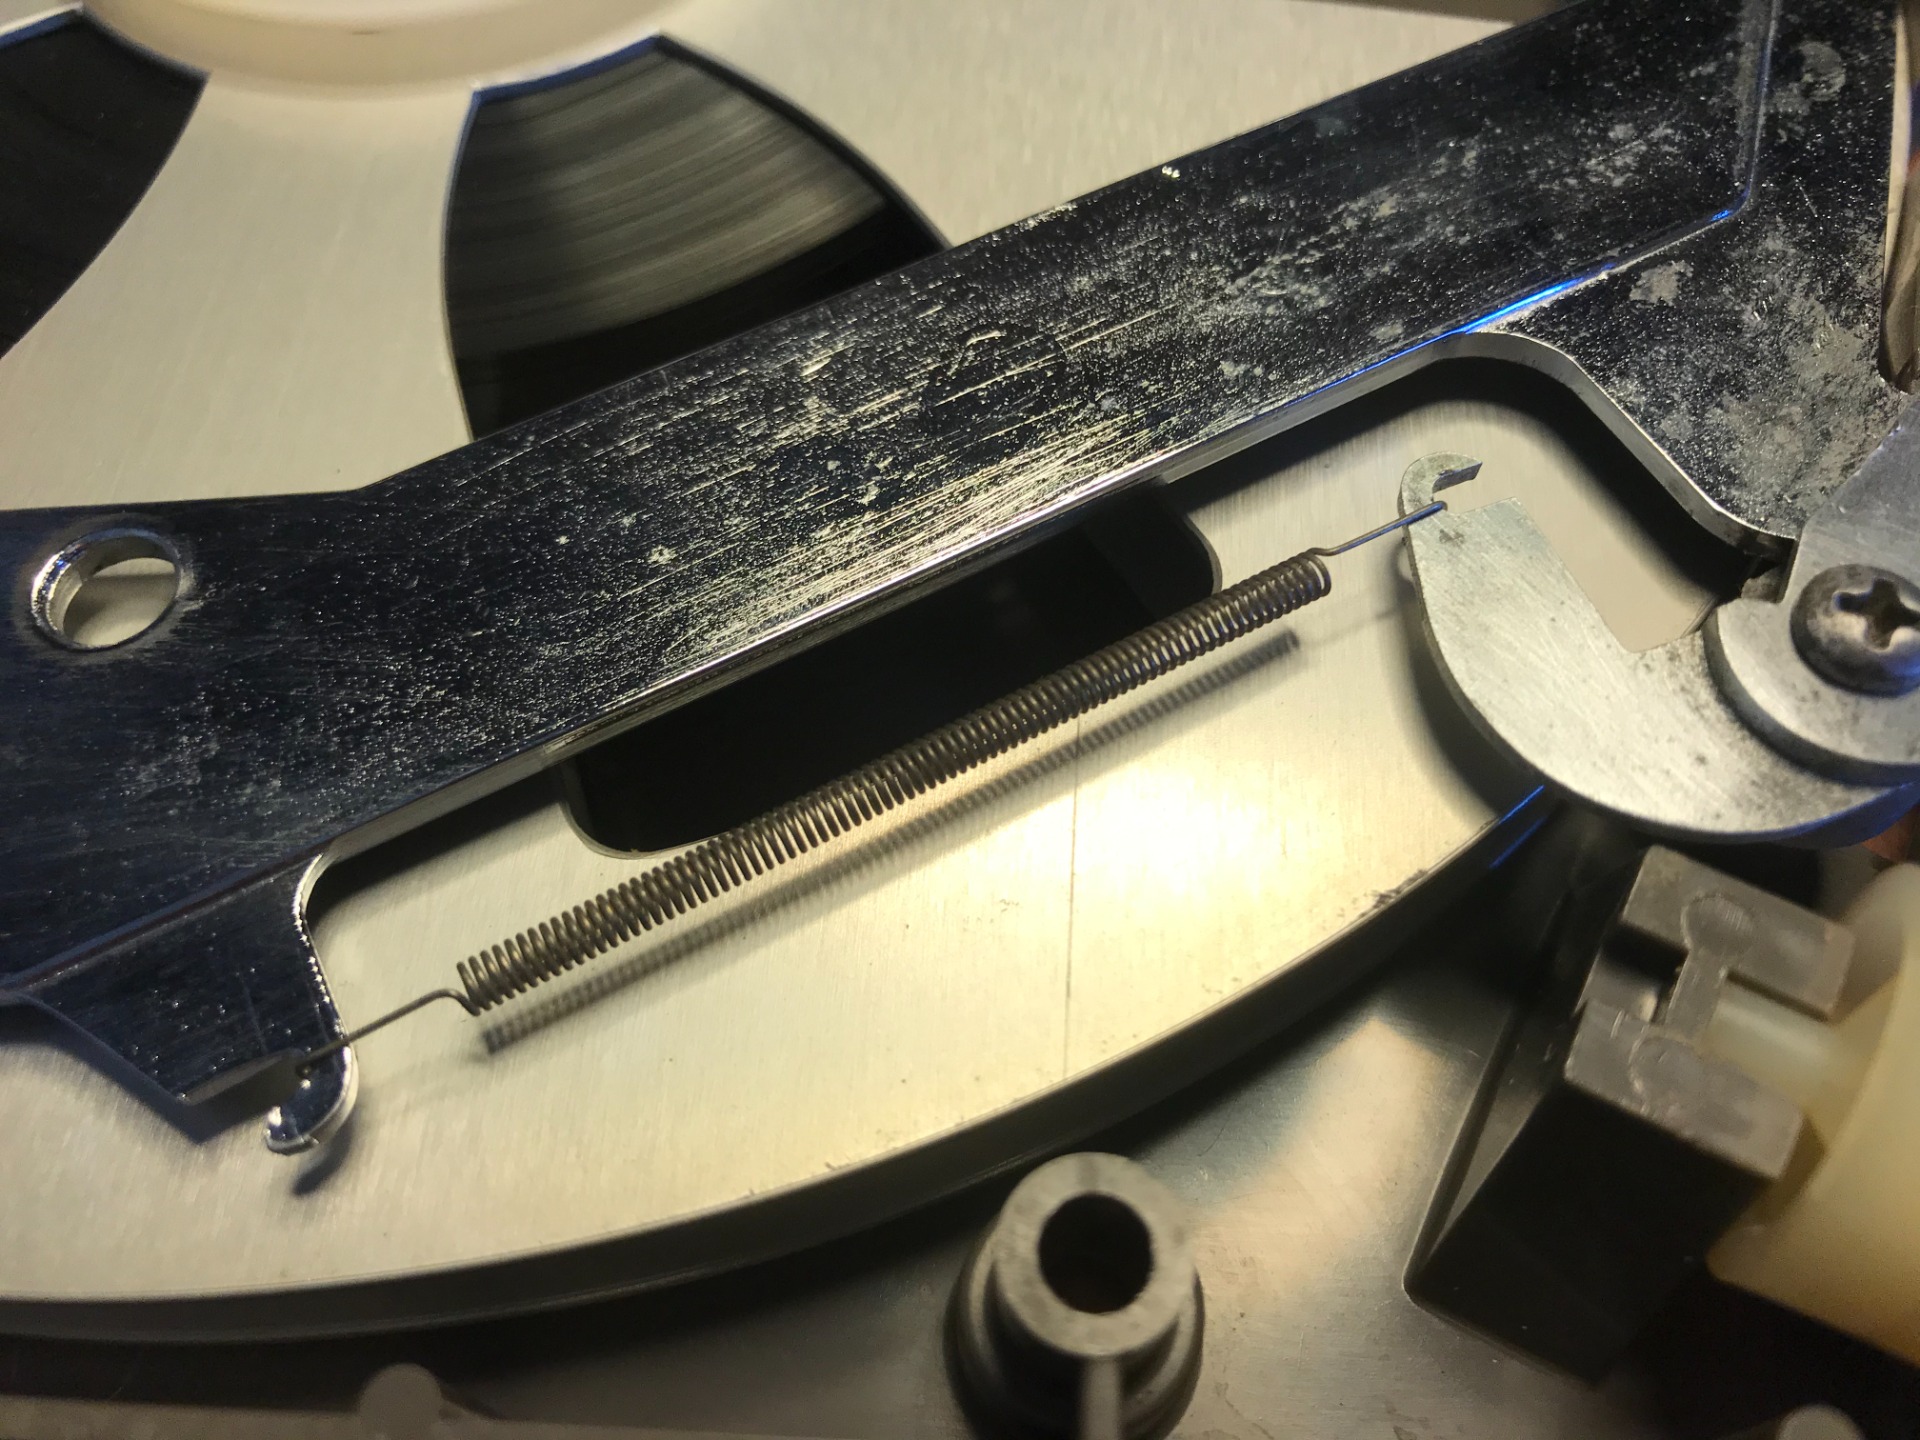
Then I lift the top coil, turn it over and lay it next to it. This gives us a view of the braking system in the cassette. This is a long metal arm, the left end of which presses against the spools with rubber feet and the right end guides the tape through a fork.

The brake is held in place by two metal brackets, which are attached to the housing with small Phillips screws.

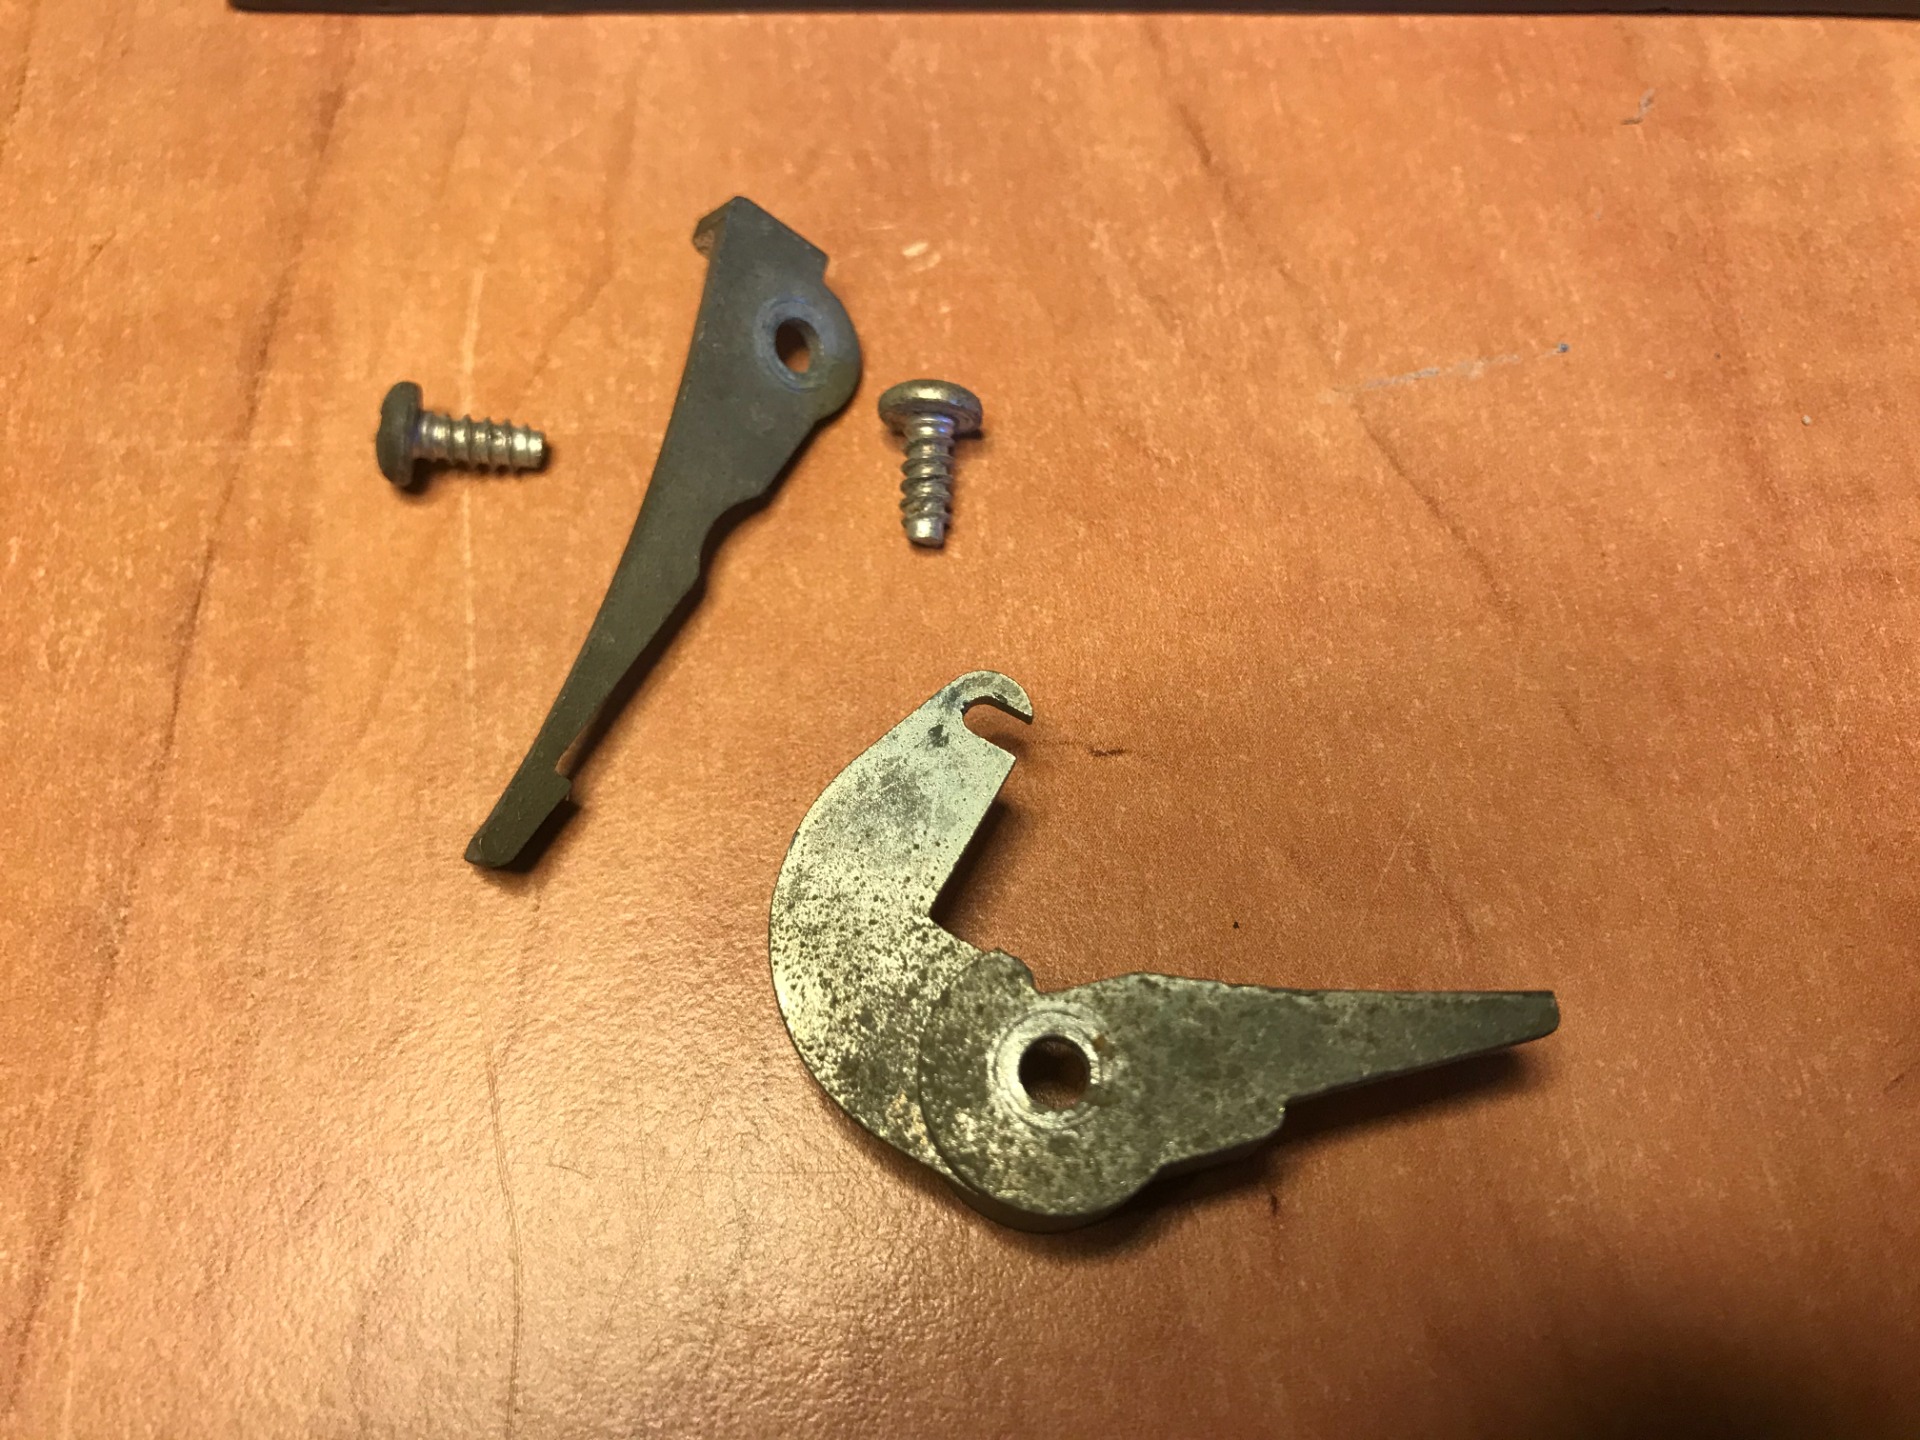
First I loosen the spring with which the brake is kept on tension, then I unscrew both brackets.

After this you can lift the brake out without effort. It is always wise to check the brake pads yourself. In this case they are still in good condition, but there is also a chance that they have melted completely and lie in the cassette itself as a sticky substance. You could compare them to Wasco crayons but just as creamy as peanut butter...

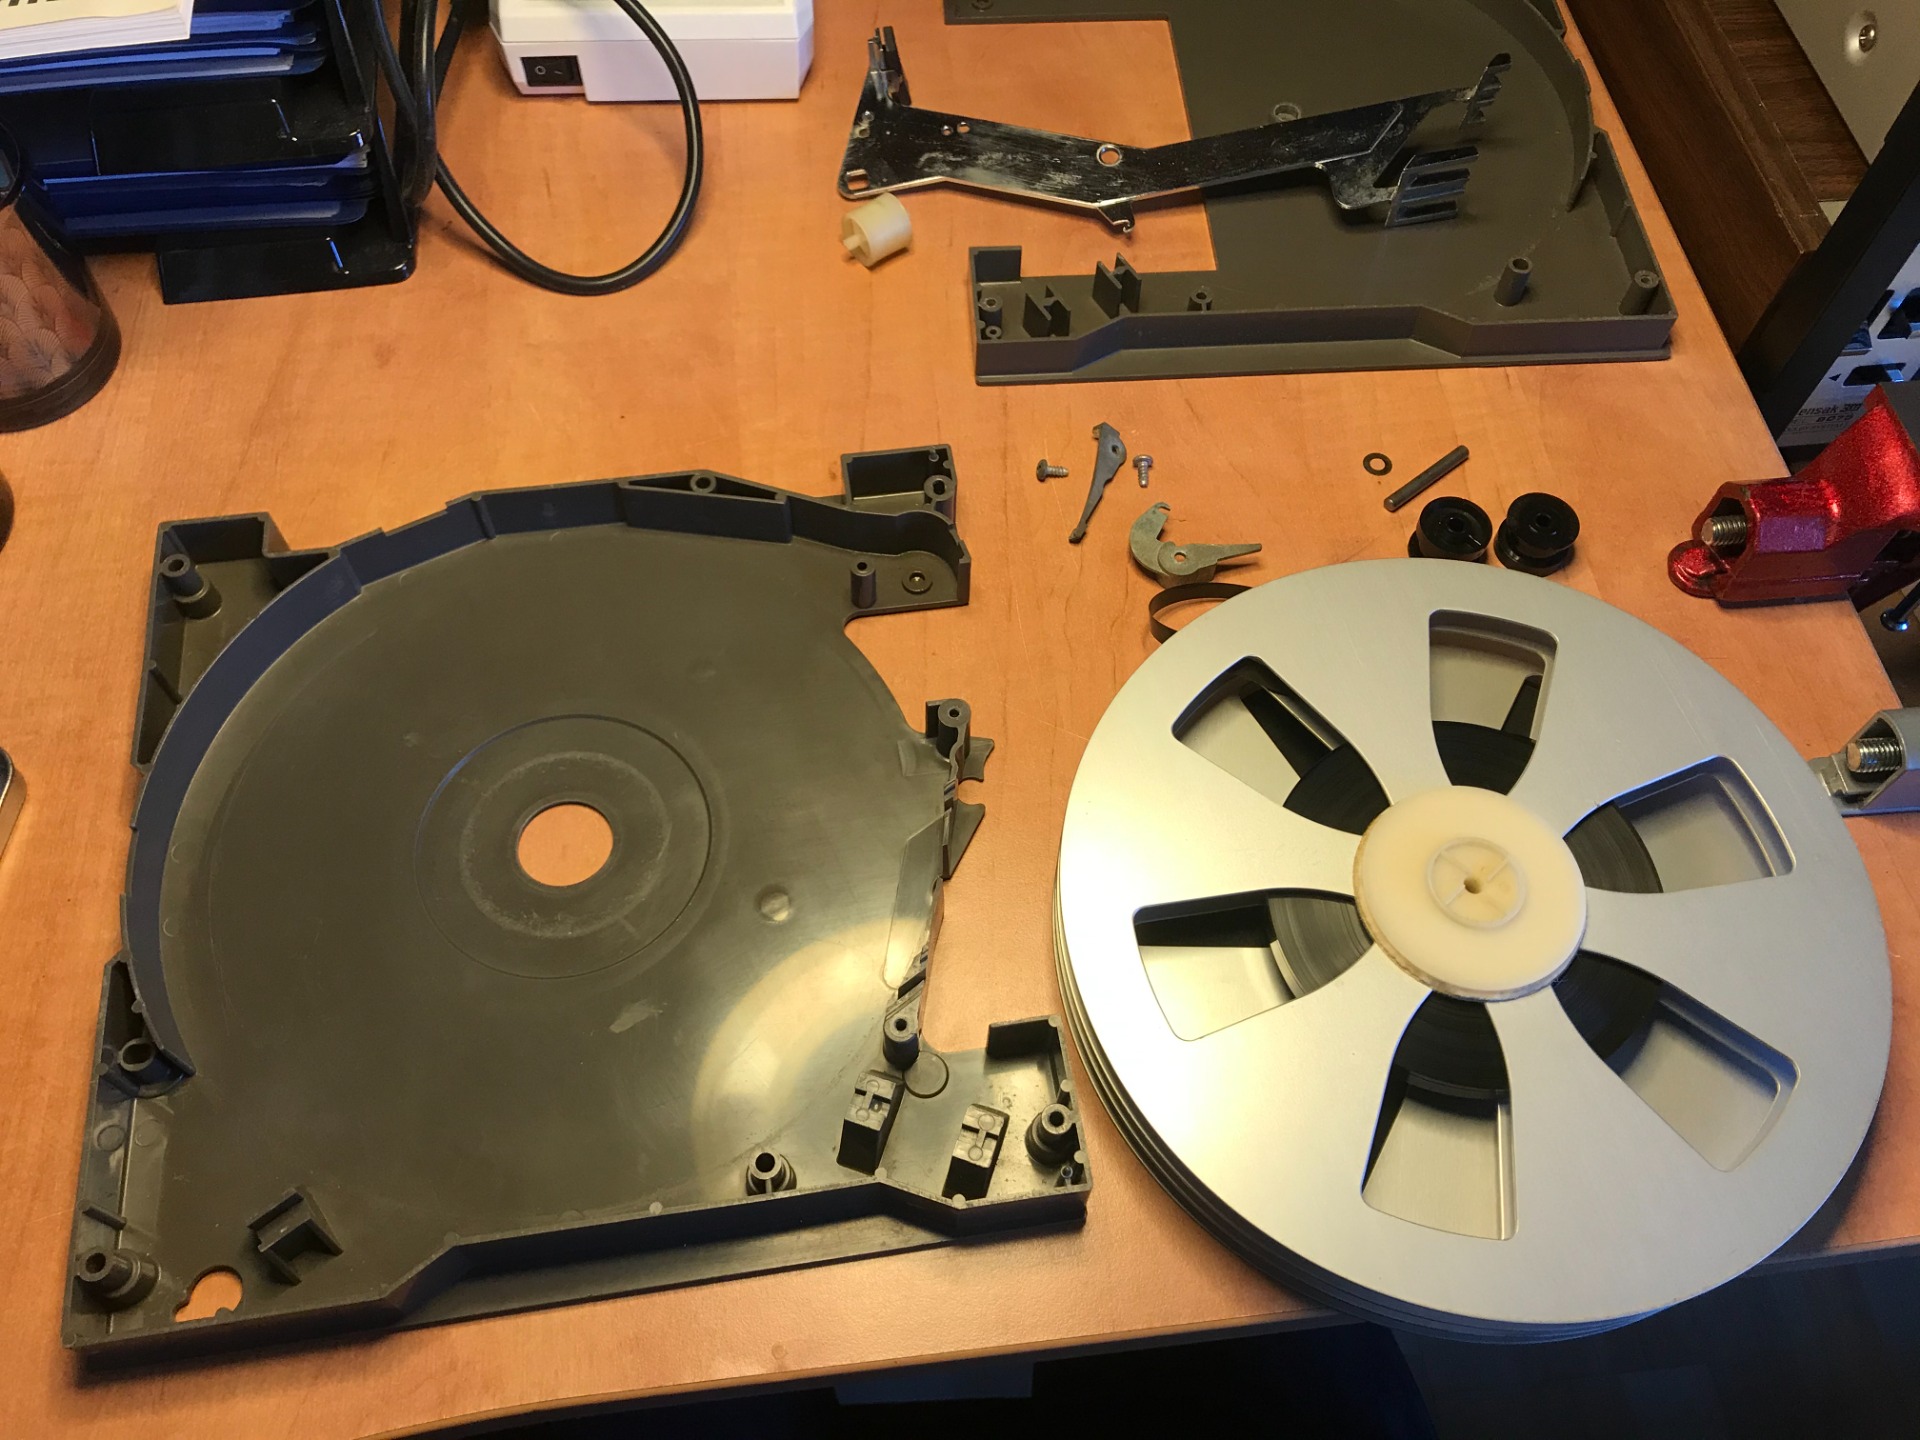
Now that the brake is out, the bottom coil can also be removed, I first turn it over before I put it on the other coil.

The brackets are (I suspect) cast iron, and very susceptible to surface rust. I sand this off without much effort. I can't get it really perfect anymore but most of the rust can be sanded away

The shaft with the two black rollers rests in the housing through two notches. In this case, there is a layer of oil in it. I don't suspect that this is original and that someone else has once lubricated it. In the past I have personally experienced that oil is never a bad idea with cassettes or cartridges with tape. So I replace this with grease as a lubricant.


I wipe the indentations with a clean cotton swab to catch the oil. Then I spread the grease on the same places.


I checked the two rolls with alcohol, at first glance they still looked quite clean, but some dirt still came off. It is important to remember how the reels will be stacked on top of each other again. The wide pieces should face each other as shown in the photo above. Again, don't forget the O-rings. These come on the notches between the housing and the black rollers.

The top of the housing also has a notch around which the coils will turn. the middle I dip in the fat.


The underside of the housing has signs of wear which come from the plastic shaft on the coils themselves. I hesitate for a moment, but eventually put a thin layer of grease on it.

Time to put things back together. I have also cleaned the housings with compressed air, but no pictures of this. Here the lower coil is back in and I screw back the brackets of the brake. Don't forget to put the spring back on the brake! After this, the top coil can be put back on.


The white roller has two lugs with a flat side, this flat side rests in the openings in the housing. The tape goes in there first.

I'll check again to make sure everything is as it should be. It is especially important that the tape is not unnecessarily twisted. Only around the white roll should the tape make a stroke.


When you click the housing back, it is still a good time to look at the black rollers to see if the shaft is properly seated. Sometimes you just have to push it into the notch. Only then can you close the housing properly.


Before I close the housing, I take a look at the screws that were used, I take a screw from another cassette for comparison. I noticed that the screws used here are too long and push out through the other side, which can be seen through a small hole in the housing. You can see the difference in length in the second photo. The left one is the original screw, the right one is an imitator.
The previous tinkerer did not only use oil, but also too few and too long screws...

So I fly to the local hardware store for a set of new screws that most closely match the original ones. With this I replace the wrong screws and fill in the missing ones.
Now it's time to test the cassette!

On to the next cassette, "Christmas Rhythmic Library 266" (RX-266).
Not much needs to be done to the cassette. It is still in pretty good condition on the outside which is often a hint to what you can find inside.

Something I didn't show with the previous cassette, but I'll do it again here is blowing the dust off the tape with compressed air. Caution is advised, the string of tape that comes off the reel will rage during this operation and can easily get damaged somewhere.


Not much else needs to be done, as described with the previous cassette, I clean and lubricate the points where necessary, the white roller here as an example.


The point where the cassette is driven doesn't look fresh anymore, I check it with a cotton swab dipped in alcohol. Here again a clear spot of wear where the plastic scrapes on the housing. A wipe with grease will do this well.


Some small details that I come across on the cassettes. The type number is written on the reel with a wax crayon, this seems to refer to the third recording with Christmas music, there is also a staple through the 'Lead-in' of the tape. The staple is there for a reason. I will come back to this later on the second page.

After doing general maintenance, the cassette can already be tested.
The video clearly shows that the cassette does not play completely smoothly, but it is not the cassette itself. I still have to deal with the player himself here. The central axis that rotates the coils is not completely straight. The cassette itself plays well.

We arrived at the "Variety Library V 168" (V-168).

From the outside it can be seen that something is not quite right here. The tape runs back to the top spool after turning. How this can arise can only be seen by opening it.

The coil itself also doesn't look very fresh anymore. The metal plate above it is also somewhat yellow. This cassette has been through quite a bit.
Ik begin met de buitenkant want achterop zit een rubberen voetje geplakt. Geen idee wat deze daar doet maar het laat wel een plakkerig goedje achter, dit probeer ik zoveel mogelijk schoon te maken met alcohol en wattenstaafjes maar tegelijkertijd veeg ik hiermee de zwarte inkt van de sticker dus moet voorzichtig zijn.

As soon as I open the cassette you can see that the tape runs through the top spool before disappearing to the left near the brake.

There is also a thick layer of rust on the brake bracket, it seems that this cassette has been in a fairly salty environment, or a very humid environment.


What I talked about earlier about smooth wax crayons, I am now confronted with it. The brakes are completely gone and the junk is all over the cassette. I have a big job ahead of me to get this all clean again!


I scrape off the residue with a flat screwdriver, after which I finish it with alcohol. This leaves some streaks, but it won't hurt you since you won't see this piece anymore.
There is also a thick layer of paste on the coil itself, I tackle this in the same way by scraping off the residue and going over it with alcohol.


I sand the brake calipers so that they look a lot fresher again.
The brake itself will also have to be completely cleaned, for now I dip the parts that come off in alcohol so that they can soak.
The brake caliper itself undergoes the same treatment as the rest, scraping with a flat head screwdriver and polishing with alcohol until it is clean again.
After soaking, I clean the remaining parts of the brake. Scrape and polish until they shine again, at least something that should pass for shine...
Now that the brake parts are clean, a new brake must of course be installed. The rubber foot that I removed from the housing earlier gave me an idea. I use new feet for the brake. These paste itself not great so mount them with superglue on the metal plate. After mounting the brake bracket there appears to be quite a bit of space between the plate and the bracket. I fill this space with insulating tape. The result doesn't look bad if I do say so myself!

The coils are very filthy and in need of a major refresh.

To get the coils clean, I first run with alcohol and cotton swabs the places where remnants of the brake are, I also wipe the edges of the coil as well as the inside as far as possible. I check the rest with a damp household cloth, I first wring it out above the counter because I don't want the moisture on the tape! The coil looks a lot fresher, the cloth itself is different under the gray and yellow spots.

The tape itself is also very dirty. Unfortunately, there is little that can be done about this, I run the roll with compressed air which blows away most of the dust, but that's about it. It's lucky that the mess from the brake didn't end up on the tape too much. Only a small part has been in contact with it, I manage to get most of this off and polish it lightly with alcohol. Hopefully it won't affect the tape too much...

The serial number is also written on this coil with a piece of chalk. VL-2, probably volume two of the Variety Library?
When lifting the coil, the plastic suddenly comes loose from the middle. Apparently these can come loose... Putting
it back together is just a good look, but it's not that complicated. A small recess in one piece falls into the hole of the other. With this you press the two parts clamp together when the bottom coil is again in between. Then put the top coil on top of it again.

The white roll undergoes the same treatment as its counterparts, yet I see that the tape has worn grooves in it. The cassette has probably had many running hours!

because the tape has to be twisted one turn, I first place the top spool next to it so that the tape runs neatly from one turn to the other without a turn. After this I turn the coil counterclockwise and put it on top of the other. This creates the stroke in the tape that you need when running around on the white roll.


After I put everything back together I check the new brake. He seems to be working well. The rubber feet inadvertently clamp into the coils themselves, which is good for holding the coils securely when not spinning.

Finally, I clean the screws with some sandpaper. The white deposit is again superficial rust.
What is certain is that the cassette has been used a lot and probably in a fairly humid maritime climate.
Still, the cassette looks a lot better now that I've taken care of it. All that's left is to test!
The cassette plays again as usual. He still scrapes a bit against the housing, but this is up to the player himself.

It sometimes seems like a no-brainer, but when you see how much mess I'm left with after making this cassette...
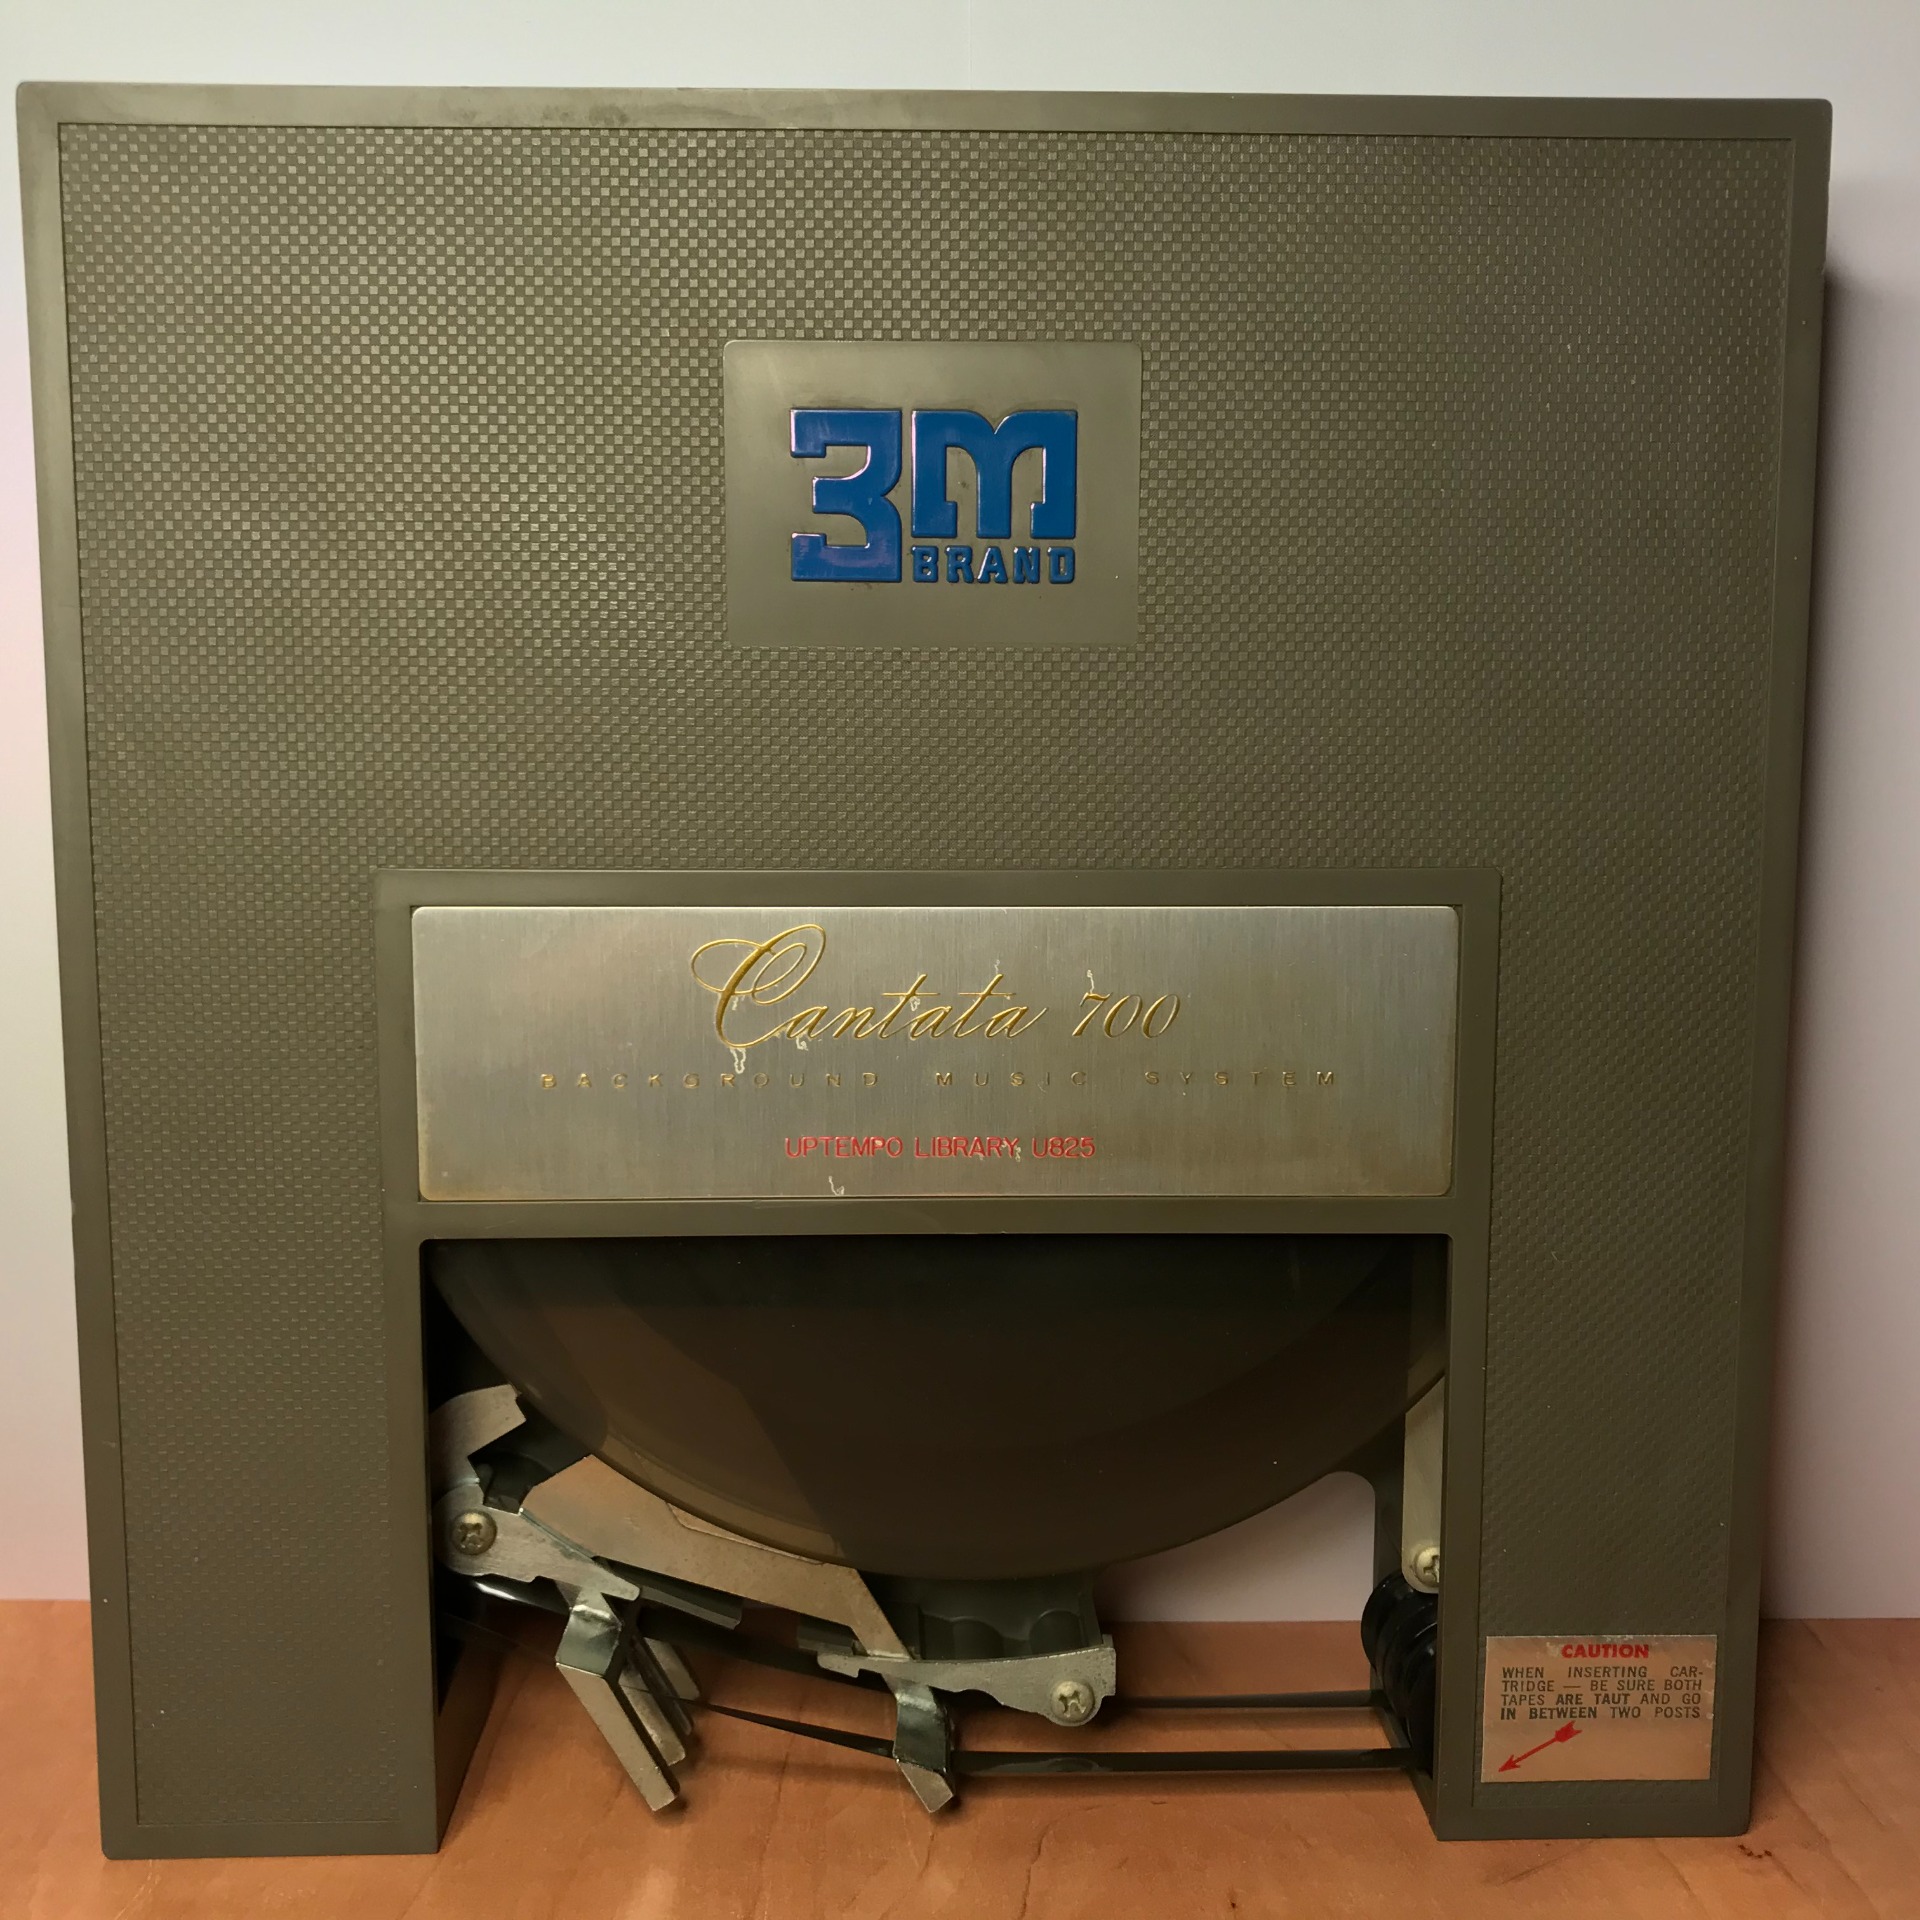
Time for the fourth cassette, the "Uptempo Library" U825 (U-825).

What is striking about this cassette is that the reel is made of plastic and is also one pinch smaller. I have been informed that this cassette was produced much later than its predecessors with metal reels.

The cassette looks pretty good inside, even though there are some stains and dust inside. A cleaning and some lubrication should suffice.

I didn't realize for a moment that the brake has to be shorter to get to the coil. They solved this with a nice modification to the existing brake. Fortunately, the brake pads themselves are still good.


When lifting the top coil, another detail becomes visible. There is an aluminum plate between the coils together with a carbide bracket that is loose in it. No idea what function this picture fulfills. I take it out with a single Phillips head screw.

U-3 is on the reel, Uptempo volume 3?
The fork at the other end of the brake has some superficial rust spots. Instead of sanding it I run it down with alcohol. I want to keep a smooth surface because the tape will run along this again later.
On the coils themselves is a layer of dust and something that looks like nicotine, the latter can be seen because the coil looks somewhat faded. Fortunately, I can wipe this off with a damp household cloth. The text 'U-3' is saved by the way and the coils look a lot fresher.
Stapsgewijs zet ik de cassette weer in elkaar.
Finally, I clean the outside for a while, being careful not to wipe the paint off the housing. It is mainly nicotine that comes off.

By the way, each cassette has a sticker on the back, which contains some information about the general use of the cassette as well as its type and serial number. What also struck me is that no start and end date is stamped on the sticker in any cassette.
Another thing I've noticed with every cassette is that the drive point is always skewed, sometimes partly under the housing. This is due to the brake pressing against the coils. Nevertheless, it shouldn't be a problem. The spindle in the player itself should straighten it along with the brake being released. it does explain something else to the player though. The spindle is bent and presumably because a cassette has been on the player for a long time with the brakes applied, but the suspicions remain...
Time to test the cassette!
Before I had serviced the cassette, it slipped a lot. This sound can be heard almost continuously as a high-pitched tone. This is still present, but to a lesser extent. I still have to find out the reason behind it, but I suspect that the tape itself is not completely fresh anymore...
In order not to make the page too long, it has been split into two parts from here on. Click here for part 2 of this page.