
Reparatie - Sony WM-R202
The WM series from Sony is well known, it is this series that made the Walkman great, the WM series has a wide range of Walkmans, with recording function, equalizer, AM/FM tuner, auto-reserve, Dolby B & C. And much more.
Well, enough about the series itself, we're here for a very specific model, the WM-R202!
December 12, 2019

The name itself is easy to explain, WM stands for WalkMan. R for Recording. 202 is the model number. The WM-R202 is related to the Sony WM-201. Same sizes and same running gear. With the biggest difference being the recording function, there is also the addition of an indicator for the direction in which you play (shown on the front). What is striking about the WM-R202 (and 201) is that the battery is housed in a separate compartment. You can easily disconnect this to replace the battery. Without the compartment (with battery) the Walkman clearly weighs less, it is also a lot smaller in respect, it is also no thicker than one and a half cassette case!
That is exactly what Sony wanted with this series, as small and compact as possible, as many functions as possible and yet a solid construction with the best quality available. What's more, they're easy to maintain (up to a certain point). The metal parts are pressed from the lightest and thinnest possible material. The fine mechanics and printed circuit boards are designed to fit each other.
By the way, what should be mentioned about the recording function, it is quite limited. You cannot use any other type of tapes for recording except Ferro Type I tapes. Although the Walkman has Dolby B, it only works for playback, not recording.

The manual also tells...
- No more than 1.5V DC (one AA battery) should be supplied.
- The Walkman should not be placed in a location subject to excessive heat, sunlight, moisture, dust or mechanically shocking environments.
- May not be used below 5° Celsius. (upper limit will be somewhere around 40/50°C.)
- If it comes into contact with water, it must be immediately disconnected from the power supply and it must be checked by a "professional"
It is also important to know that you have to let it warm up after a long standstill.
Do this without a cassette tape.
Striking is the mention of tapes with 120 minutes recording time. These cassettes have very thin tape, which makes them very sensitive. It is therefore not recommended to switch a lot from A to B with these types of cassette.
Don't forget: Walkman™ is a brand name of Sony™
Enough information. Time for some pictures, we take a look at the appearance and the functions that are present.

Striking for me is the missing 'It's A Sony' sticker which used to be under the Sony logo itself. Some may find the sticker adding to the collector's value, if it had still been on it I 'in principle' should not remove it. Still, I like the Walkman better without it, so I'd rather have it gone than having it still present.
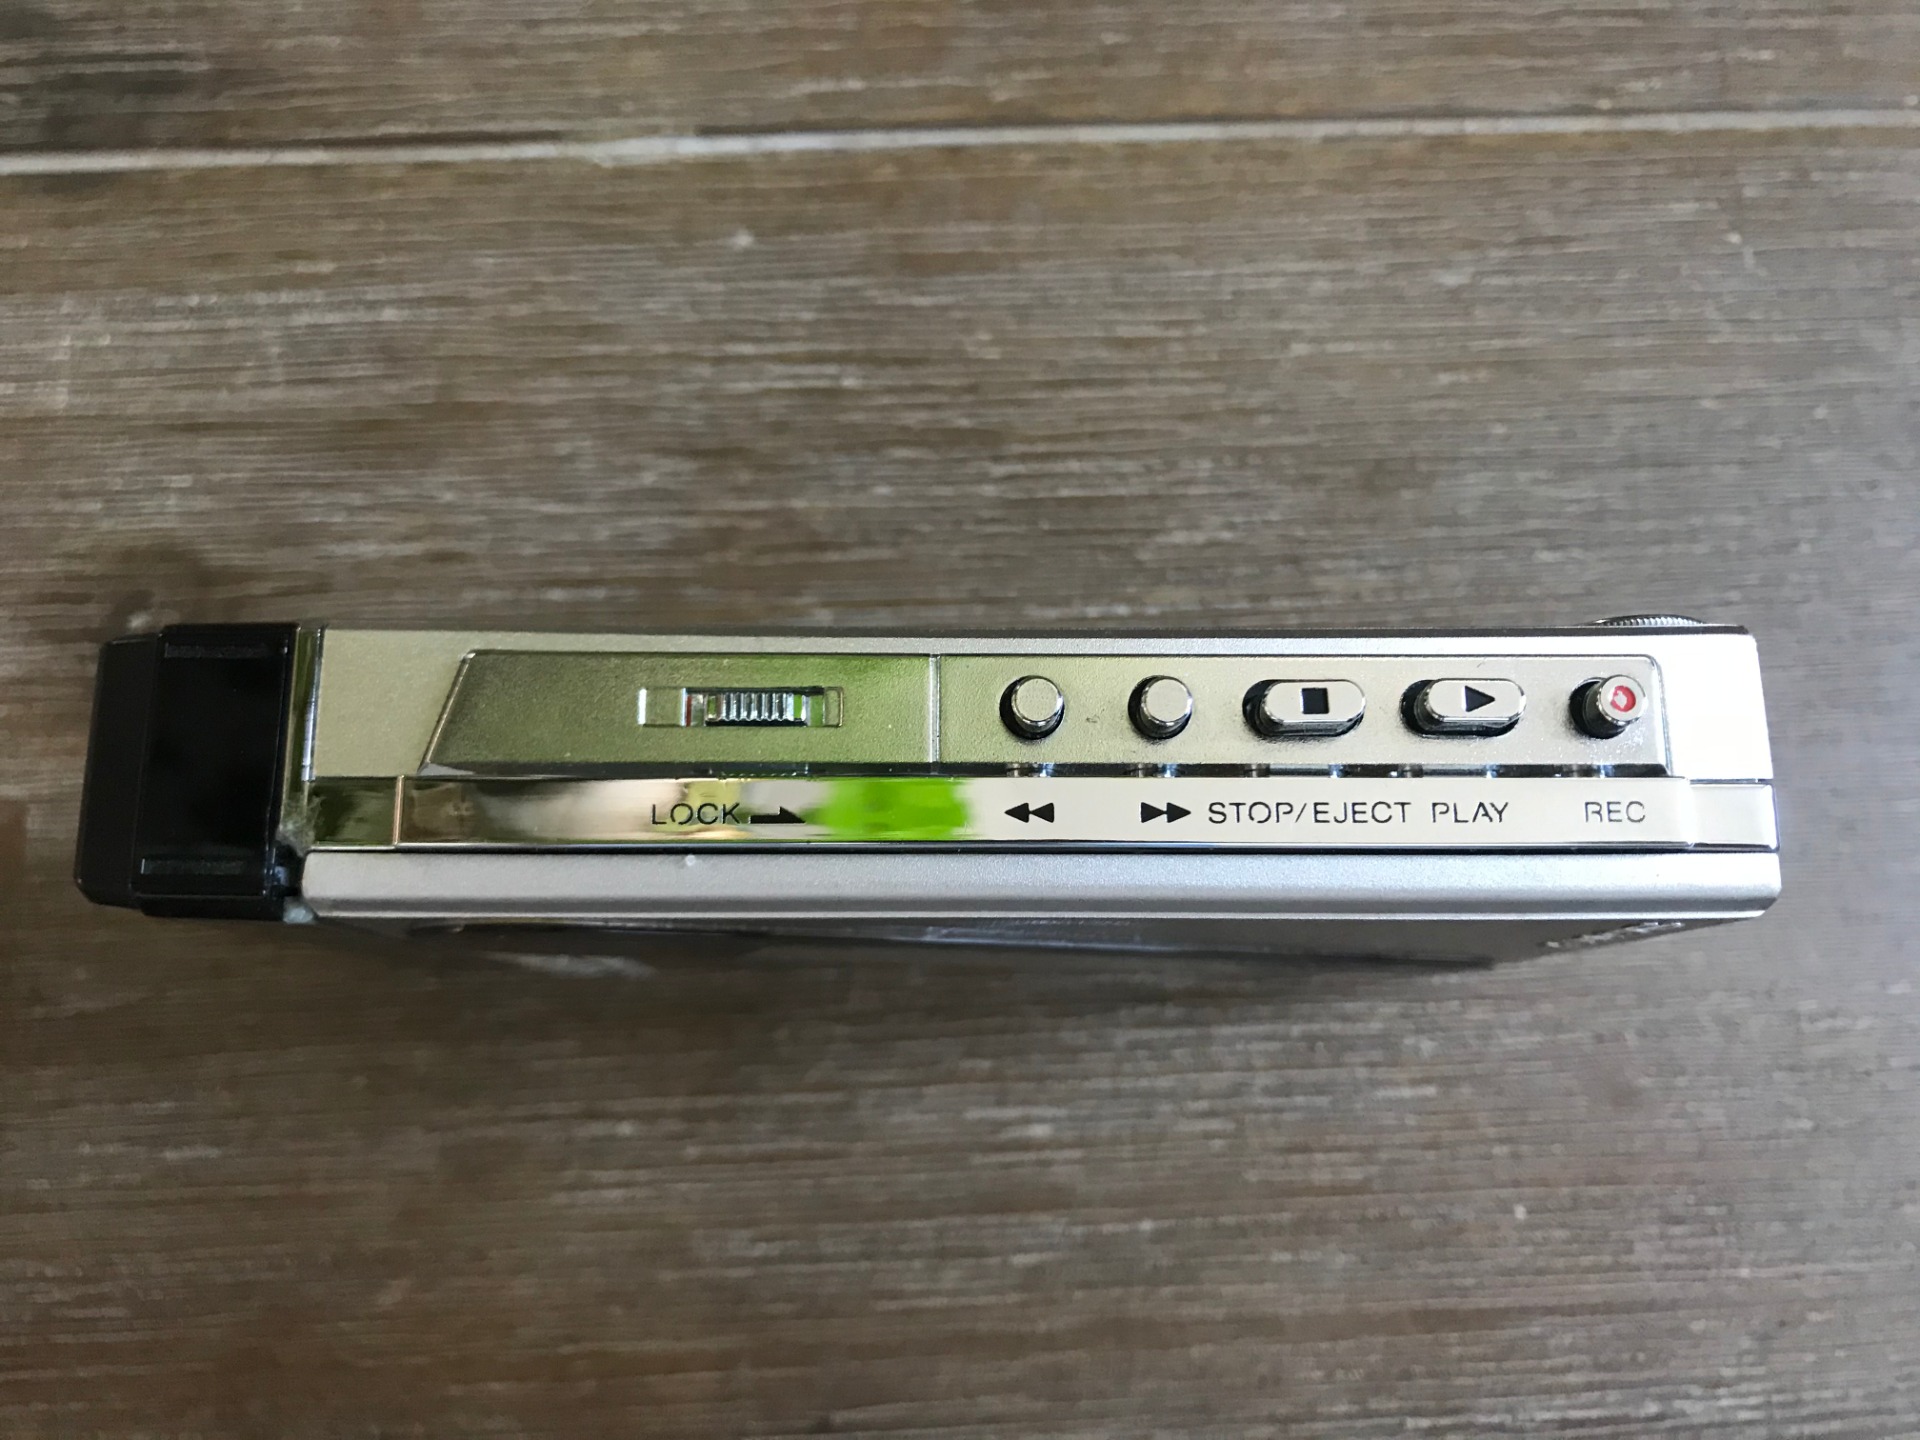
Almost all 'standard' options that you see on a fixed deck can be found on the Walkman. Only the pause button is missing. The material itself is a combination of metal and plastic. It is difficult to see which parts are plastic and which are metal. There are also remarkably few signs of use. (they will be discussed later on, find them yourself until then).
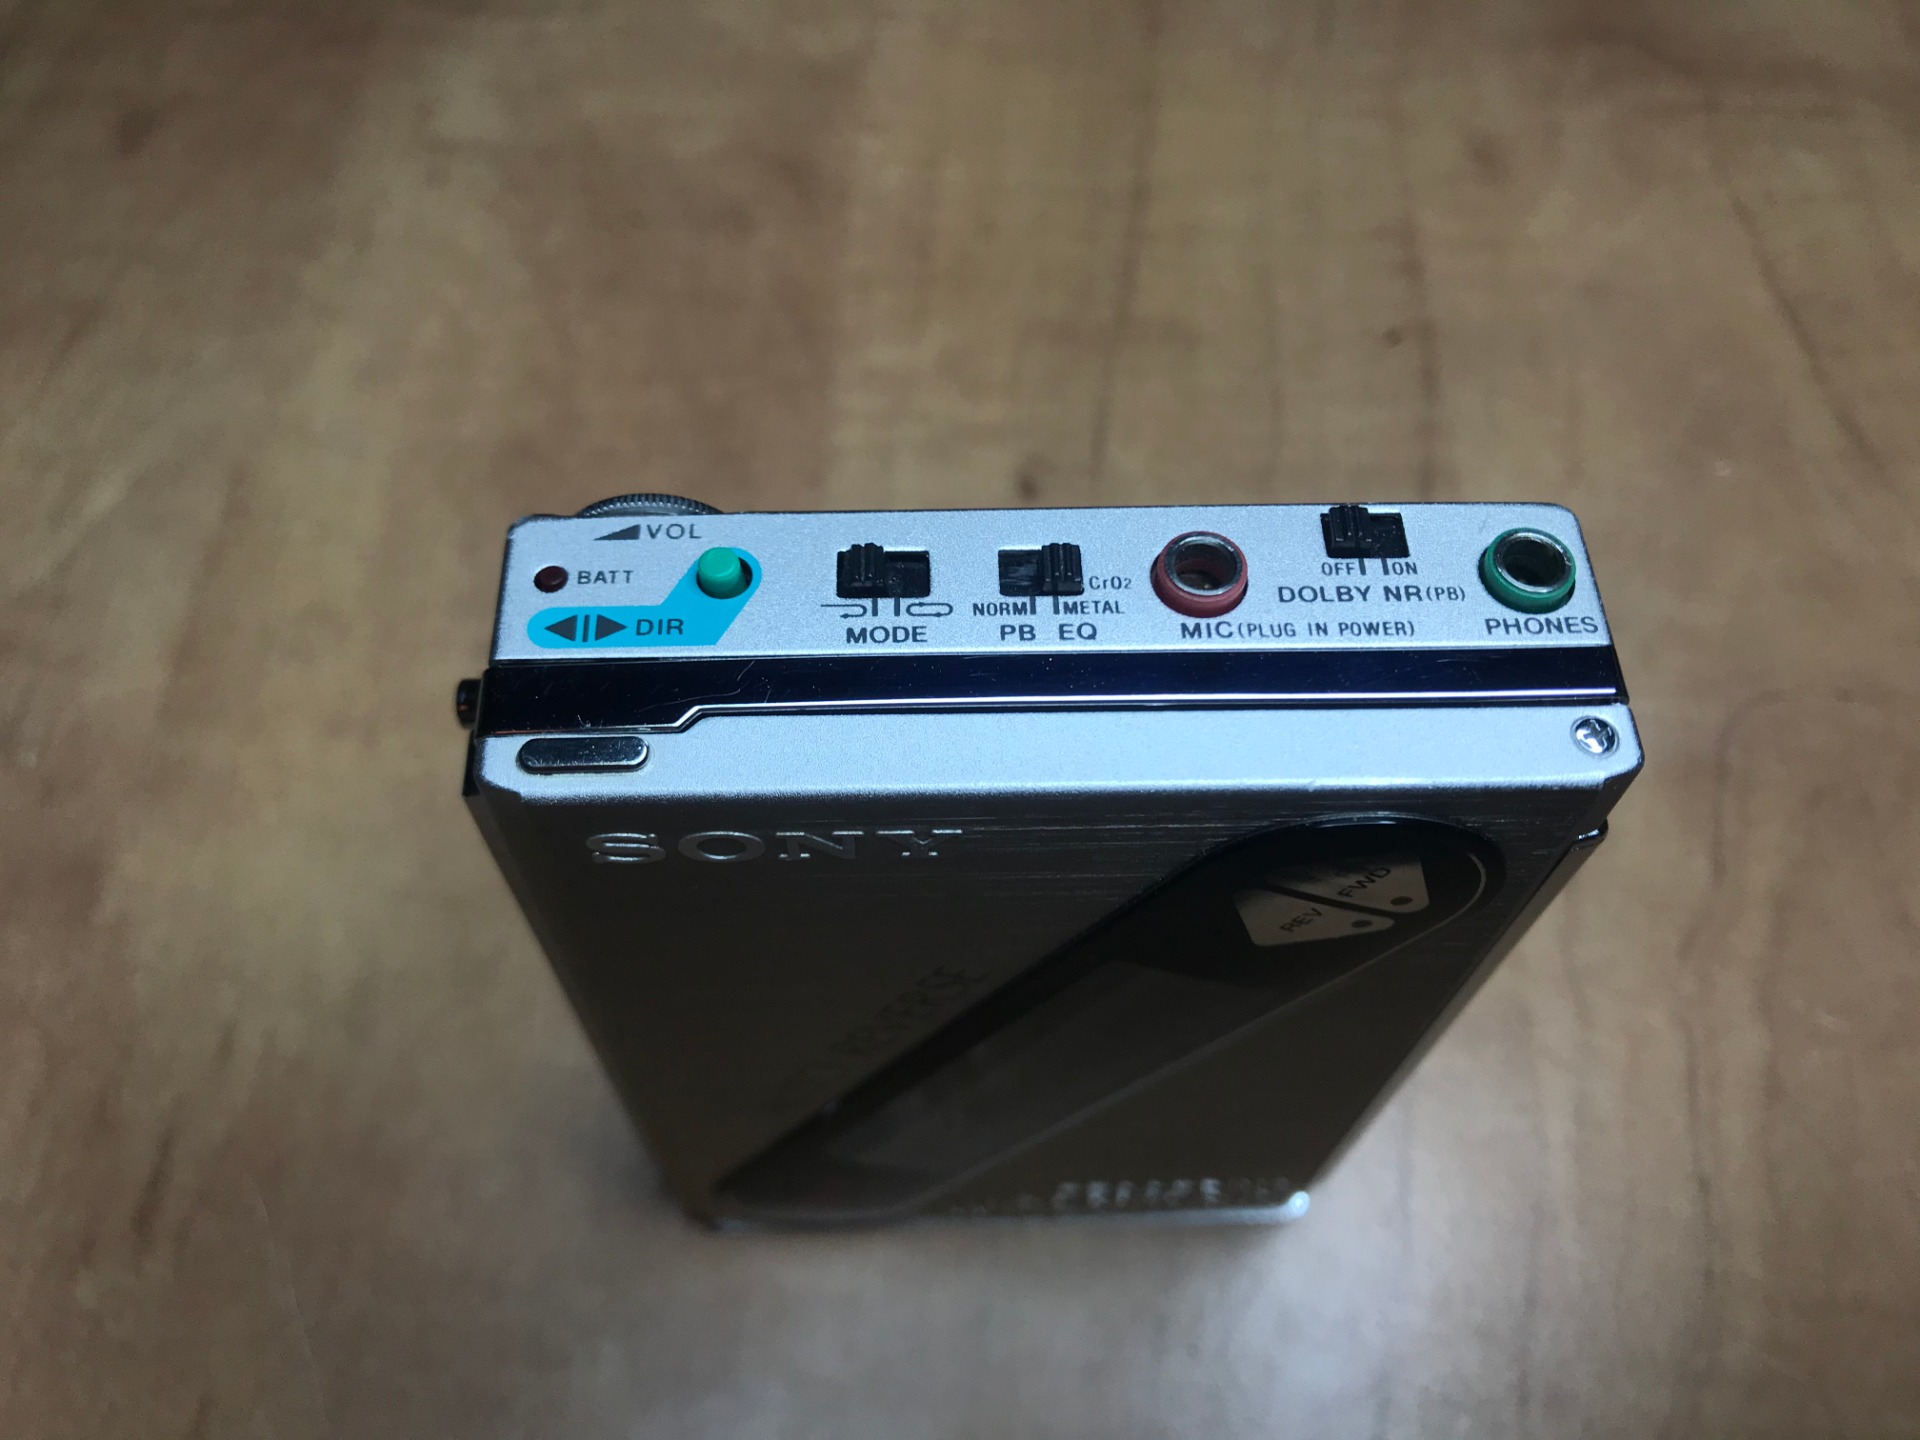
On top we find options and also the connections. With a cpress on the green button you can switch sides, also there is a small red indicator light for the battery, you can choose to play one side or the whole tape. You can choose from the three most common tape types and finally a switch for Dolby B. The connections are for the microphone and headphones.


The volume button is hidden on the back together with the information sticker. If you look closely you will see a small dent on the back. one of the signs of wear on this walkman.


Finally, there is an indication on the front of which side the Walkman is playing. This automatically changes to 'Forward' when you open the lid. The motor makes quite a bit of noise when it switches, the manual states that this is normal.


It is difficult to take a picture in which everything is in clear view, but here's a view of the inside. Again, there is an eye for detail here. The reels are engraved with the Sony name. Everything is neatly and compactly built in, there is just enough space for the cassette itself.

The Walkman runs on a single AA battery. Be careful when detaching this compartment, the hooking parts are made of plastic and can break easily. Fortunately, these are still intact!

The maximum playing time on one battery is low compared to other (more modern) models.
Yet we are talking about batteries from the 1980s. The current batteries have more capacity, and I also recommend that you always take an extra set of batteries with you, especially on long journeys.
It is striking that this Walkman can also use the so-called 'gumstick' battery (mentioned above as the NC-5WM). This is a compact type of battery, these batteries were never a real success. Moreover, you also need another (smaller) compartment.

Under the location for the battery compartment is the sticker with the serial number, would this be the 764,595th Walkman in this series?
Changes are more that this is the 595th or maybe 4595th.
Normally I clean everything before I take a picture, as you can see here, the Walkman is very susceptible to fingerprints.
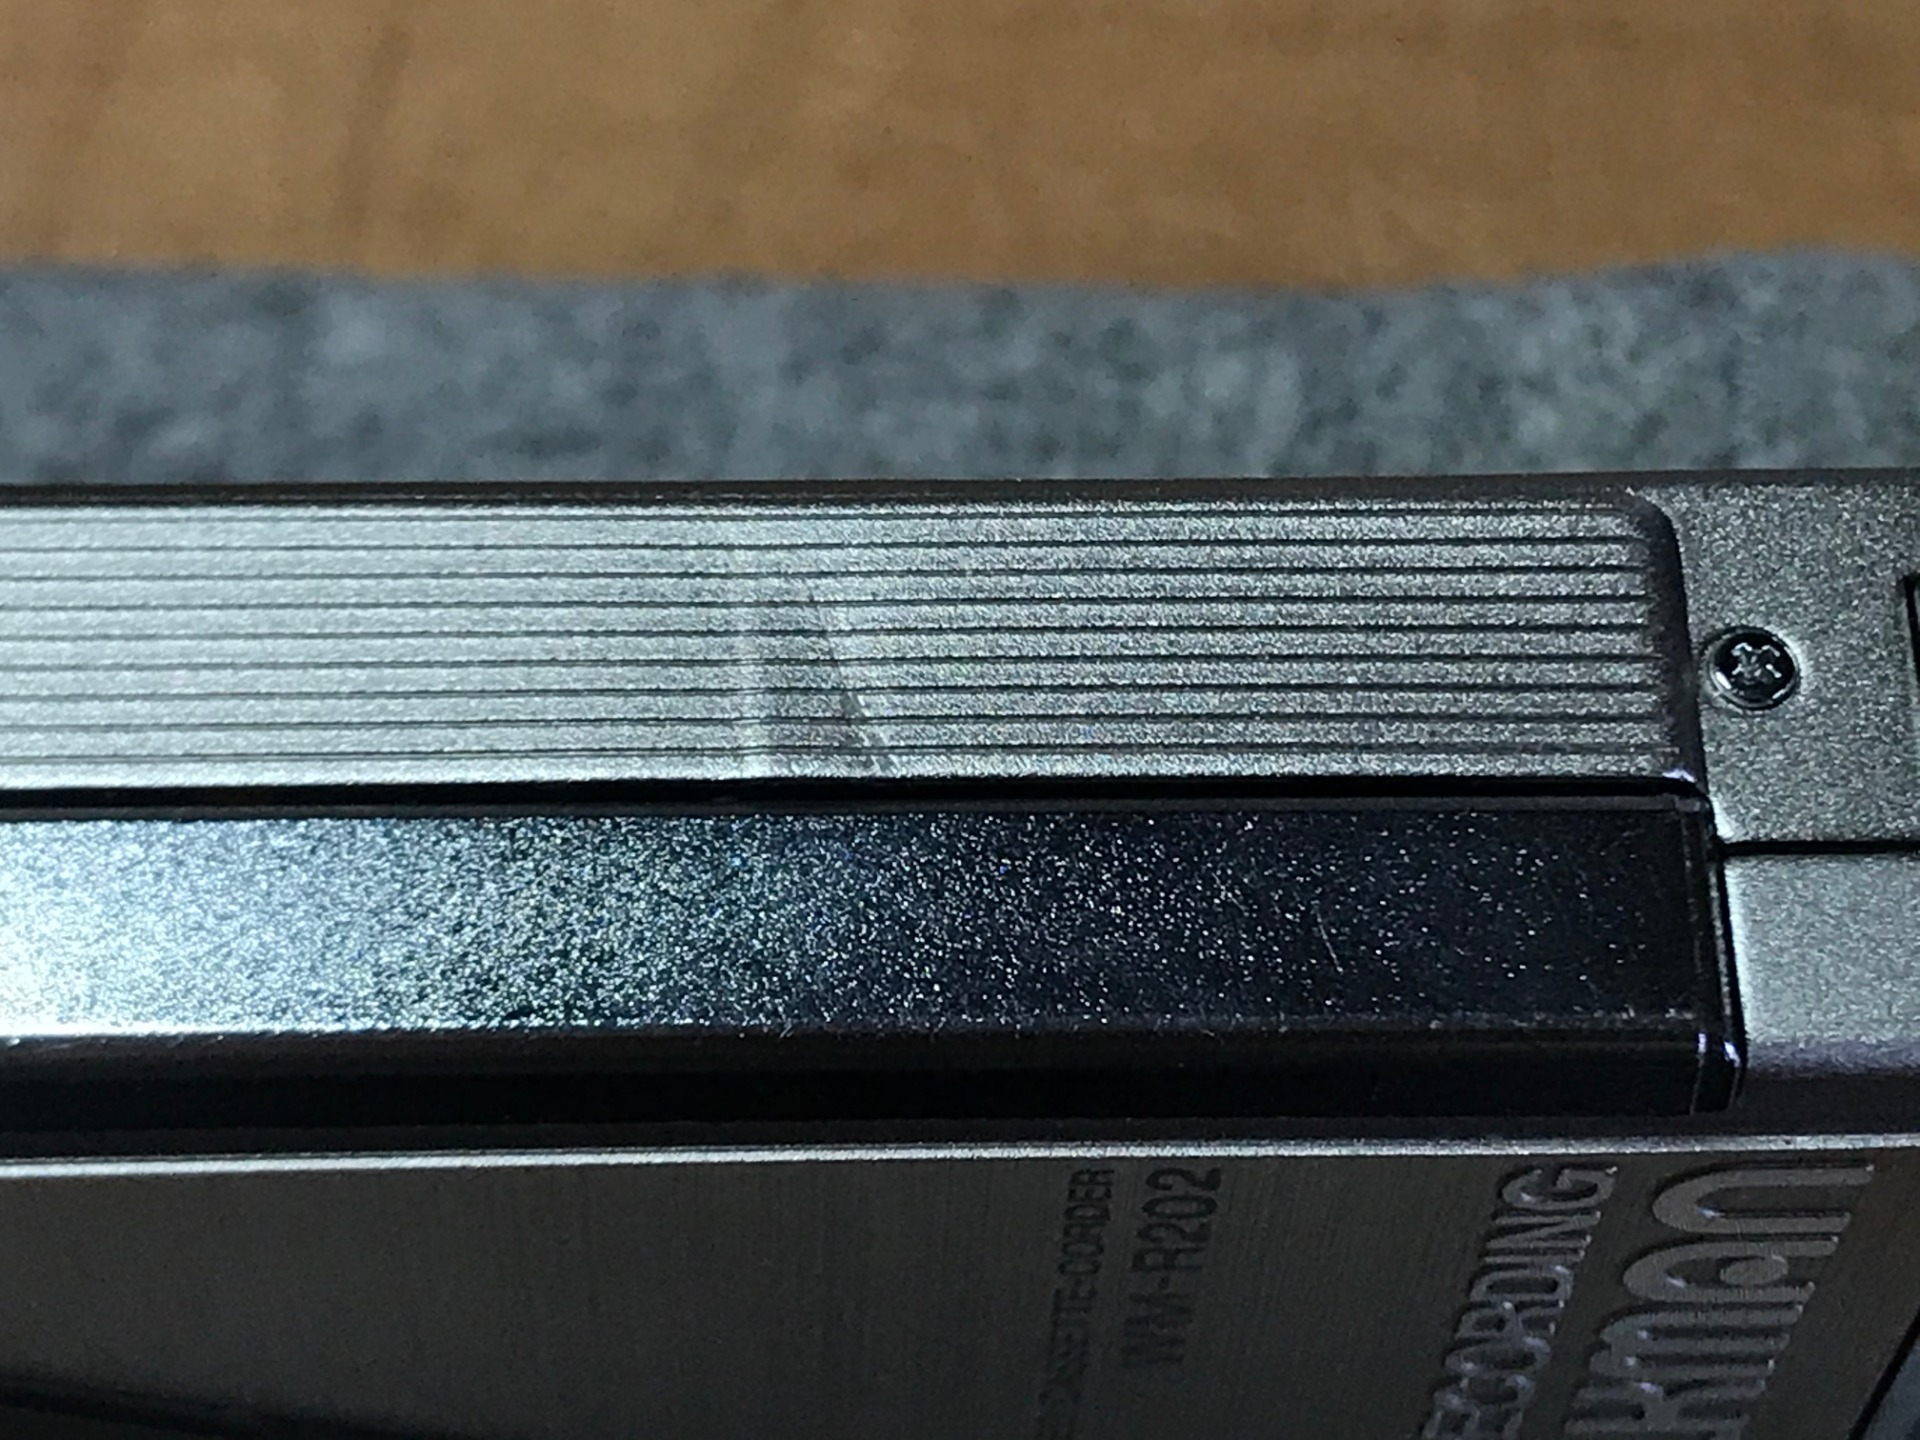
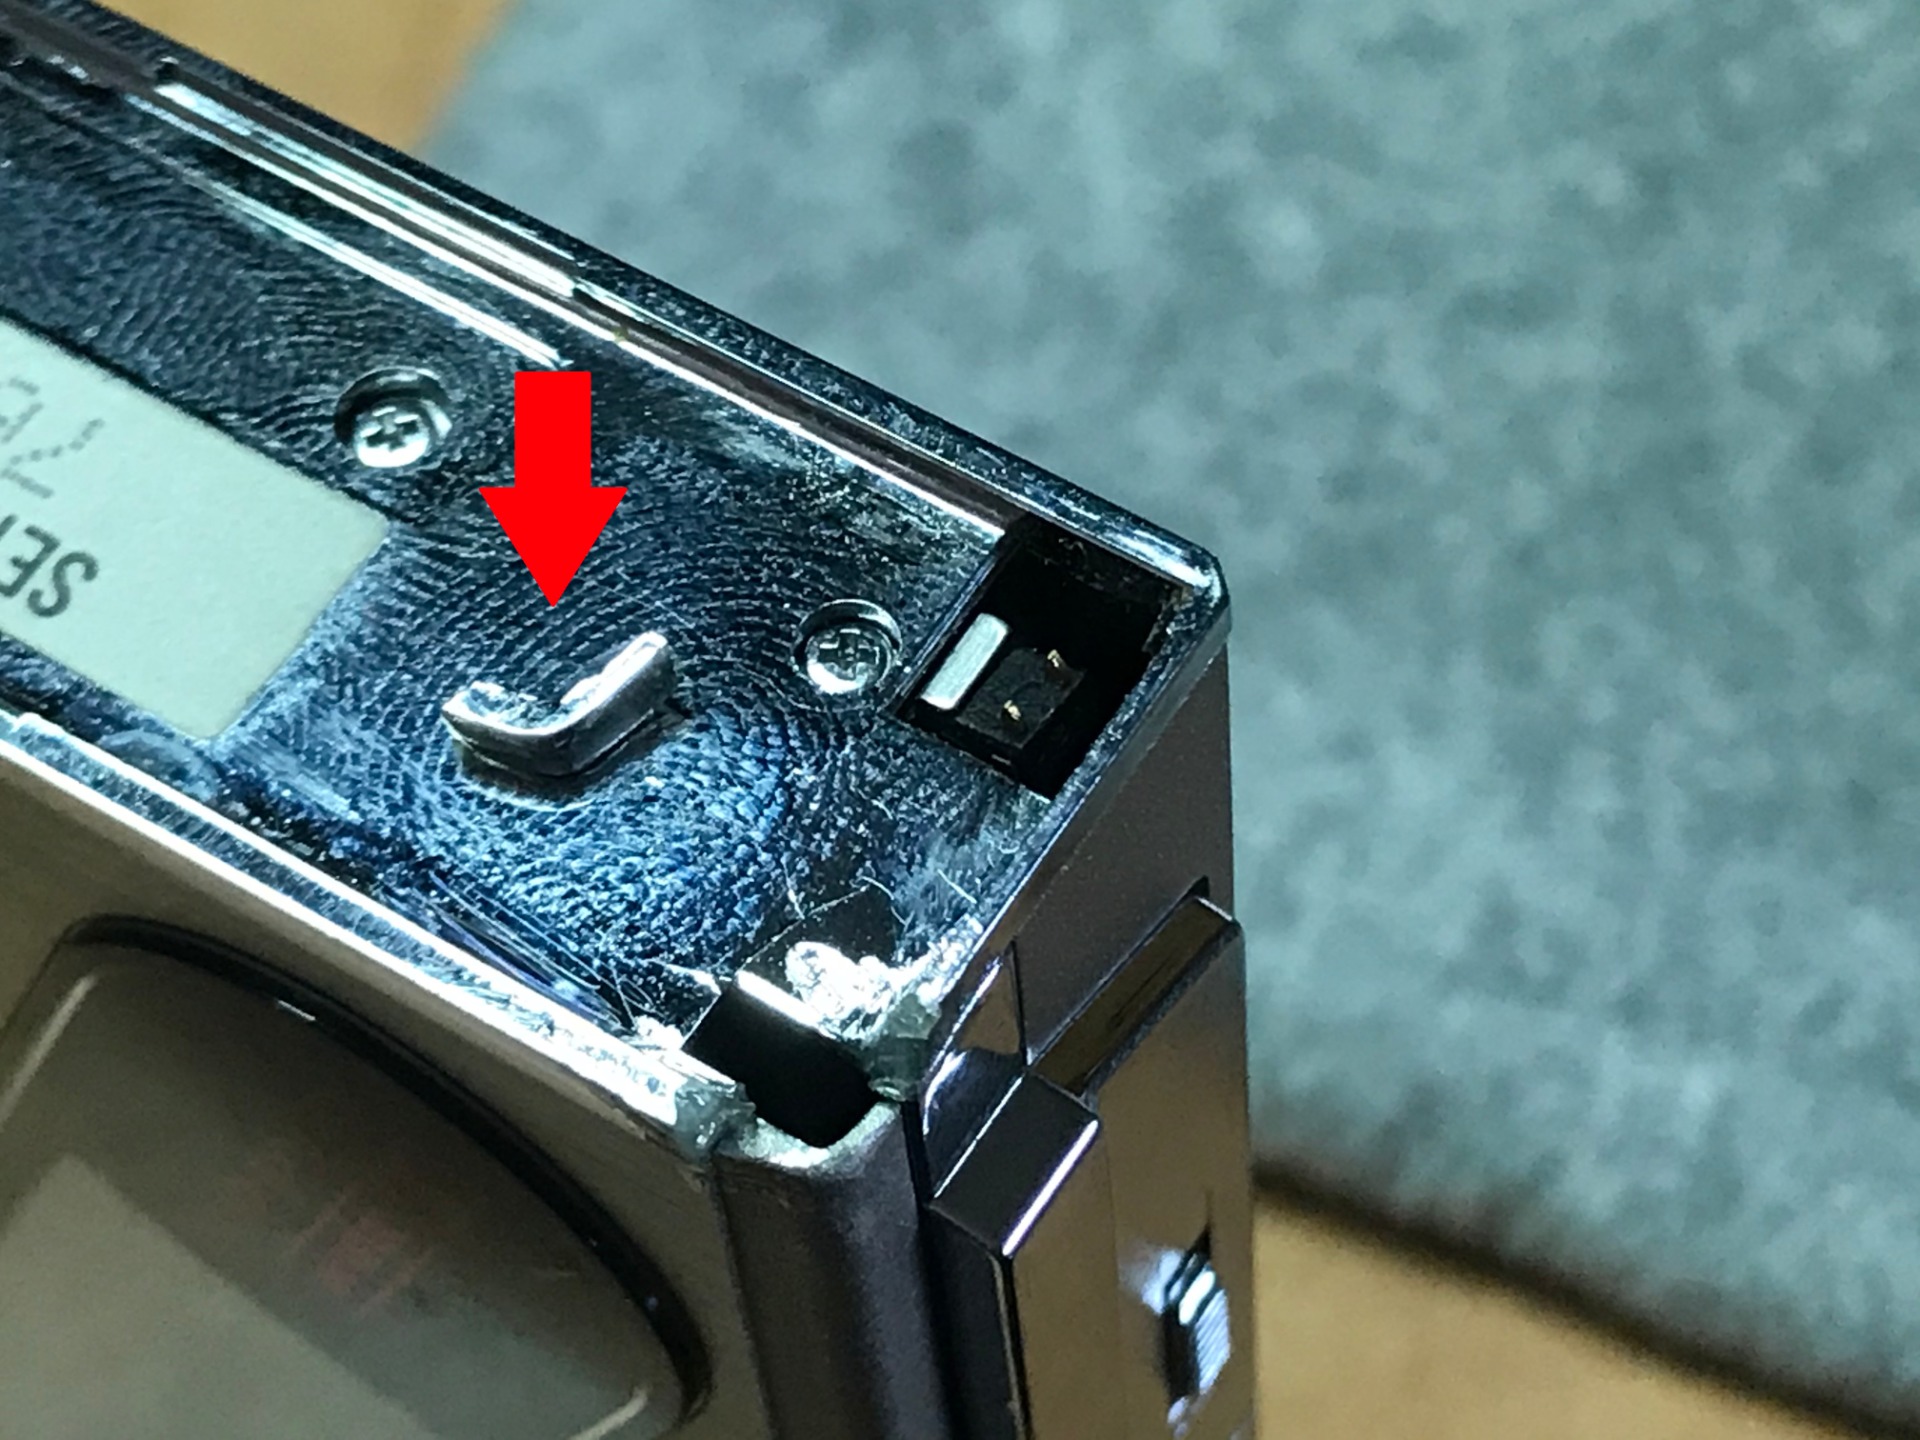
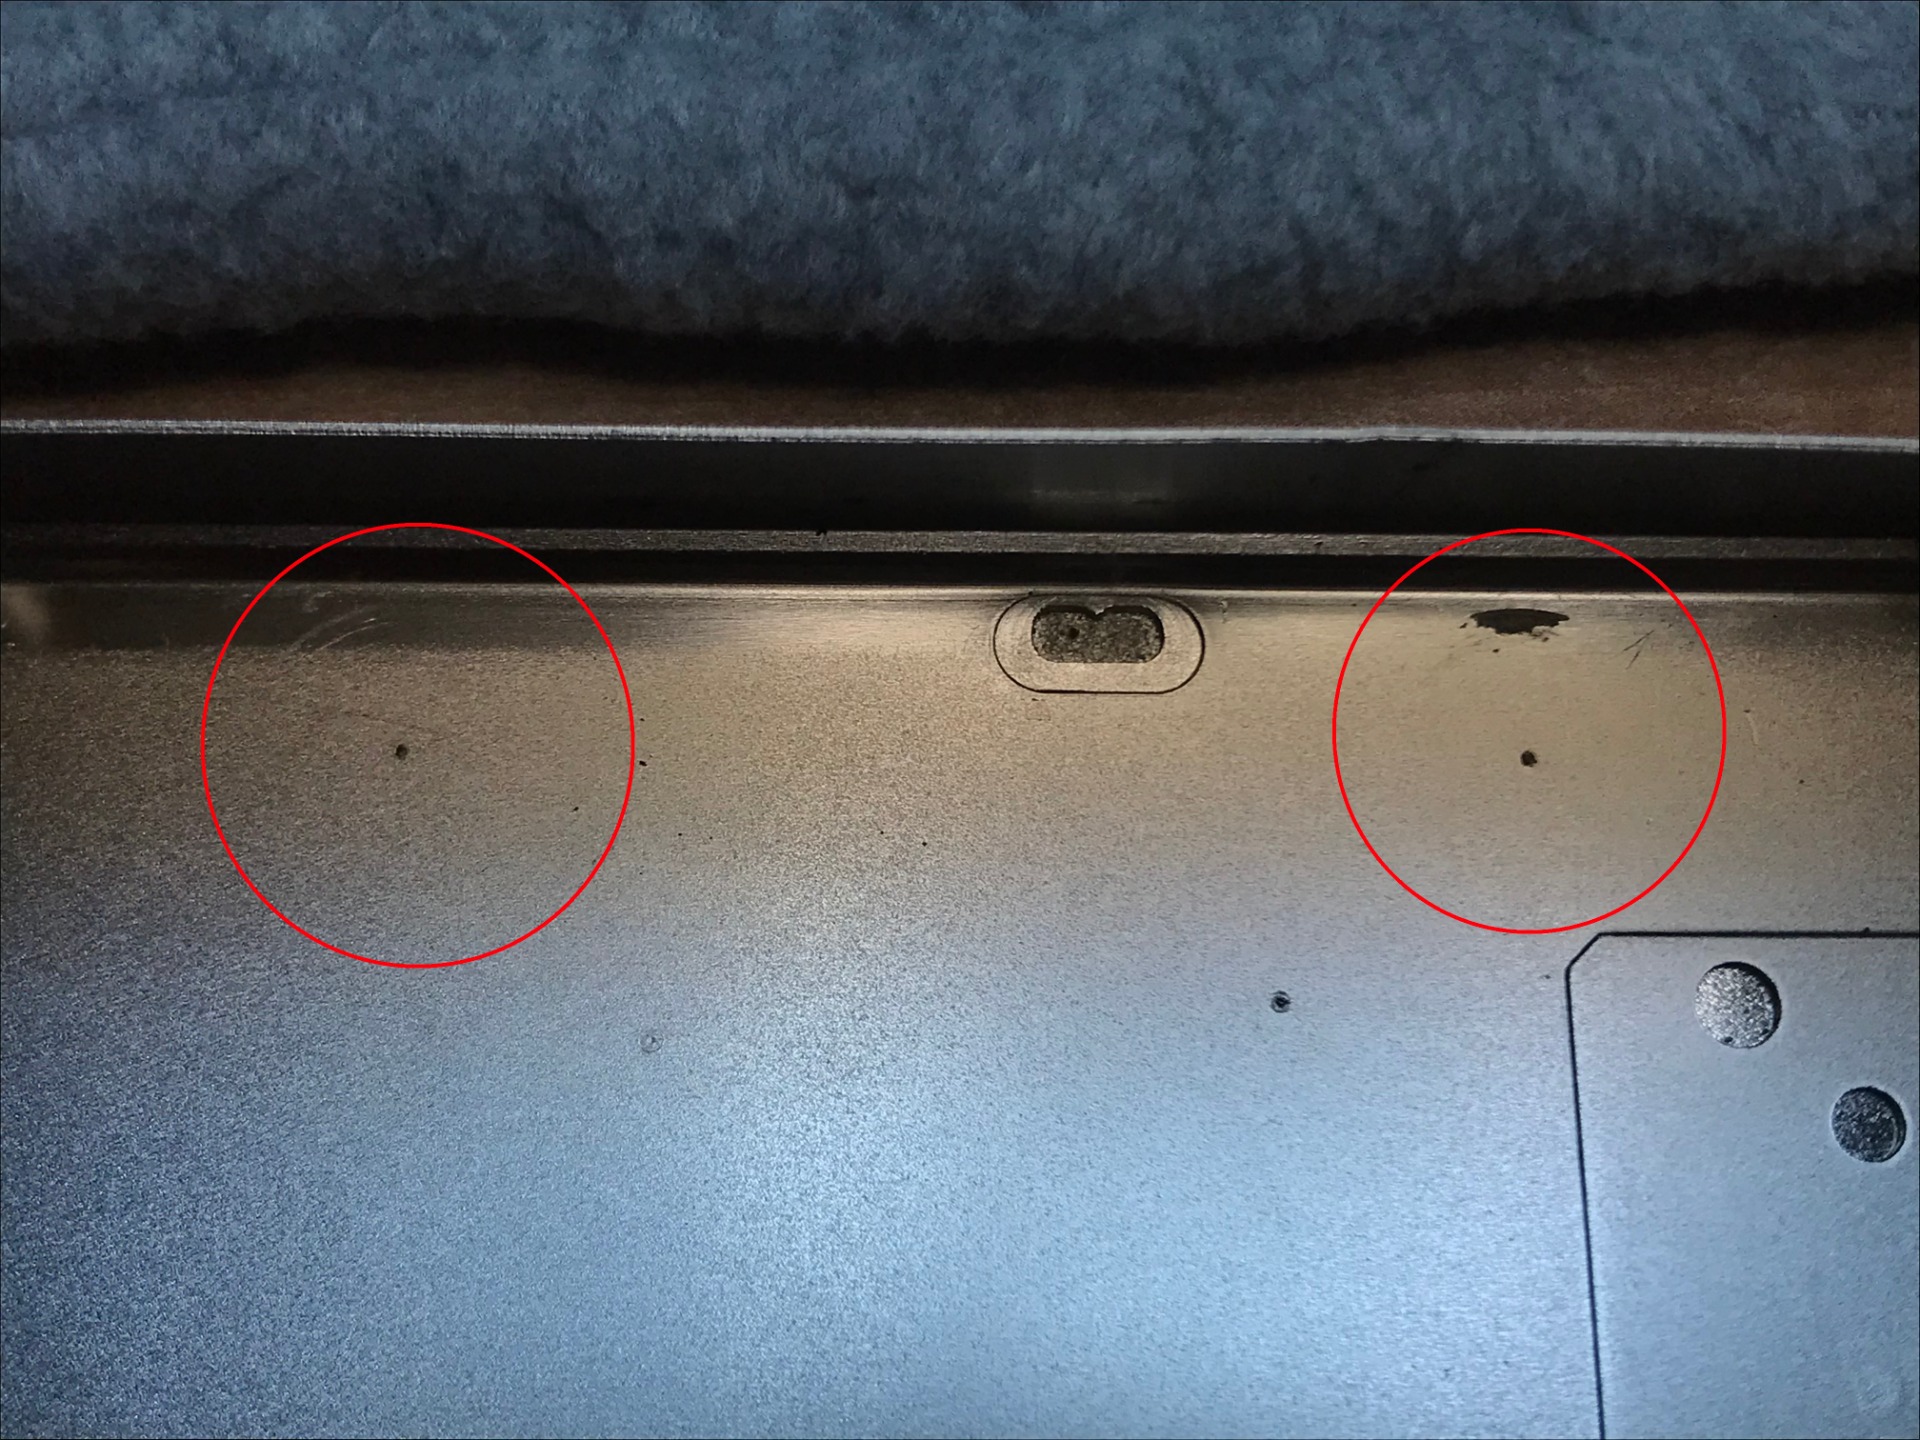
Finally, we have the signs of wear, I can find three in total, on the back some small scratches and a dent, on the side is a small dent (dented outwards). Finally, a small piece of plastic has broken off, luckily I still have the piece so I can glue it back in place. The latter is important, because that piece of plastic keeps the battery compartment in place!
Now that we have studied the Walkman in detail, we can start with the repair.
We need the following tools to get the job done:
- Screwdriver PH00 (Phillips head)
- Screwdriver 1.2mm (Flat)
- Strap Attachment Aid (a hooked bar)
- Fine oil
- 96% Alcohol
- Cotton swabs
- Tray for screws
- Possibly a magnifying glass


I remove the battery compartment from the Walkman, we also immediately look at the weakest link in the entire Walkman, the small hooks that hold the battery in place. The contact point is also incorporated at this point. if one of the hooks break, you can no longer use the entire Walkman. Unless you tape it to the Walkman...
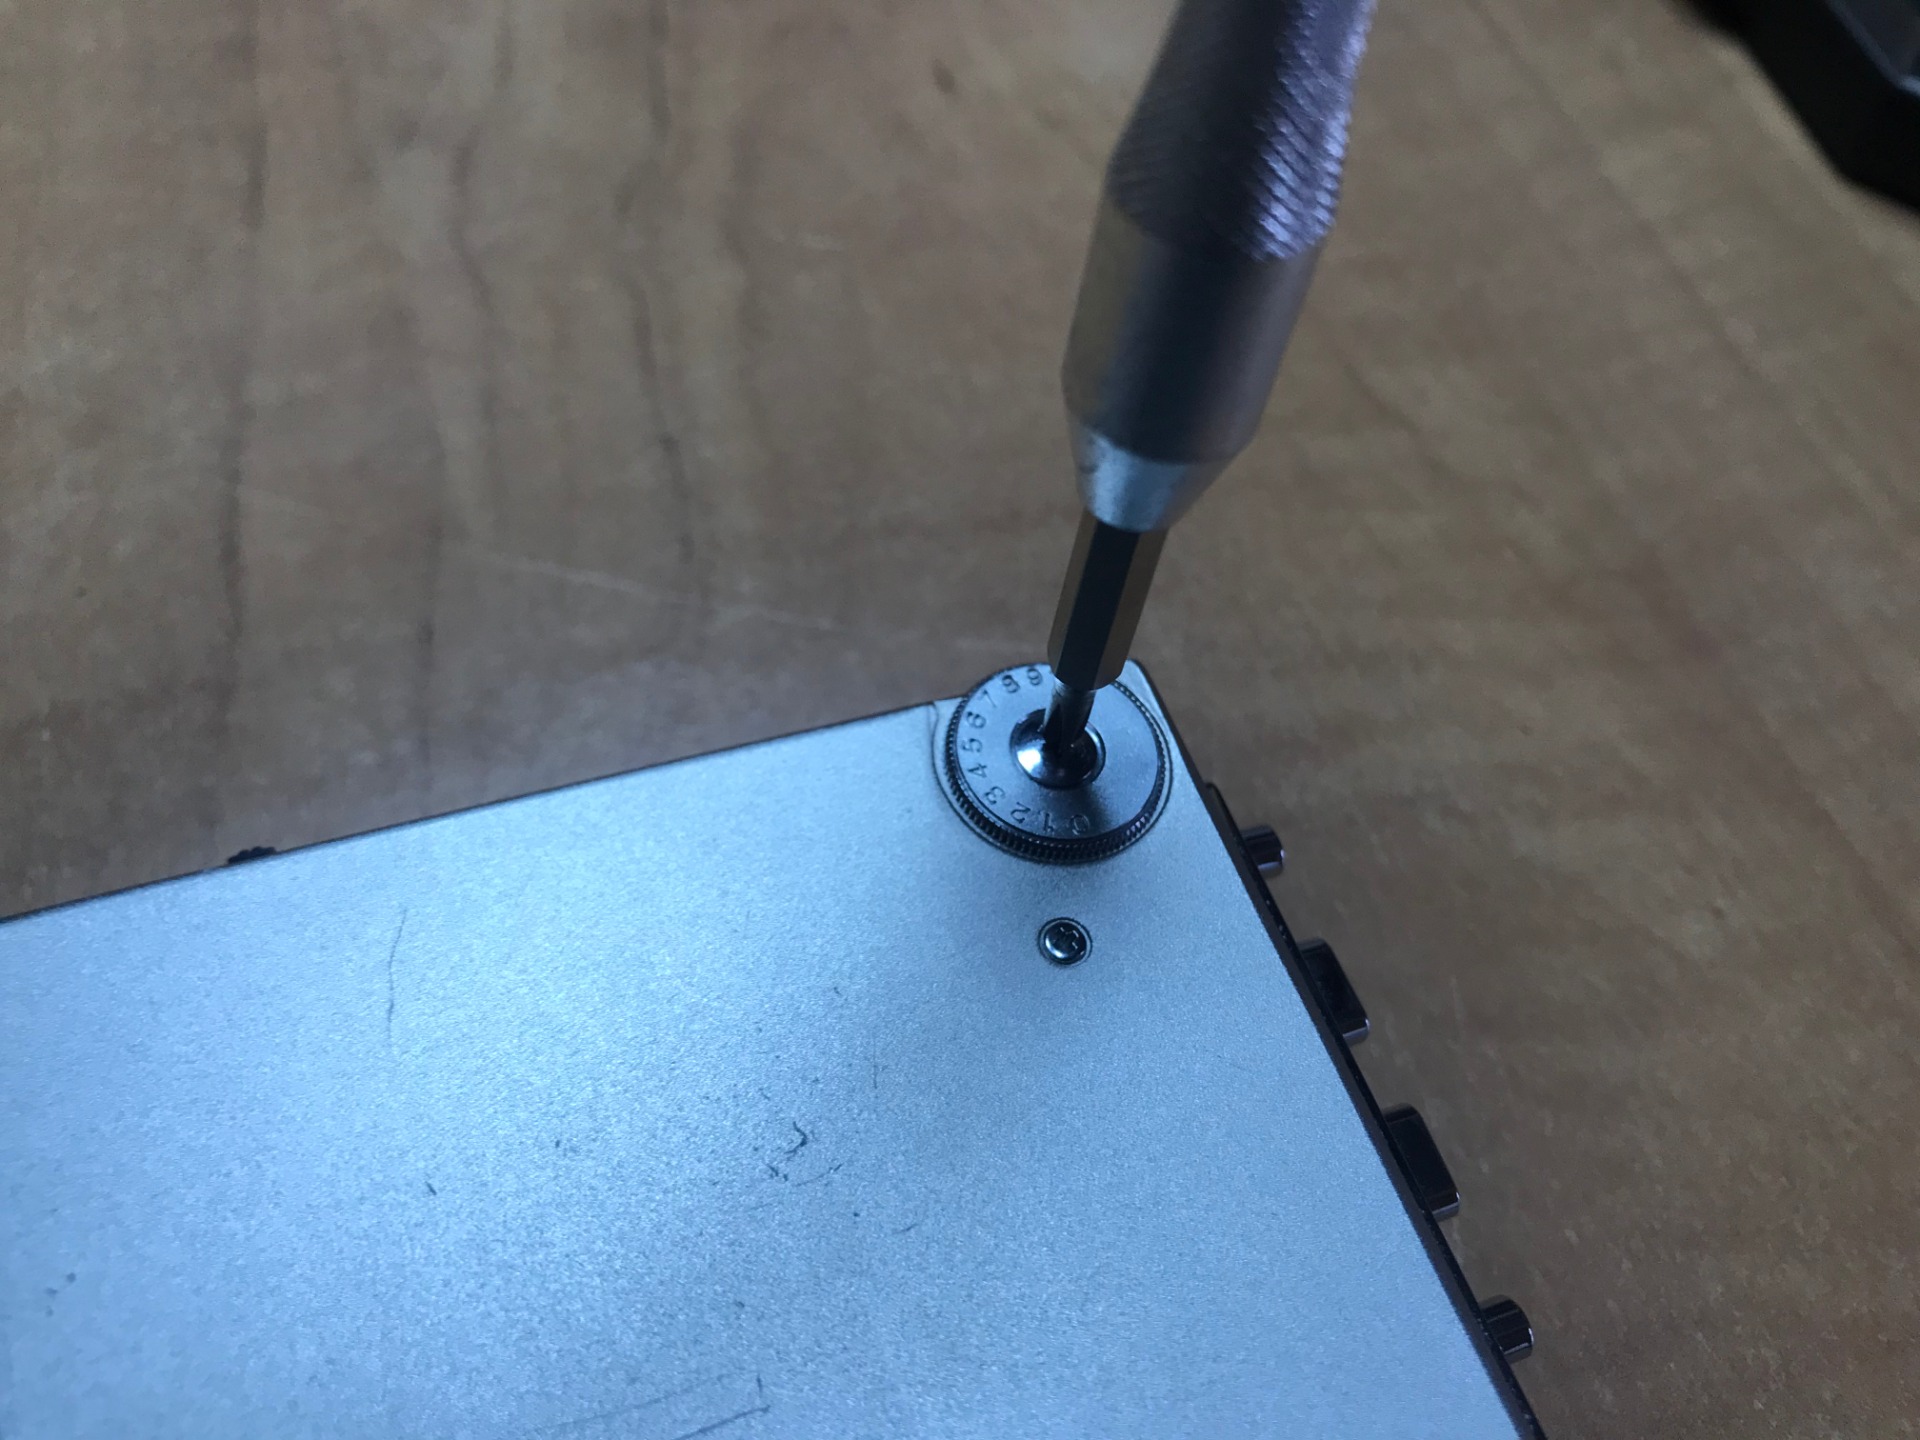

First I unscrew the volume knob, you'll also turn the volume knob to 100% with this, of course the exact opposite happens when you mount it back.
The volume knob can be fixed in two ways, you can see this on the underside of the knob, you can mount it the wrong way around, so make sure that the position is correct before you put it back in later.
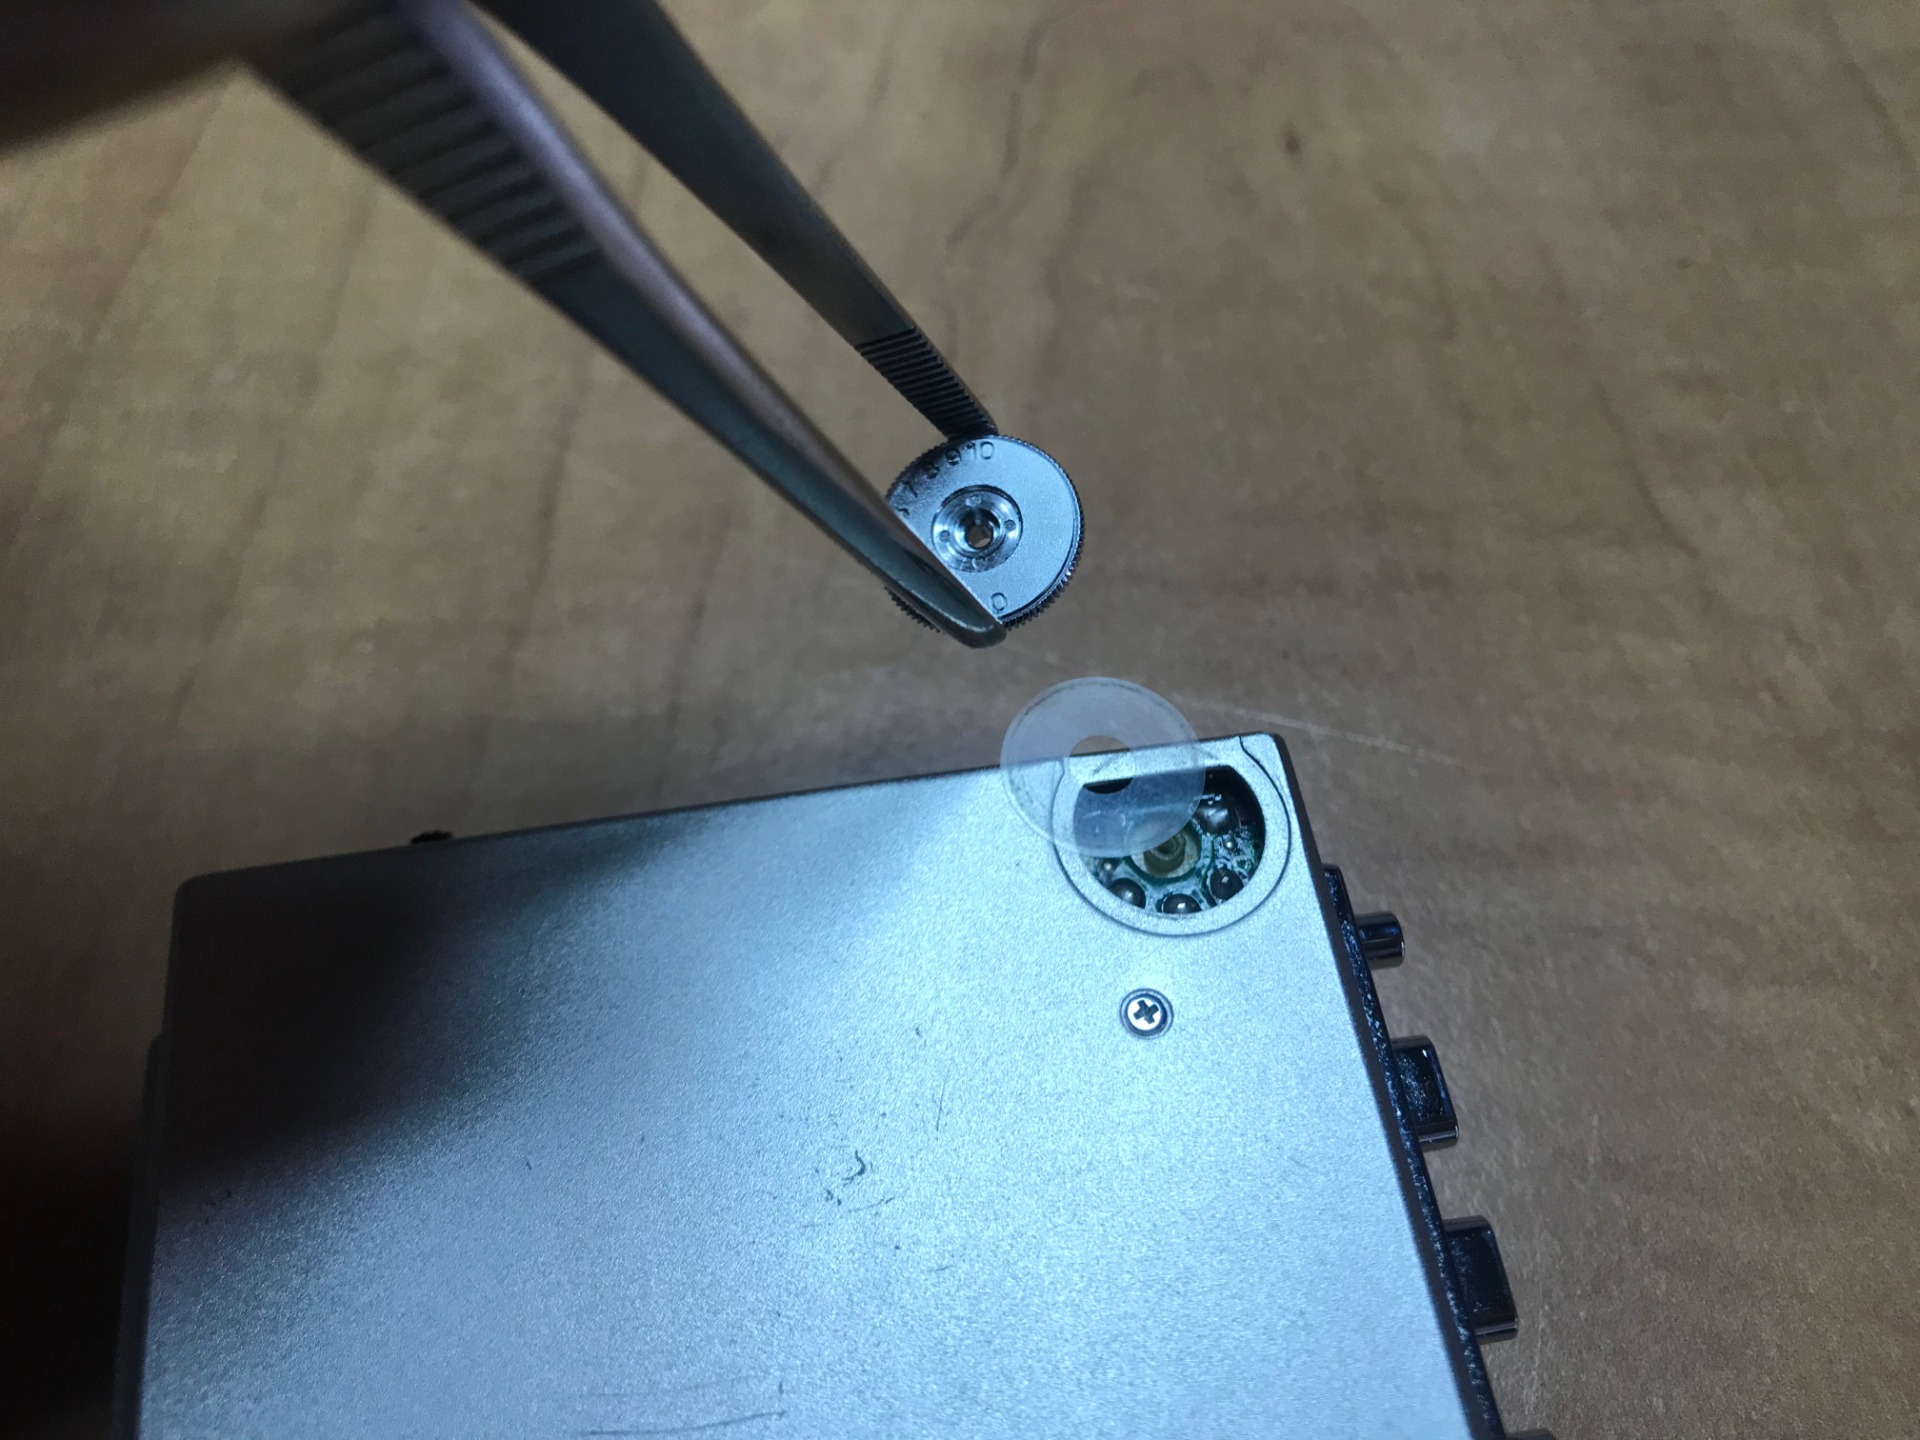
Under the button itself is a plastic membrane, so the metal of the knob does not rub against the metal housing.

After the volume knob, the screws on the back can also be removed.
There are two small screws on the side that need to be loosened.


The screws are very small, put them somewhere where you won't lose them. Except for the volume knob screw, all other screws are the same, so you can put them together.

Now the housing can be removed, do this carefully and start at the bottom, lift it over the buttons and connections. Please note, some buttons can (and will) come loose, so it is actually better to lay it flat when you do this.


The two buttons are for Tape type and Dolby, they are also both different, and must be put back in the same way. The 'Tape type' button has two small pieces that should face the open side, the Dolby button has a protruding nub that fits over the switch itself.

As mentioned, Sony Walkmans are known for being compactly built. The WM-R202 is therefore no exception, fortunately everything is now within reach.
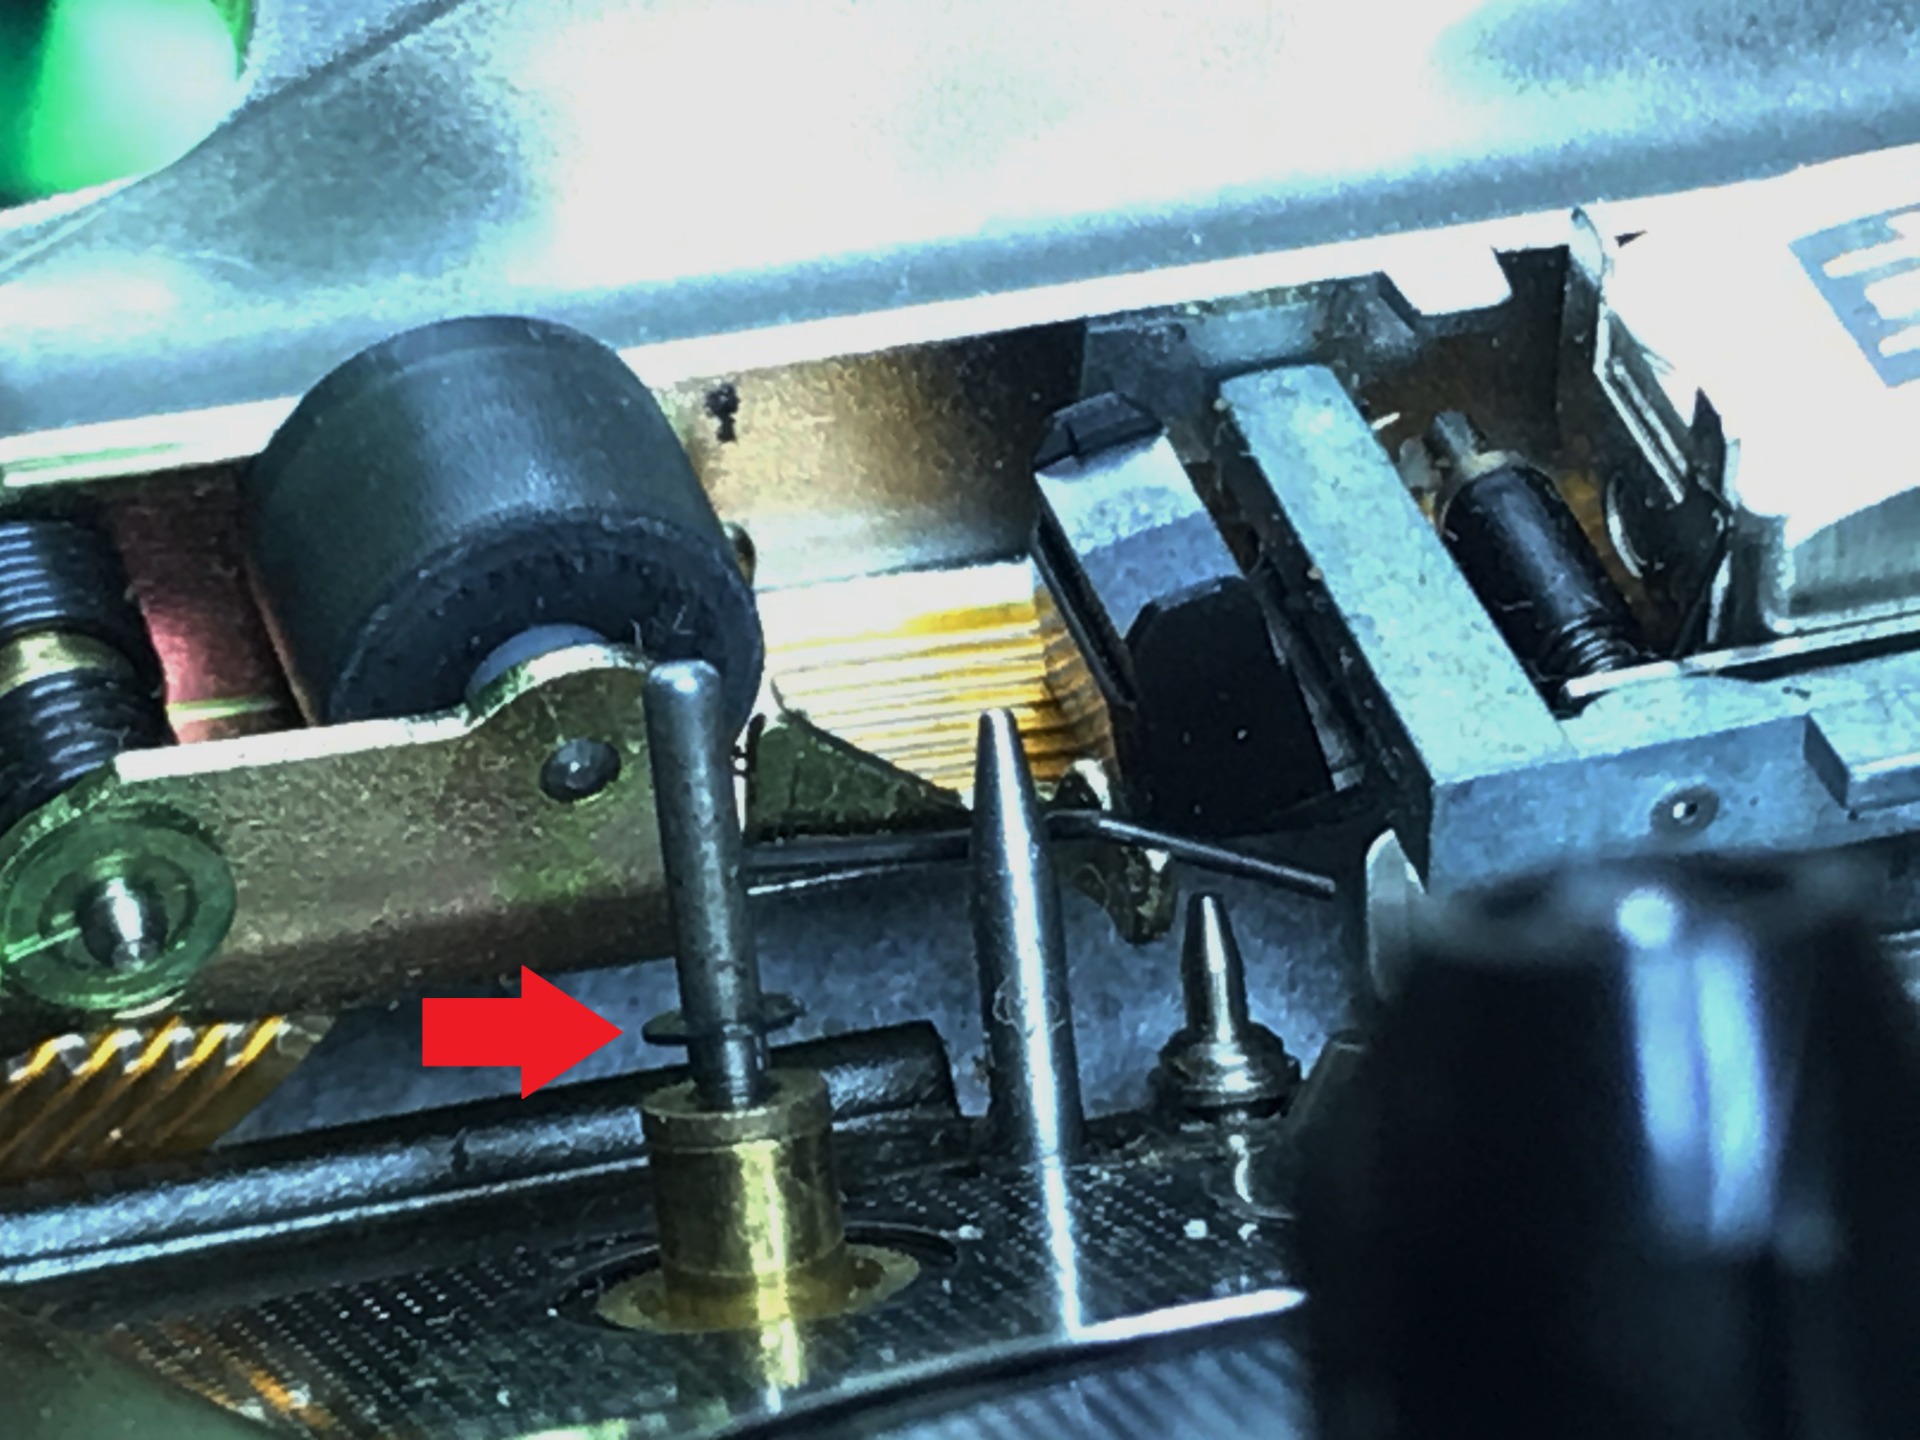
We see the belt that runs along the many wheels. At the top right you can see the motor hidden under the circuit board, the small white gear (above the black one) determines the direction of rotation of the transport, the white one on the left is interrupted, it only turns to turn off the Walkman or change the side of the tape.
The brass wheels are the flywheels of the device, they ensure stable playing of the tape.

Of course there will be a new belt, I bought this through a web shop and it arrived within two weeks.

Here the old and new belts next to each other, you can see that the old (left) is somewhat deformed, but something else strikes me, the new belt is thinner. Experience tells me that new belts are almost never equal to the original, some mention this with the excuse that it is better. In my opinion, the new belt should just be the same as the previous one. Unfortunately it is difficult to know in advance whether the new belt is correct, fits and works well, we will have to experience it ourselves...

With a lot of effort I managed to take this 'action' picture, it is not easy to mount the new belt and also take a picture. I strongly advise you to take a picture of how the old one used to sit (or use the picture on this website as an example).

The new belt is on. Here's another photo of the tool I used. The set-up aid (tool at the bottom) comes in handy here, but is actually still too large.
You can see I put the battery back in again, it's time to test it. Be careful with all open parts, you can easily damage it.
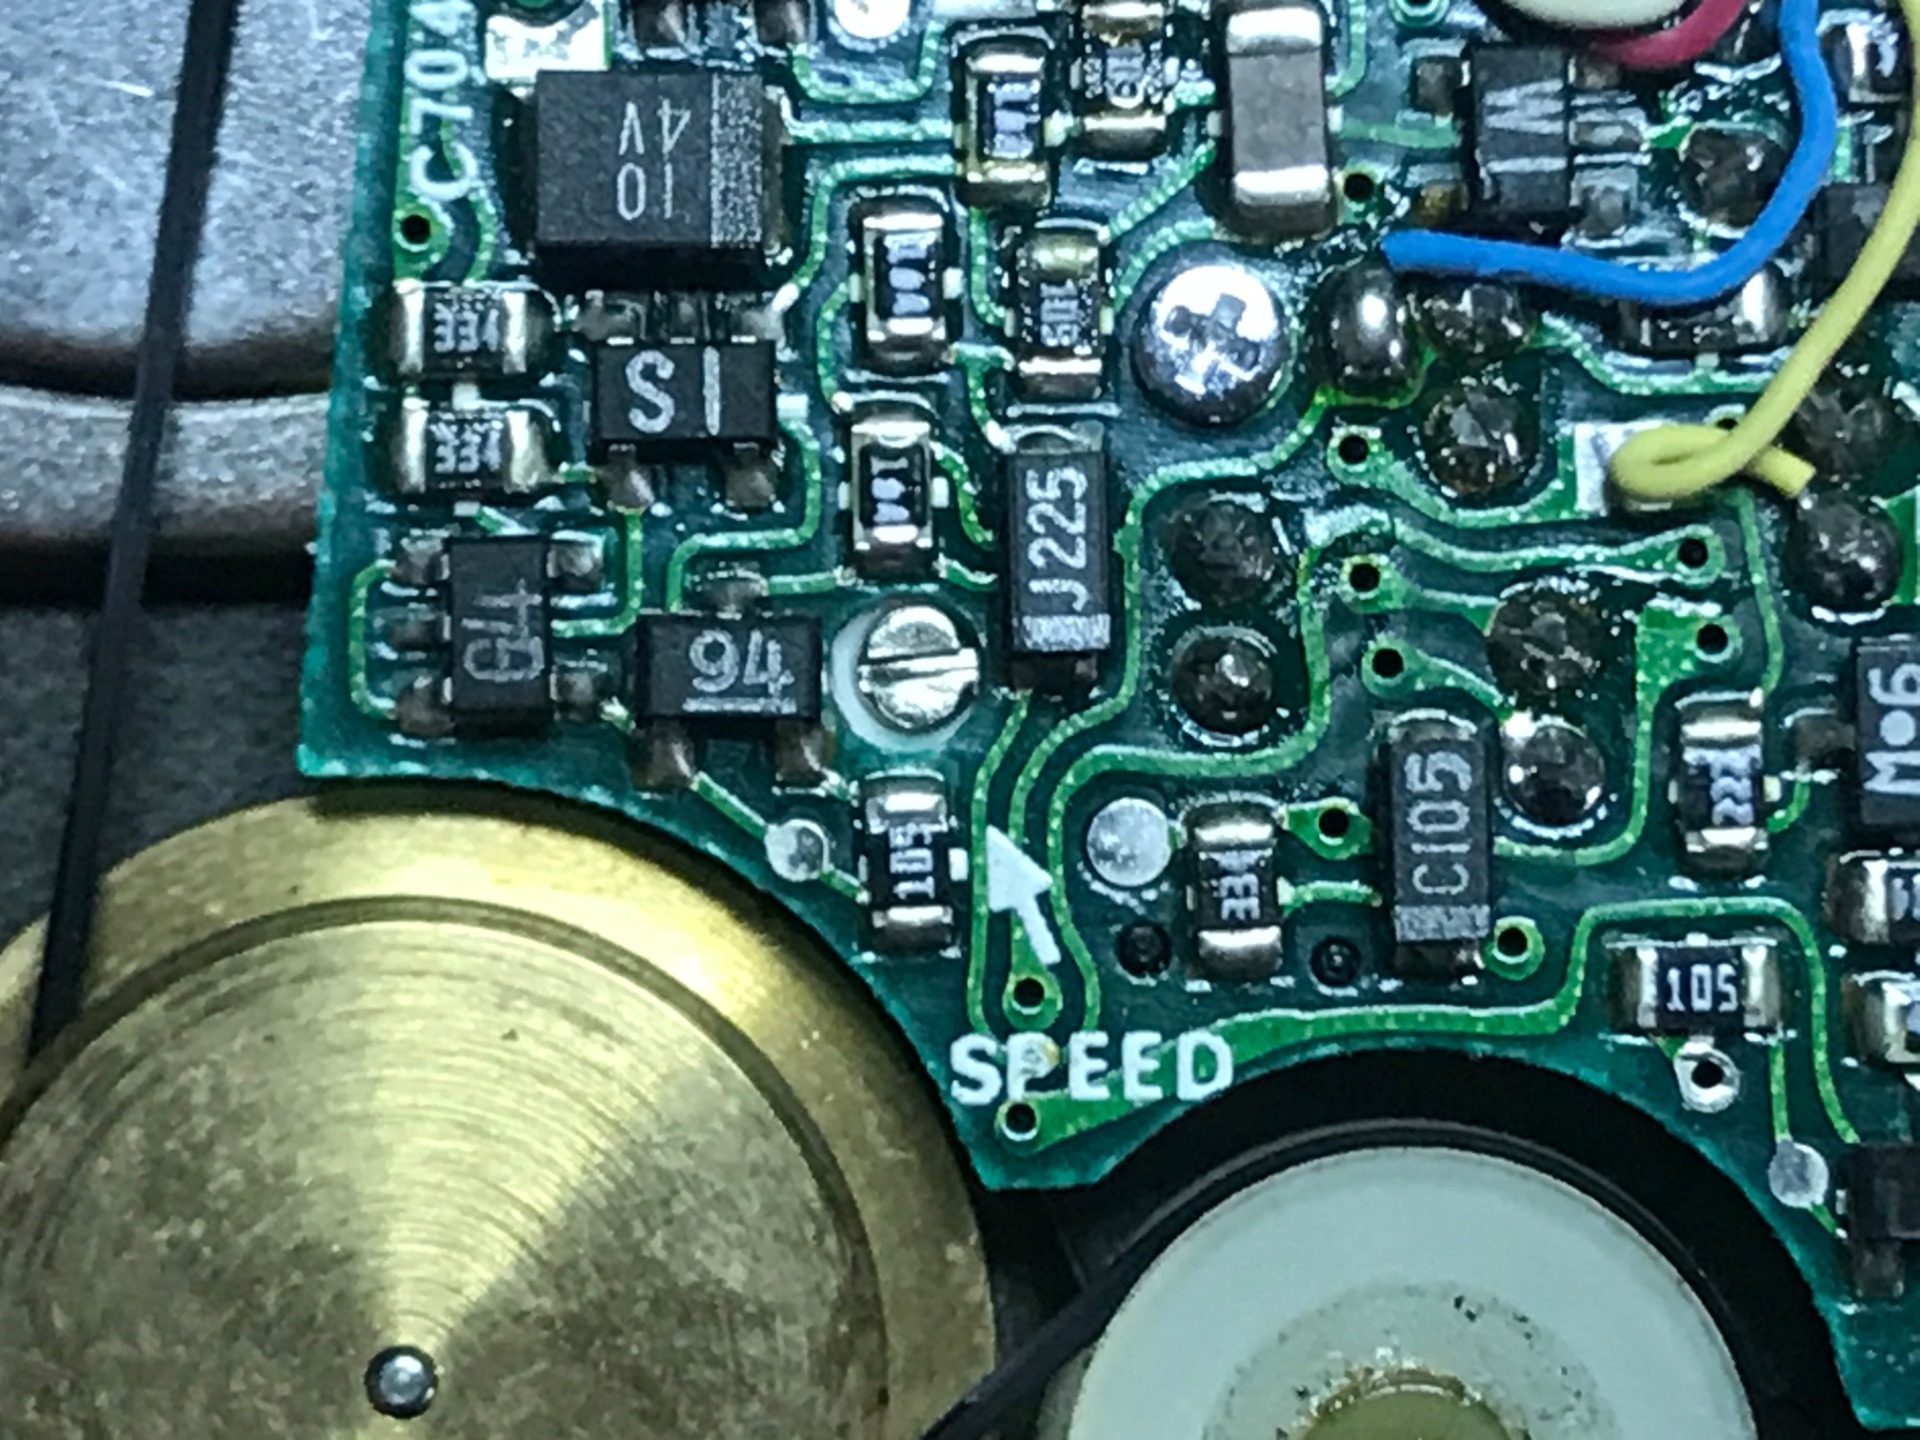

New problems arise during testing, the speed is no longer correct, it plays too slow. Although it is not the correct solution, the motor can be adjusted via a small screw. Adjust it with a small flat screwdriver (1.2mm). Preferably do this with a plastic driver head to prevent contact with other parts. Or remove the battery compartment.
(To mention, I actually adjusted the speed while it was playing, in this case you can immediately hear if you are adjusting it properly, this is the fast, dangerous and lazy method, do not do this yourself without the right experience and laziness).
You can also play with the Dolby adjustment, but I see no reason to touch it.

After some testing everything seems to be okay again, the Walkman can be put back together, I first put the two buttons back that have come loose and smear my fingerprints everywhere in the process. Slide the housing back over the buttons. Make sure that the buttons remain in the right place and switch them back and forth once the housing is on, so you know whether they are in the right place or not.
After this the screws of the housing can be placed back as well as the volume knob. Make sure that the volume knob is correctly positioned and test it as well. After this, I polish the Walkman for the umpteenth time to take photos, by the way, use a dry lens cloth for this.

Now that it's all put together again, I'll test it thoroughly again. Almost everything works properly, but it strikes me that it is less stable when playing forward (A side) than when playing backwards (B side), strange. Still, I decide to take it out for a few days, after all, I bought this Walkman for one main reason.
Along the way I notice that it can hardly withstand shocks, every small bump with the bike or step you take on foot is heard back in the music. Yet it passes the biggest test:
Every time I take a Walkman with me, I suffer from interfering signals. Transmission towers, mobile devices, power lines, even the lines above a railway, the Walkman picks up signals from outside. Especially annoying if you are in a train with people using there phones around you. Your own mobile also gives signals every few minutes, this comes through so loud that it hurts your ears even at lower volume.
In theory, you can solve this problem with the Faraday cage. By shielding the sensitive equipment with a metal housing, you block the interference signals and you no longer hear them in your music. The WM-R202 (partly) has a metal housing and indeed, when passing transmission lines and also with my mobile, there are no more interference signals coming through the music. With this test passed it's time to look at why it plays so bad.
I'll sit down again, take it apart again and test everything. It strikes me that with the case off it plays without any problems.
I put it back together and test it again, for a moment it seems to work well, but soon I hear from the music that it is not playing steady. Only then do I notice what seems to be wrong. I can hear the moving parts rubbing against the housing!

On the inside I see abrasions, it's the flywheels that are rubbing against it.


Here's the problem, the flywheels have quite a lot of slack and rub against the housing, time to look at the Walkman from the inside.

And there we have the cause! Replacing the belt as well as general use has given slack to the idlers. For a moment I thought I had solved this easily by pressing them down again, but they keep being pushed up when used after some more research I notice they are broken... So I have to replace these to keep the flywheels free from the housing. I'll have to look for a suitable replacement.
The next day I cycled straight from work to the hardware store, no luck with the first, but the second was a hit, almost then. The smallest circlips they have are for an shaft diameter of 1.9mm. My guessing is I need clips for a shaft diameter of approximately 1.2mm.

Still I take a chance, when I get home I bend the rings to the right size. I use a piece of solid steel wire of the same thickness for this, with a pair of pliers I squeeze the ring around it. I take it off the piece of wire and squeeze it a little tighter to the right size.


I carefully remove the old ring from the shaft, maybe you can see the fracture in the picture, it is also a lot smaller than the new ring (the clip in the photo is original and not yet bend to the correct size).


And immediately I run into another problem, the hole on the cassette itself is to small, it jams when I put a tape in it, and the Walkman no longer plays. So I have to look for another solution.
This repair will be continued, finding the right clips is not an easy job unfortunately...
December 23, 2020

So we skip a whole year! But finally I might have the right parts to complete this project, let's put them on!

I thread the new washers over the small shafts with tweezers, but when I turn the Walkman upside down they come off just as quickly. The washers are too large to get stuck in the shaft notch.
I will have to look for even smaller rings, but after endless searching on the internet I can't find anything. The Walkman goes on the shelf and will have to wait for me to find the right parts.
March 11, 2023
Another 2 years pass. The Walkman has been shelved for a long time after many frantic attempts to find the right clips. Today I gave it another try.
First I looked at donors that I already had laying around, but the dimensions of the shafts and rings differ from those of the R202. I look around again for loose parts that I have but without success. I will have to search the internet for a suitable candidate.

First I looked for the maintenance manual, parts in the manual are named separately, including the rings which bear number 89.

The next page contains an explanation of the parts with a serial number. Unfortunately no information about the sizes of the rings. I type the serial number on the internet but find no additional info. In the end I decide to measure the size myself as far as this is possible. I come to an shaft size of about 1.1mm.
With this information I search the internet for not so much an O-ring but a suitable circlip. Eventually I come across a web shop that can supply clips of 1.2mm. Although too large for my purpose, it may be possible to adjust these clips to the correct size. Ordering the clips costs me almost €16 in total, but I don't see any other option to get the right clips. Now I have to wait for them to arrive to see if I can actually use them, the delivery will have to take a maximum of 15 working days...