
Sony WM-BF22
November 9, 2022

The Sony WM-BF22, a Walkman and FM/AM Radio combination from 1988.
"The original, the market leader since its birth in 1979. Design and production based on the concept of fantastic sound. Anytime, anywhere".
It is the text at the bottom left of the Walkman. Together with the interesting appearance it gives the idea that the Walkman is a special edition and somewhere this is correct. But those who are familiar with Sony's Walkmans might say that this model looks cheap, this is also true somewhere...
The appearance of the Walkman has something special, the blue part is also an image of what looks like crumpled paper. Whether there is a meaning behind this I dare not say, but it reminds me of the crumpling of a blueprint that did not get further than the drawing board, after which the designer started again and eventually managed to design and develop this type of Walkman. A far distance from the traditional series of Walkmans that Sony had produced prior.

If we look at the Walkman from different angles, we get a look at different functions. Here of course the buttons to operate the transport, play, fast forward and rewind and the stop function. The ejection of the cassette happens when you open the door, the walkman is a type where you load the cassette into the door and then close it to load it into the mechanism.

On top we find the switch for choosing the type of tape, to the right of it the control for the radio frequency, connection for the headphones and finally the volume control.

On the right side is the connection for a external power source, the switch to choose between radio or cassette and finally a selector switch for AM or FM.

On the back the battery compartment and the well-known universal clip with which you can click it on your pants or belt. At the very bottom right a small hole with which you can adjust the speed of the motor.
The only thing that is noticeably missing is the Dolby switch, but a tape recorded with Dolby can sound just as good (or even better) if this function is left off during playback.
The Walkman is indeed a cheaper one from the series of good quality Walkmans from this manufacturer.
But it does not make it any less better than compared to it's more expensive predecessors and descendants. The Walkman is surprisingly well built and does justice to this with a great sound reproduction!
The mechanism inside is very solid and in fact requires little maintenance, except for a single component. The drive belt probably needs to be replaced and that's why this type of Walkman is currently on the workbench. I have tested it but it does not move, I also don't hear the motor running, which could mean that the belt may be stuck and keeping a hold on the motor. I don't have a manual and can't find it anywhere online. Fortunately, it doesn't make replacing the belt a particularly difficult job because again, the Walkman is not a complicated build.
To start with the repair, the device must be dismantled, but it can be deduced from the photos above that there is not a single screw to be found. The Walkman is closed with clips on the inside, a cost-saving choice that made it possible to make this type of Walkman cheaper. However this also makes the repair a bit more of a challenge.

First of all, we take off the battery cover and the belt clip. Something strikes me here...

One of the former batteries has leaked, there is corrosion on the metal bracket. Leaking batteries are never a good sign. But maybe the damage isn't too bad and I can polish off the corrosion later. Let's go open up the Walkman and see how it looks like on the inside.
Because I don't have a manual I have to look for alternatives if I can't figure something out myself, luckily there are other enthusiasts who went before me. So I also refer to another website to see how I can best open the Walkman. Here's the link to the relevant website.
Opening the housing is done in an alternative way. We could of course insert a flat screwdriver between the seams, but this will certainly cause damage or worse break some clips. Another option is to use plastic inserts, in my case makeshift plastic shards made from a shopping cart coin. I shave off the edges so they are a bit sharper and can be pushed in between the seams of the housing. I proceed by pushing in these shards on specific places until it finally clicks open.

And so we enter the Walkman without damaging anything.

The first thing that strikes me is that the belts actually don't look that bad, on the contrary they are still quite good, the engine also rotates freely and the rest goes happily along... Although this is a good sign at first, it also means the problem lies elsewhere...

I check the operation again with an external battery but the Walkman does not give a kick!

I therefore suspect that the problem may have something to do with the
corrosion caused by the leaked battery, as it seems to continue on the
circuit board itself, this of course ain't good news...
We're going to take the whole circuit board out of the case to see how bad the damage is.
Before we can do this, there are a few steps that precede. There is a plastic tab above the radio control that can be pulled out. I also press the play button so that it won't jam with the housing when I remove the circuit board.

While I disconnect the circuit board, this part suddenly falls out, it is the pointer to the chosen radio frequency. I put this aside for now to put it back in place at reassembling the walkman.

With the printed circuit board out we see what is hidden at the bottom, here is the mechanical array with the gears and the system to switch the position of the gears.

When we zoom in on the battery holder we see something disturbing, the corrosion has indeed continued on the circuit board, quite a bit even...

I grab the multimeter and check the connections. The meter beeps, so luckily the connection is still good up to this point. But the corrosion seems to continue underneath the gears so I'll have to take the gears out to see how far the corrosion extends.

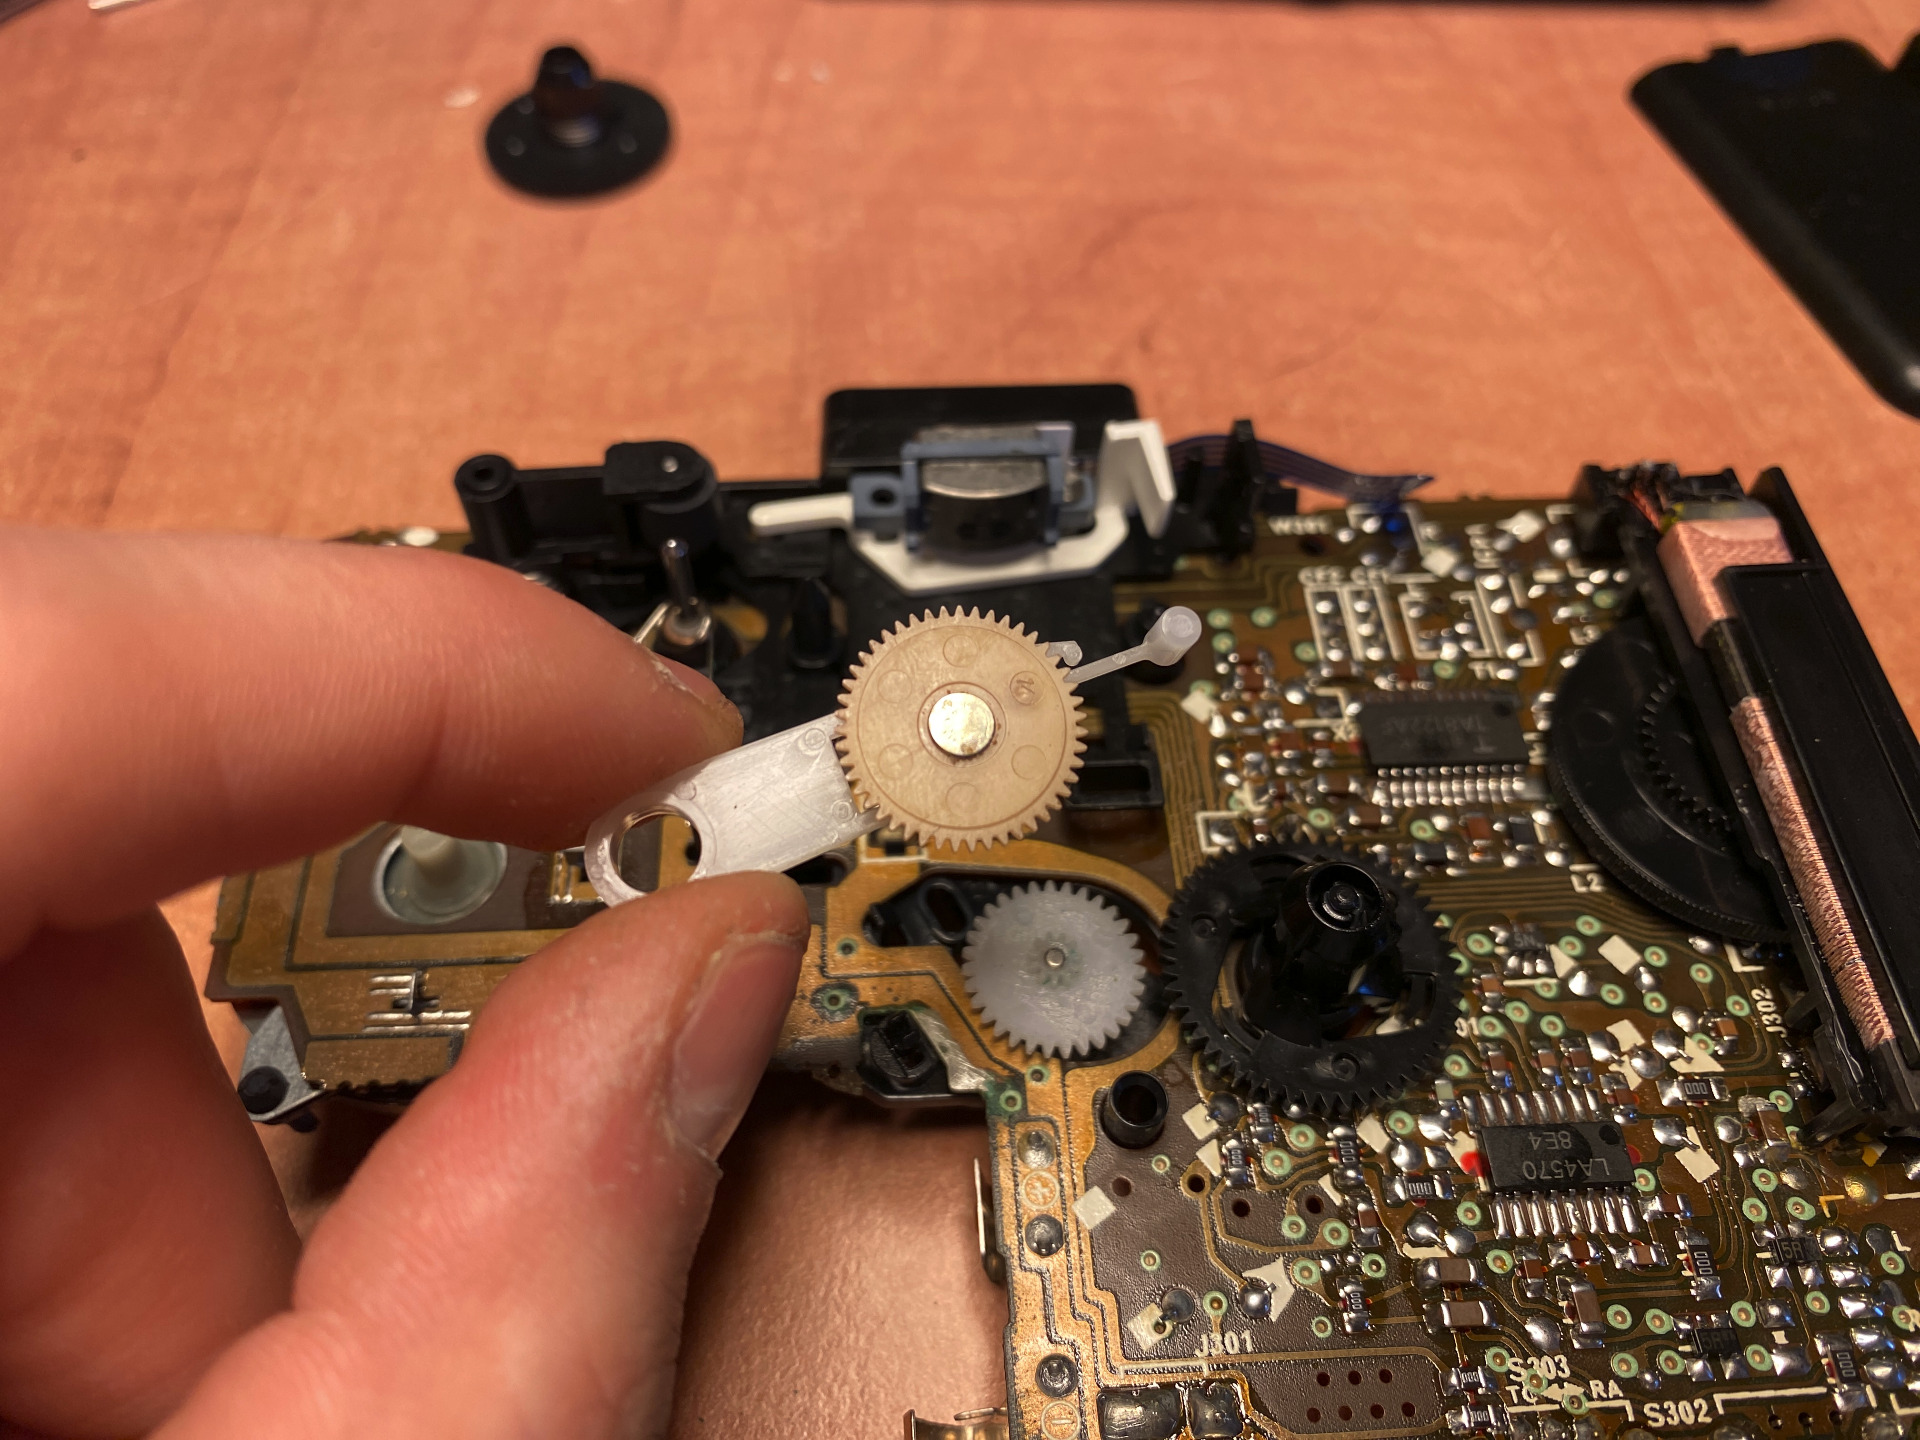
There are two parts that hold the big black gear in place, this plastic plate is one of them (red circle). To lift it up I have to bend away a small clip (red arrow) and lift the plastic plate.

It's hard to see, but the plastic plate is slightly raised after this, just enough to lift the gear off.

The gear sits on a shaft that holds it in place with two clips, I have to bend these to the side and lift the gear to get it loose. I use a small prong for this.


It takes me a few minutes but eventually the gear comes loose and I can take it off.
Unfortunately I still don't get a good picture of what is hidden underneath, however I do see a green spot again, more rust...


The next step is the small gear, it's attached with two clips that I have to bend inward. This can be done quite easily by using tweezers.

My suspicion is correct, there is corrosion under the gears and the printed circuit board is also affected by this. I decide to go one step further and also remove the white plastic piece with the beige gear.

The other end of the white plastic is clamped under another piece (green arrow), which I have to lift to remove the part. Again two clips (red arrow) which I have to bend aside to lift the whole assembly slightly.

Now that we have a clear overview of the damage, we can start measuring the circuit to see where the connection is broken and look at how I can restore it again.

When measuring, I notice that the voltage is interrupted at the left switch, which is understandable. It is the switch to choose between the radio or cassette, if it is switched to radio, the cassette motor remains off...

I put the housing back on and put the switch in the correct position, I measure again but still have no connection.

I spray some contact spray on the switch and measure again. The meter beeps, so we're connected. I reconnect the external battery to the Walkman and turn it on. The engine starts running!
So it wasn't the belt or the corrosion, but a faulty switch that prevented it from running!
Fortunately, this problem is quite simple to solve, but we are not there yet, the corrosion will get worse over time if nothing is done about this. power to the rusted parts may act as a catalyst* on the copper on the circuit board and will eventually spread to unaffected parts of the board.
*A catalyst means that a certain substance (in this case electricity) can act as an accelerator to the rust. In short, if I were to use the Walkman without treating it against rust that's already present, it may spread to the rest of the circuit.
It is good to know what the effect of corrosion can be on a circuit board, but how do you combat this? Again I'll have to browse the worldwide web and quickly find a possible solution to this problem.

According to the advice I took from this website,
the best way to combat the rust would be baking soda, in combination
with distilled water. I'll have to mix the two components together into a
thick paste and spread it on the spots of rust and let it soak in.
After half an hour I have to rinse this off after which the corrosion
should release from the circuit board. The website has some extra steps
that I won't follow up, although I do try some alternative solutions
myself.
It took me some time, but in the end I manage to get the components together for the job.
Baking soda (for those who don't know) is a 'basic' agent which
is the opposite of acid. There are many products in our household that
are basic, soap, various cleaning products or, for example, soda in
general. Rust can also be combated with acid, but acid also reacts
violently to other materials such as copper. Since copper is the main
component on the circuit board, it is therefore not advised to use acid
to dissolve the rust.
Distilled water. Is water from which minerals such as salts have been filtered out. After all, it's these impurities that cause rust formation of which salt is the main culprit. In theory, distilled water should therefore not cause any problems on the circuit board, although it is advisable to let the printed circuit board dry thoroughly before powering it up again.
According to the aforementioned website, I should mix one part baking soda with two to four parts distilled water. So I add some soda to an empty jar, with a pipette I add about two parts of water.
After this I stir the two substances together with a cotton swab, but it does not quite work, the soda sticks to the swab, because of this the ratio between the two substances is no longer correct.
I add a little soda and instead of stirring I shake the jar until the two substances merge.
The result is not exactly a thick paste but more a watery solution... Time for more baking soda!
I add another bit of soda to the solution and shake it again, if the result is still watery I add some more soda and repeat this process until I finally have a nice thick paste. In the end I have a ratio of five parts soda and two parts distilled water before I get to the right viscosity.
I dip a cotton swab in the solution and put it on the spots of rust, I also cover the battery holder with the paste.

I look at the clock to see how long the solution has to take to work it's way into the rust. Anyone who has looked at the date at the beginning of this page will see that we are about a month further, it took me some time to get the right resources for the solution. There were also some underlying events that caused the repair to come to a halt for half a month. Fortunately, the magic of editing allows me to proceed with the page without interruption so that you, the reader, don't have to wait a month for the results.
Half an hour has passed is and it's time to see the result. I wash away the soda above the sink with distilled water, however the result is no big difference with how it looked before....
I'm somewhat disappointed about the result, but at the same time I didn't have very high expectations, I shake and try to pull out some other tricks out of my sleeve.
I grab a plastic brush, dip it in the solution and scrub over the spots, which I rinse again with distilled water. My workbench has started to become a mess, when I wipe it up with a cotton swab, I notice that some rust has indeed come off the print, the dirt on the pad is greenish in color which must come from the rust itself.
Also the rust on battery connection has not changed a lot, some rust is gone but a large part is still present, I proceed and also brush the connection together with the paste.
I repeat the process a few times and decide that it has been enough, the rust has certainly diminished but has also penetrated so deep inside the board that I'm not going to get it all off without damaging the board itself. I clean everything one last time with distilled water and spray some compressed air to get rid of the moisture. After the print has been allowed to dry, I reconnect the external battery and see if everything still works. The engine starts moving and the gear array happily turn along with it.
Although I mentioned earlier that not removing all the rust could cause problems later on, I believe that I have managed to remove most of it so the rust will have much less effect on the Walkman, it is nevertheless very important that another battery will not leak in the future when it is in the holder. Time to start putting the Walkman back together!

I lay out all the parts and start with putting the gears back. This assembling process is almost the same as disassembling so there won't be much difference.

First I place back the white element with the beige gear, this time I do this by hooking the thin end under the opening at the top right and sliding the other end over the shaft at the bottom left. After this, the small black gear goes back into place, I can now slide it on with ease after which it clamps back in place with the two clips. The last step is the big black gear that drives the cassette.
The large gear needs some extra care, if you look closely at the photos you can see that the large and small gears do not immediately hook into each other properly, I turn the large gear a bit while holding the small one, eventually the teeth click back into place.
When placing gears or other moving parts back to place, it is important to always check whether everything rotates and moves as it should, after placing each object, give the assembly a spin and see if everything rotates without any problems. This way you'll prevent problems or damage afterwards when everything has been put back together.

The gears are back in place and rotate as they should, the next step is to turn the print over and look at the belts, although the old belts are not very bad it is never a bad idea to replace them with a new set.
Before I do that I take a look at the pointer of the radio frequency, after all, it fell out during disassembly. It will be a challenge to get it back in the right place later. After all, it hooks into a gear that is attached to the rotary knob. I'll have to figure out where the pointer should point at when on a specific frequency. For now I take it off and turn the board over.

The two belts are placed one below the other. I can easily remove the belt that runs from the motor to the flywheel. The belt that goes to the drive mechanism of the cassette is slightly lower and cannot be removed immediately.
The bottom belt gets caught behind a small metal spring, which fortunately can easily be removed, after which I can place the old belts next to the new ones. It is at this point where I realize I don't really know where to put which new belt, they both look the same...

Something that is clear is the difference between the old and new belts. The left belts are not as distorted compared to the old ones on the right. The thickness of the new belts is also different from the old ones. This however won't be a problem. After some research I find out that the top new belt has to be put on the motor and the bottom belt goes to the gear assembly, this is because there is a small difference in length between the two belts.
Time for some more detailed work, adjusting the speed as well as checking the stability of the walkman now that it has new belts
I connect the walkman to my Wow & Flutter meter and attach the external battery to the board. Then I put a special tape in the otherwise still naked Walkman and monitor for any deviations through the special test tones on the cassette.
Monitoring the walkman is quite a complicated job if you don't know how it works, I will do my best to explain this as clearly as possible, perhaps it won't hurt if I explain this topic again with a separate blog. Should I ever write it I will make a reference to it.

On the photo you can see the speed and fluctuation of the walkman before I adjusted anything. The first (drift) meter indicates the speed with a scale of 3%. Look at the bottom row of numbers. Here you can see that the walkman is almost 3% too slow. The second (flutter) meter indicates that the walkman (when at a scale of 3%) deviates about 0.25% from a perfectly stable point, which is not bad for a walkman of this series.
In theory, you could say that with a well-trained ear the fluctuation may become audible from 0.3%, if the difference is around 0.5% and higher, it quickly becomes a disturbing factor that makes your music unbearable to listen to. Although this Walkman is on the borderline, it does not deviate far from the average compared to other Sony models.
To adjust the speed I have to turn a small potentiometer next to the motor. It is best to do this with a small flat screwdriver. The position of the meter is (in Sony models) often revealed by a small hole in the housing. This allows you to also adjust the speed when the Walkman is completely assembled.

The only drawback is that the potentiometer is on the other side of the circuit board, when I turn the board over the cassette falls out of the holder. I still try to adjust the speed but this results in the meter swinging completely to the other end and even off the scale. In short, adjusting the speed is not possible when the Walkman is still taken apart...
Before I can close the housing, the frequency pointer has to be put back into the right place. I turn the radio dial all the way to the left and place the pointer in a place that seems logical. After this I put the housing on top and look through the window at the pointer. I now turn the knob all the way to the other side. As much as I try to get the pointer properly adjusted, it can't go further to the right than shown in the photo. This is probably how it should be. The only thing I can do is try to align the pointer with the frequency of what may probably be the most famous radio station in the Netherlands.

With the pointer located around 101 FM, I turn on the radio function and listen for a match. The first thing that comes through my headphones is Rick Astley's 'Never gonna give you up' which I did not see coming. It seems that this is the correct frequency, but at the end of the song it turns out to be a different radio station. After some puzzling I manage to get the pointer properly adjusted. The housing of the Walkman can no be closed.

Closing the walkman is a simple job, I already placed the circuit board in the bottom of the housing. On which I press the play button and hinge the top cover over the play button. I take a last good look to see if nothing is protruding out of the walkman and close the housing. I hear the clips click and look around to see if it has indeed closed firmly on all sides.
Now that the walkman is back together I put the test tone cassette back in and put two batteries in the compartment. Now I can adjust the speed without it overshooting in all directions.
Adjusting the speed is a very delicate job, in the end I manage to get the speed reasonably stable, the meter is set to a scale of 0.3% (we again look at the bottom row of numbers) the speed now fluctuates between -0.1% and +0.1% which is a very stable position.

When I look at the flutter meter one last time, the needle seem to stay at the same point. At a scale of 1% (see the top row of numbers) it still indicates around 0.25% fluctuation. Even with an even more precise scaling, the meter remains stable at the same value. In short, it fluctuates slightly but remains stable within that range.

Although this is exactly the same picture as at the top of the page (before I started the repair) the walkman is back in perfect working order. It can be put into use once again which will be very soon, however not by me...

It goes straight into the box to be sent to its new owner! This marks the end for this repair and I can shift my focus to other devices, because there is more that needs to be refurbished.
December 7, 2022
Related pages:
- Sony WM-DD30 Repair
- Sony TCS-370 Repair
- Sony TCM-6 Repair
- Sony WM-24 Repair
- Realistic SCP-7 Repair
- Compact Cassette Repair
- Compact Cassette Information
- The Compact Cassette past and present Blog